Through this tutorial you become familiar with developing a Python application with a graphical userinterface. We will create an App which draws some basic shapes. The color of one or more of the shapes can be changed by entering a RGB color value (three numbers), for the color components red, green and blue. These numbers can have values 0-255. Examples of how to draw shapes are given here.
If you are a beginner, you might want to do the -Hello world- tutorial first, as we will not cover the basics outlined there.
Tutorial steps
- Design and create the user interface
- Write code for drawing
- Set color
- Read user input
- Drawing with different colors
- Draw the colored shape
- Make entry of numbers fool-proof
These steps are explained in detail below.
1. Design and create the user interface
The user interface consists of two parts:
- A part for entering the RGB values
- A part for drawing
We can use a Canvas for the drawing part, which is a component which can be used for drawing.
Start with a design: Draw (on paper) a sketch of the user interface that shows the division into two parts. One of the parts contains three input fields and an Ok-button (Button) to execute the input of the values.
After you finish the design, you can start creating the user interface.
Start by creating a new file in your editor (eg. Thonny). Save the file on your computer and name it “Assignment2_s1234567.py” (use your student number in the name). Start by importing tkinter and create a window with a title:
from tkinter import *

window = Tk()
window.title('Draw colored shapes')
Feel free to change the title. Next, add a Canvas:
canvas = Canvas(window, width=400, height=150)
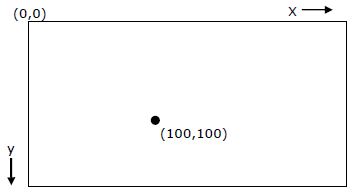
canvas.pack()The origin of a canvas is the upper left corner:
Next, we can create a shape inside the canvas. To create a rectangle object on a canvas, we can use the syntax:
variable = canvas.create_rectangle(x0, y0, x1, y1, option, ...)So our first rectangle can be coded like this:
# draw a rectangle:
rectangle1 = canvas.create_rectangle(230, 70, 300, 120,
                                     outline = "black", fill = "green",
                                     width = 2)
To finish, call the mainloop() function of the window to make it appear:
# run
window.mainloop()
Check if it works (Run the script). If the Run icon is greyed out or unavailable, you might have to configure the proper interpreter: select Run > Configure interpreter, select “Local Python 3”.
Write code for drawing
Now we can draw a more meaningful shape. There are many tutorials on using the canvas with tkinter. Some examples:
Study these.
Another example of a simple landscape with a sun:
# horizon:
background1 = canvas.create_rectangle(0, 0, canvas.winfo_reqwidth(), 60, outline = "blue", fill = "blue")
background2 = canvas.create_rectangle(0, 60, canvas.winfo_reqwidth(), canvas.winfo_reqheight(), outline = "blue", fill = "brown")

# circle:
sun = canvas.create_arc(30, 25, 100, 95, start=0,
            extent=180, outline="#fcba03", fill="#fcba03")
From this you should be able to experiment and make your own combined shape that consist of at least 3 basic shapes. If you are doing this as an assignment for Application Development, you must come up with your own shape. So the example above will not be sufficient.
Set color
To change the color of a shape, we can use the itemconfigure function of the canvas:
.itemconfigure(id, option = value, …)In our case, the option that we want to change is the fill color, so the code could look like:
canvas.itemconfig(rectangle1, fill="red")to make rectangle1 red. Instead of “red”, we can also use HEX color codes, like #fcba0 as used for the color of the sun in the example above.
For this tutorial, we will input the R, G, B color values as integer numbers. So we can add a function for that, that we will name “setColor”:
def setColor(r, g, b):
    # change color of a shape:
    canvas.itemconfig(rectangle1, fill=f'#{r:02x}{g:02x}{b:02x}')
The code behind fill= is a way to convert integers to HEX code and combining them, as explained here. This is not something you can come up with as a beginner. But often, you may find this kind of solutions via Google: “python convert r g b values to hex color code”.
To test it, add a call to it just before the window.mainloop():
Check if it works. Then remove that line again, as we will not use it like this.
Read user input
First, add the userinterface elements needed to input 3 numbers (these will be 3 Entry-widgets) and a Button. We start with one Entry widget for the color value ‘R’:
entryR = Entry(window, bg='lightgrey', width=10)
entryR.pack(padx=(10,0), side=LEFT)
Copy this piece 2 times, so we have a total of 3 Entry widgets. Rename the copies so you have 3 variables, entryR, entryG and entryB.
Then at last, add the Button:
button = Button(window, text='Change color', height=1, width=10, command=button_click)
button.pack(padx=(10,0), side=LEFT)
The command is a reference to a function named button_click, so we must add that, otherwise the code will result in errors if we try to run it. That function can look like this, add it near the other function:
def button_click():
    # read r, g, b values
    # set the color
    print("button_click()")
The two lines with comments are pseudo code explaining what needs to be done in this function. Thinking of what a piece of code should do and expressing that in pseudo code is a good design strategy for developing an app/script.
Test if the userinterface works and see what happens if you click the Button: the message should be printed in the shell.
Drawing with different colors
To draw using the color values entered we need to call the setColor() function in the function we have just created. setColor() expects three integers (r, g and b) as parameters. However, if we read the three values from the Entry, using its get() function, these are Strings (which is text). Therefore, we must convert the Strings to integers (numbers) using int( … ). To do this, add this code (at the end of the Event Handler):
r = int(entryR.get())
print("r:",r)
Repeat this part for the g and b values too. Then test it (check if values are printed in the shell).
Draw the colored shape
Now add the call of the setColor() function to the end of the button_click() function, with the 3 variables r, g, and b as parameters. Test again, the color of the shape should now change.
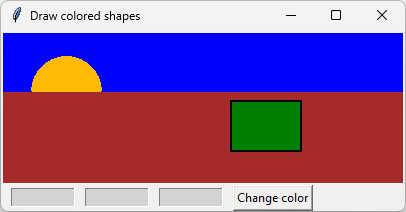
Your applicaiton is now almost finished, and could look like this:
Make entry of numbers fool-proof
You might notice that if you enter nothing in the Entry fields, or add something that is not a proper number, things go wrong (you get error messages and things do not work as expected).
To solve this, first thing we can do is surround the problematic code by what we call a try-catch construct, like this:
try:
    r = int(entryR.get())
except:
    r = 0
Surrounding the code to get and convert the number by a try-catch construct, allows us to try something, but if that fails, we can handle the exception (in this case, if things go wrong, we will give r the value of 0).
Check if this works.
Next thing that can go wrong is entering the wrong kind of numbers: this way of specifying a color works only with whole numbers ranging from 0-255. To fix this, we can add a modulo operator, which restricts the value that comes out of the operation to that range. To do that, add % 256 to the line:
r = int(entryR.get()) % 256Summary
In this tutorial you have written Python code and learned how to apply variables in expressions to perform calculations.
You have also learned the following:
- Create a user interface.
- Read and use values in a user interface.
- Use drawing methods.
- Use of variables in expressions.
- Apply mathematical functions.
- Find information using the online help function.
Are you a student?
For students doing the course Application Development, having added the required comments is mandatory. When you hand-in the assignment, this will be checked. Before handing in, check the “Finalize” section and the checklist that comes with the assignment on Canvas too! You must proof that you understand the content of this tutorial, by creating a different, more complex shape or drawing than the one demonstrated here.