Through this assignment you become familiar with developing a Python application. We wil create an App in which you can input text and then show that text as part of a message in the App.
Python is renowned for its readability and simplicity. Its syntax facilitates concise code, making it suitable for both beginners and experienced developers.
With a vast standard library, Python supports a wide range of applications, from web development to artificial intelligence. Python’s popularity stems from its versatility, community-driven development, and widespread use in diverse domains.
This tutorial consists of the following steps:
- Install Python and a code editor.
- Practice basic Python
- Create a first user interface using Tkinter
- Add components to the user interface
- Define the interaction: make the button do something
These steps are explained in detail below.
Install Python and a code editor
Go to python.org/downloads and download Python for your OS. Then run the installer.
We will use the editor Thonny for this project. Download and install that via thonny.org.
Practice basic Python
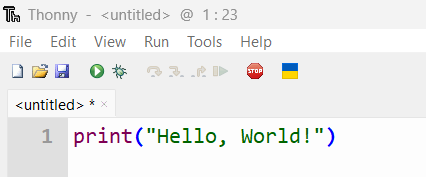
Start Thonny and create a new file (via File > New).
Add your first line of code, which uses a print statement to display (print) text:
print("Hello, World!")Which looks like this in the editor:
Hit the Run ![]() button. In the Shell, at the bottom of the screen, it will show the printed text:
button. In the Shell, at the bottom of the screen, it will show the printed text:
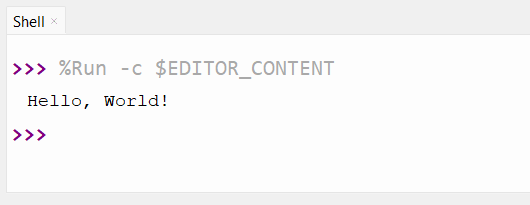
The Shell is also sometimes called Console. It’s a place at which text output of your application is displayed.
Now press Save ![]() and save the file in a folder on your computer.
and save the file in a folder on your computer.
Now go to the w3schools Python tutorial and practice a few of the examples given there (go through the first 10 pages or so, and learn how to use comments and declare variables).
For instance on the numbers page, you learn how to add variables that hold numbers of various types:
x = 2 # int
y = 2.8 # float
print(x*y)
Run this to see the result.
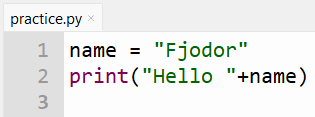
Next, lets learn how to use Strings (these are pieces of text surrounded by quotation marks):
name = "Fjodor"Now print a welcome message for that person with given name:
print("Hello "+name)A complete bit of code should then be:
Check if that works:
Do not forget to add a short description of your first application as a line of comments on the top of the Python file.
It is strongly advised to do more self-study. Continue with at least the first 12 pages or so of the tutorial on w3schools (until operators).
Create a first user interface using Tkinter
In the this step we are going to add a user interface. A user interface is also called graphical user interface (GUI). We will use the Tkinter framework for this. A framework is a set of pre-written code that provides a structure for developing software applications. By using frameworks you greatly reduce the time and effort of coding.
The foundational element of a Tkinter GUI is the window. Windows are the containers for the other GUI elements. These other GUI elements, such as text boxes, labels, and buttons, are known as widgets. Widgets are contained inside of windows.
Create a new file (File > New).
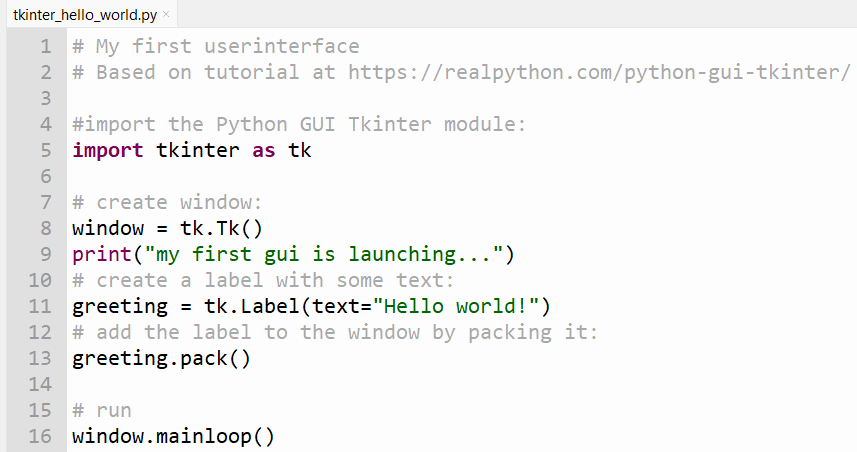
To get started with Tkinter you must first import the Python GUI Tkinter module:
import tkinter as tkAfter which you can create a window. A window is an instance of Tkinter’s Tk class:
window = tk.Tk()Now add a label with some text:
greeting = tk.Label(text="Hello world!")Now, we must add the Label widget to a window. You can use the Label widget’s .pack() method for that:
greeting.pack()Finally, we must start the main loop of the Window:
# run
window.mainloop()
Try the code by running it. A small window should appear.
mainloop() is a method on the main window which we execute when we want to run our application. This method will loop forever, waiting for events from the user, until the user exits the program – either by closing the window, or by terminating the program with a keyboard interrupt in the console.
Add comments and print statements to clarify the code, like in the example below. But try to explain it in your own words.
To learn more about userinterface widgets you may follow this tutorial.
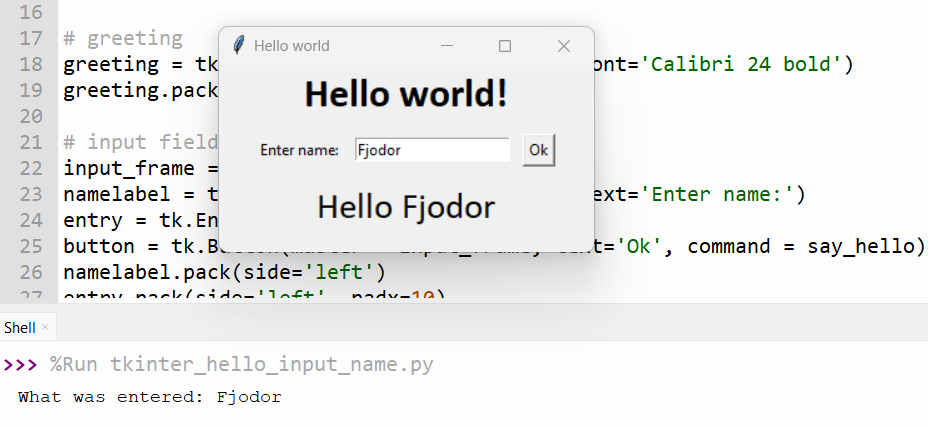
As an example, a quick way to change the font is to add a property for that, eg. font=’Calibri 24 bold’. Change the line that declares the Label into:
greeting = tk.Label(text = 'Hello world!', font='Calibri 24 bold')Run the App. Is the text displayed larger and in bold?
Add components to the user interface
Make a new copy of the previous Pyhton file via File > Save as… Choose a proper new name, eg. tkinter_hello_ui.py.
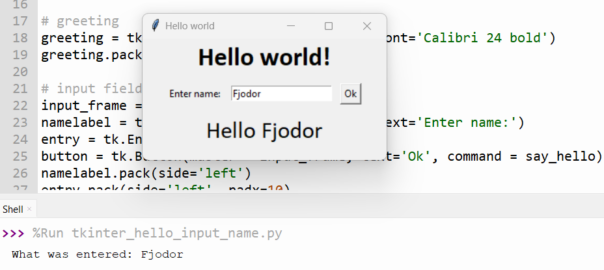
We will now add several userinterface components to input text. For that, we need a Label (to tell the user what to do), an Entry, in which we can type text, and a Button, which will process the text that has been entered. This will look like:
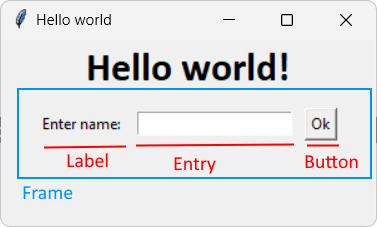
The Label, Entry and Button are put in a frame, to be able to place them next to each other.
The Frame will be created first. Add it just before the call to mainloop(). (the mainloop call should remain on the last line of the code!)
input_frame = tk.Frame()Then the 3 components in the Frame, with the frame as their master (that means they are put inside the frame):
namelabel = tk.Label(master = input_frame, text = 'Enter name:')
entry = tk.Entry(master = input_frame)
button = tk.Button(master = input_frame, text = 'Ok')
Next, we pack each component and specify its layout:
namelabel.pack(side = 'left')
entry.pack(side = 'left', padx = 10)
button.pack(side = 'left')
input_frame.pack(pady = 10)
Run the App and check if it looks like the example given above. (It will not do anything yet)
Because the App will display a welcome message, we must also add an empty Label for that:
output_label = tk.Label(font='Calibri 22')
output_label.pack()
This completes all components of the interface, but it does not do anything yet…
Define the interaction: make the button do something
The empty Label output_label should display a message. That message can be a String variable. So we must declare a String to hold the message text, and then assign that to the label. Modify the code added in the last step so it reads:
message = tk.StringVar();
output_label = tk.Label(font='Calibri 22', textvariable=message)
output_label.pack()
So at the fist line, you see the declaration of the String variable message. And in the variables for the output_label it’s textvariable is assigned to that. The ‘textvariable’ of a Label is a variable that will be displayed as the Label text. For now, because the message is still empty, nothing will be displayed yet.
Now we must assign a command to the Button so it actually does something. Find the code for the Button. Change that to add the command:
button = tk.Button(master = input_frame, text='Ok', command = say_hello)The value of command is a function named ‘say_hello’. So we must add that to the code. Add the code for that function to the top of the code, after the import line.
def say_hello():
    print('Hello')
Now Run the App en click the Ok button. When you click the button, you should see this in the Shell:

In that function, we must get what was typed in the Entry. For this we can use the method get() of that userinterface element. So:
entry.get()Now print that instead of ‘hello’ (put it inside the brackets of the print statement). Check if it works: anything you type in the Entry will be printed at the shell as you click the Button.
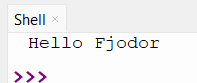
Now we must set the message so it reflects what we want to show in the interface. That should be something like “Hello Fjodor” (if ‘Fjodor’ was typed in the Entry field). In code, that would look like:
message.set('Hello '+entry.get())With this we change (set) the value of the String variable. The argument of the set method consists of an addition which is used to concatenate two Strings: ‘Hello ‘ and what was typed in the Entry widget.
The function should now look like:

If you did not do so yet, test the App. It should display the welcome message with the text that was entered in the Entry widget:
Learn more
To learn more about Python, you could follow a basic Python tutorial like the w3schools tutorial. Or, if you want to learn more about creating userinterfaces with Tkinter, you could do this tutorial, or watch this tutorial on YouTube.