In this tutorial you learn to build a temperature sensor and connect it via Bluetooth with an App. It uses a DHT11 temperature & humidity sensor and Bluetooth communication with your phone. For this we will use a Raspberry Pi Pico W, the Wireless edition of the Pico.
It consists of the following steps:
- Build circuit with the Raspberry Pi Pico W, display and DHT11 temperature sensor
- Show values of sensor on display
- Get values on your phone
- Document the code with comments
This tutorial is similar to the tutorial on creating a distance sensor, so check that for full details on the first steps: setting up the Raspberry Pi Pico and connecting a display. However: there is on difference: this tutorial uses MicroPython instead of CircuitPython. The reason for this is, that at the time of writing, CircuitPython does not support Bluetooth yet. (there is a CircuitPython simulation here)
Build circuit with the Raspberry Pi Pico W, display and DHT11 temperature sensor
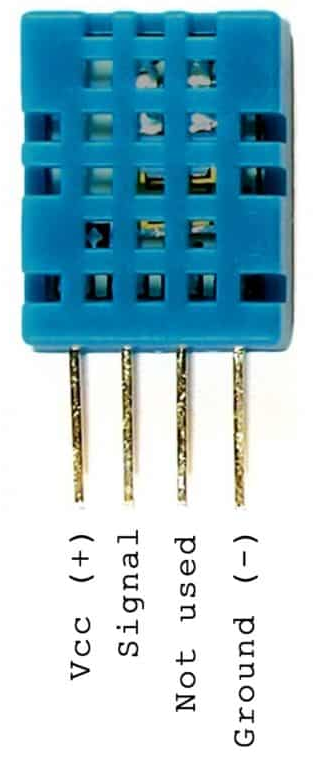
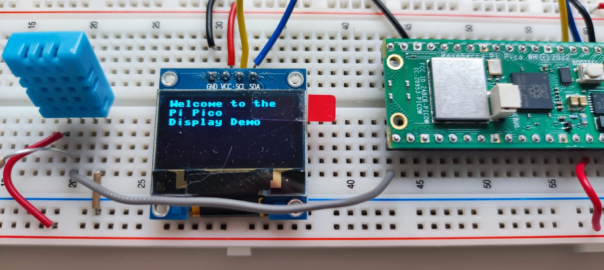
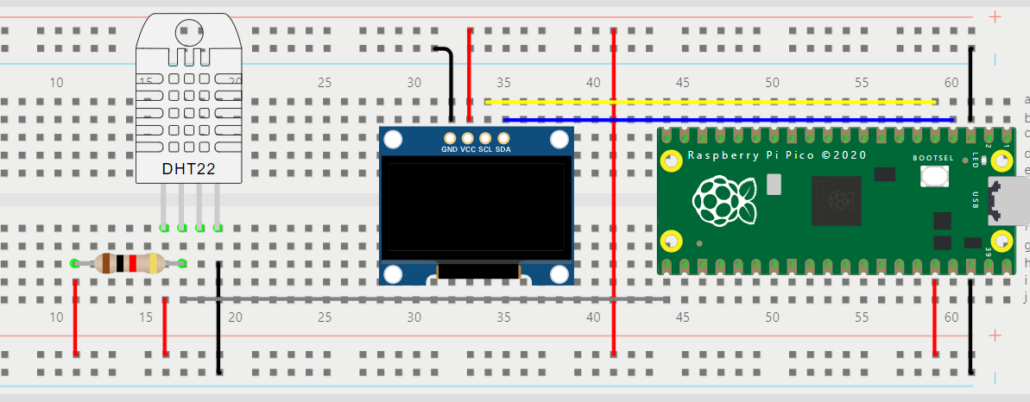
Place the Raspberry Pi Pico and the display on the breadboard, and wire them in the same manner as shown in this tutorial. Next, add the temperature sensor to the board. Place it next to the display and connect its 3 wires to GND, 3.3V and the signal pin to GP16 of the Raspberry Pi Pico.
Add a 10K resistor (color code: brown-black-orange). Check the resistor guide if you do not know how to determine what a 10K resistor is. You may also use a Multimeter to check the resistance.
Mount the 10K resistor between the signal pin of the sensor and 3.3V:
Please note that the sensor shown above is a DHT22, but the wiring is the same as the DHT11.

Check out a Wokwi simulation of this (with DHT22 and running CircuitPython) here.
Show values of sensor on display
Coding scripts is slightly different in MicroPython as in CircuitPython, so we will start from scratch here. Follow the steps below to install MicroPython:
- Download the latest release of the UF2 firmware file
- Connect the Pico to your computer while holding down the BOOTSEL button
- A drive will appear. Drag/drop or copy the UF2 file into that drive and wait for the copying to finish. The Pico will reboot, with the new MicroPython firmware.
No we can start coding. First we will test the display:
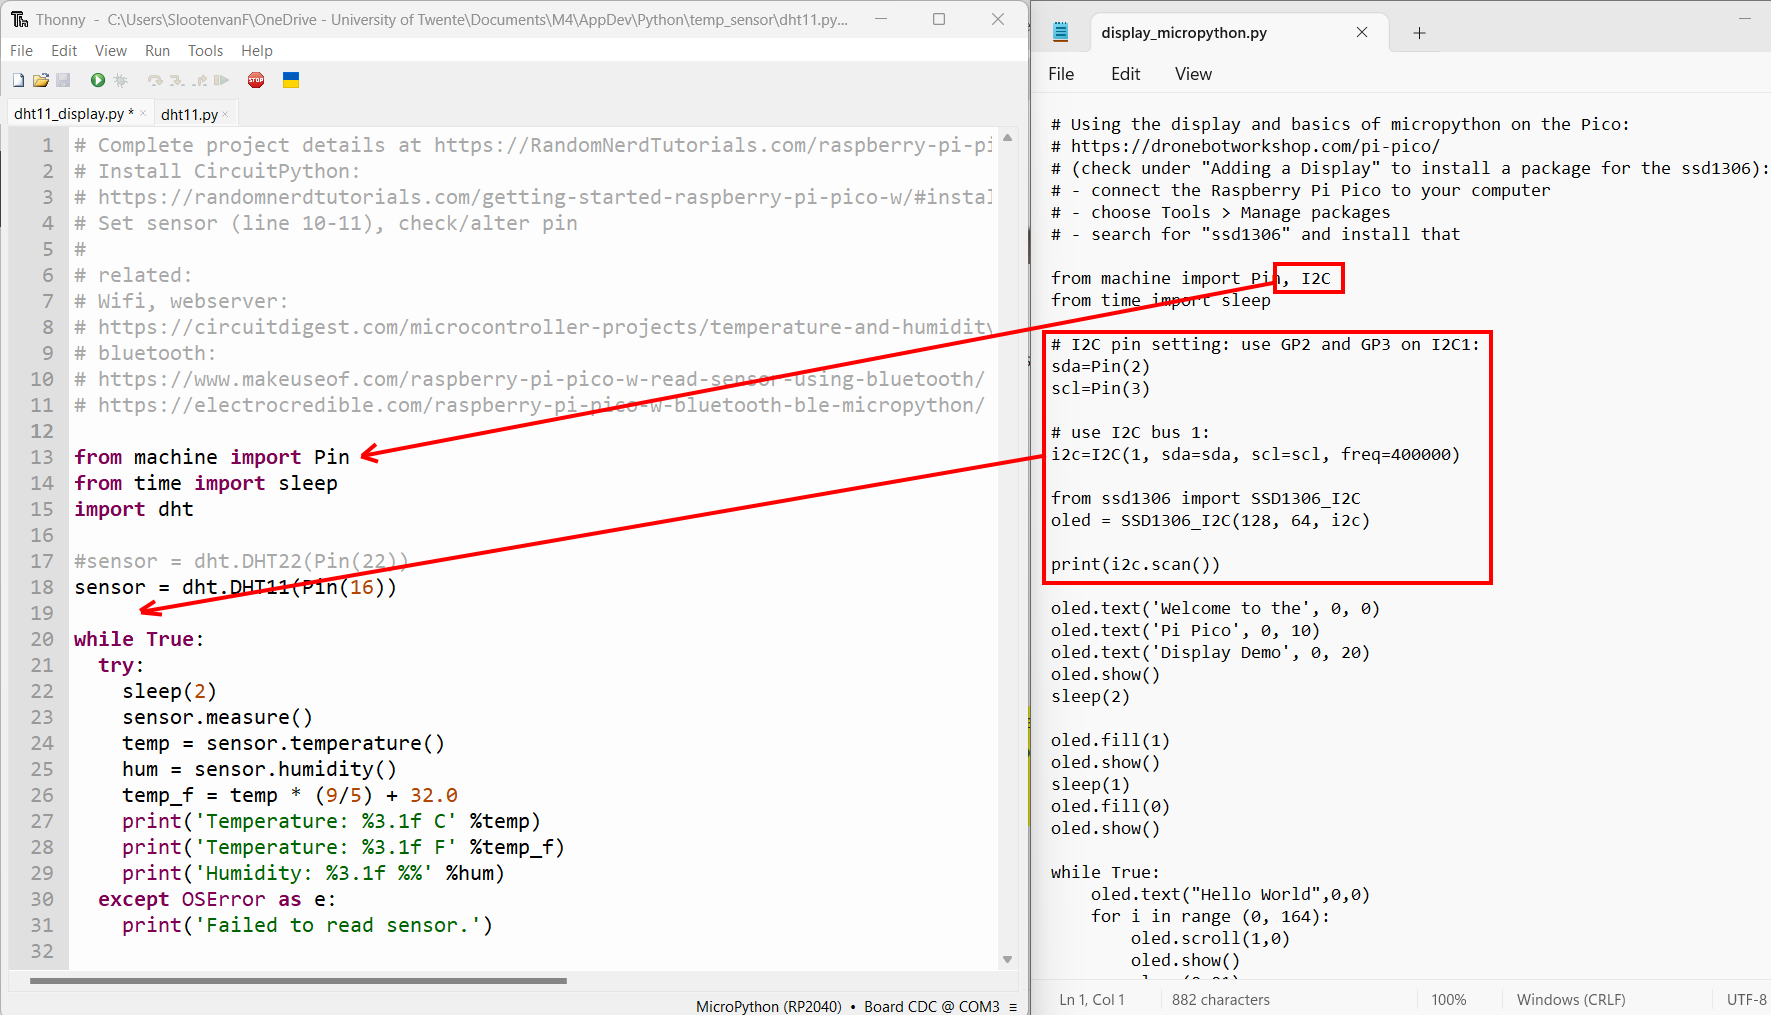
In this extensive Pico tutorial for MicroPython, we find the section “Adding a Display” which we use as an example. Some differences are the type of the display: the example uses a 128×32 pixel, and we have a 128×64. Also, we use the I2C bus 0, instead of the 1.
First try this demo script, which we use to test the display: display_micropython.py (save it into a separate folder you will use for all scripts of this project).
Open the script with the Thonny editor. Connect the Raspberry Pi Pico to your computer with the USB cable. Set the proper connection option and Python version via Run > Configure interpreter.
Next, choose Tools > Manage packages, search for “ssd1306” and install that. Now press the Run icon in the toolbar to run the script. This should result in a small demo of the display:

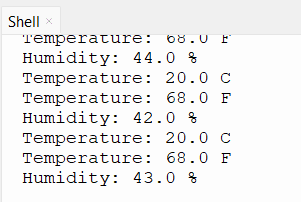
Now we will use another test script to test the temperature sensor: dht11.py
Open that with the Thonny Editor. Connect the Pico and run the script. Readings of temperature and humidity should be printed in the shell:
Now all we have to do is combine these two scripts. We will use dht11.py as a base. Choose File > Save as to save it as “dht11_display.py”. Open the other script (display_micropython.py) in another editor, for instance Notepad. Next, copy-paste the indicated code fragments from display_micropython.py into dht11_display.py:
Next in the while loop, after the print statements, add code to show the temperature:
oled.fill(0)
oled.text('Temperature:', 0, 0)
oled.text('%3.1f C' %temp, 0, 10)
oled.show()
Make sure to properly indent it, so it is part of the while loop. Then Run the code to test it. Is the temperature shown on the display?
Next, make sure the humidity is shown on the display also. We want this to appear on the lines after the temperature. The text function as an x and y parameter for proper placement:
oled.text(text, x, y)See this page for documentation on all available functions and their parameters.
Get values on your phone
First we will create a script that can send sensor values over Bluetooth. This will be based on this example. If you would like to send the values via Wifi, to a website, go to the final part of this tutorial.
We need to install two Python scripts first, which provide the necessary Bluetooth functions. Go to this GitHub repo and download the repo via Code > Download ZIP:
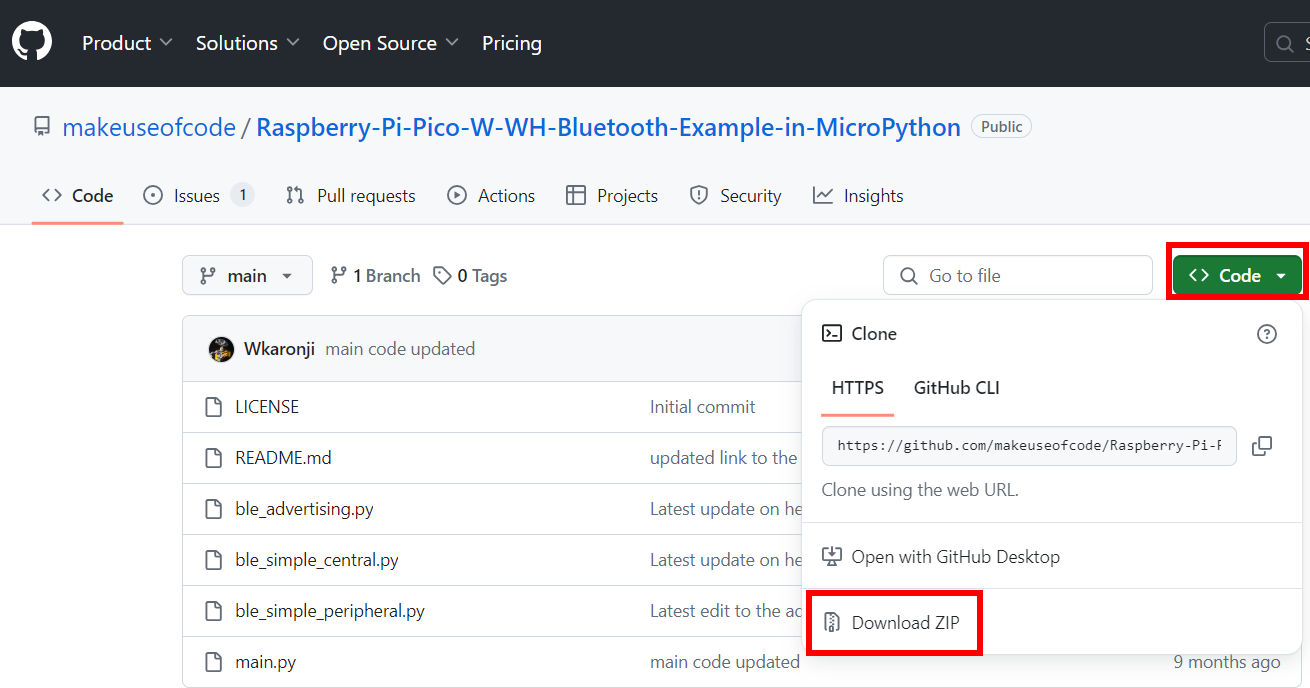
Extract the contents in the same folder as you use for the scripts for this project.
Open the files ble_advertising.py and ble_simple_peripheral.py in the Thonny editor. Save them both to the device (the Pico): choose File > Save as… and then choose “RP2040 device” to save them to the Pico (so you must do this twice):
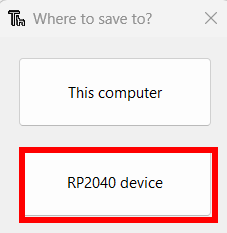
Save them in the main folder (so not in the lib folder!).
Tip: you may also upload files to the Pico by selecting them in Thonny’s file browser , right-click and then choose “Upload to /”.
From the example.py script in the downloaded ZIP, we can get an understanding of how code should look like to send something. We can combine that with our code (add that to dht11_display.py):
At the top add the imports:
import bluetooth
from ble_simple_peripheral import BLESimplePeripheral
After that, initialize the variables:
# Create a Bluetooth Low Energy (BLE) object
ble = bluetooth.BLE()

# Create an instance of the BLESimplePeripheral class with the BLE object
sp = BLESimplePeripheral(ble, "pico-fvs")
Notice the “pico-fvs” in the last line. This is the Bluetooth name used for the Pico. This will be visible if you scan for devices on your phone. So change that into something you find easy to recognize!
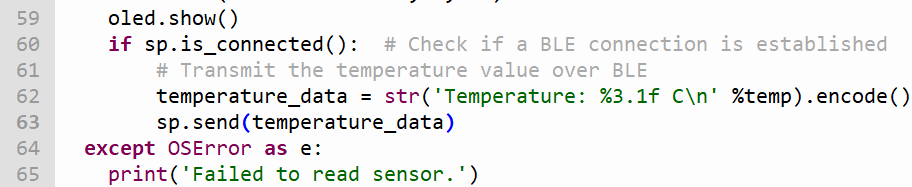
Add the code to send the temperature to the phone inside the while-loop, right after where the values are shown on the display:
if sp.is_connected():  # Check if a BLE connection is established
    # Transmit the temperature value over BLE
    temperature_data = str('Temperature: %3.1f C\n' %temp).encode()
    sp.send(temperature_data)
Make sure to properly indent the code, so it looks like:
To read the transmitted values on your phone follow the steps below.
Use a ready-made terminal App to display the values
Because we do not have a ready-made App to display the values of the sensor on our phone we will use a generic Terminal App to send and receive texts from the Pico. You can see this as a kind of a chat app, which we use to communicate with the Pico. In this case, we ask for a value, and the sensor returns that value.
To be able to see the sent text output on your phone, you must install a Terminal App that supports BLE. Search the Play store for “bluetooth terminal”. You will see there are a lot of apps like this. For Android, the app Serial Bluetooth Terminal by Kai Morich is recommended. This app has been tested and works fine.
If you want to try an alternative: the Dabble App also works fine. This app has a lot of remote control possibilities. Read this guide, at “Dabble example 2” to see how that works.
Other app? If you pick another app, make sure it supports Bluetooth LE/BLE. For iOS, BLE Terminal HM-10 works.
Connect with your phone
Start the Terminal App you just installed (on your phone). If being asked for Location permission, allow this (it is needed to locate the device). Click the connect icon in the titlebar:

Allow to turn on Bluetooth. If it does not come up with a list of devices to connect to, go to the menu, pick “Devices” and go to the tab “BLUETOOTH LE”. Press scan. If your Pico is on, it should appear in the list (with the name assigned in the code). Click it to connect to it. You should see the terminal screen like this:
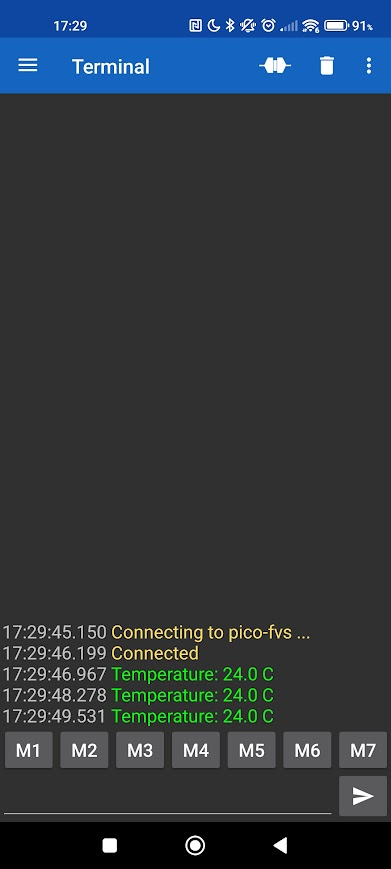
You should see a continues flow of lines with temperature readings. Instead of this, we want the Pico to only send values when we request it. We can type commands (texts) in the textfield at the bottom, just like any chat app. For instance, if we type “temperature” (or a “t”) is should give us the temperature.
Send values to the Phone
To realize this, we make variable temperature_data global, by adding it at the top of the script (before the line with ble = bluetooth.BLE()):
# global variable to keep textual temperature data:
temperature_data = ""
This allows us to use that value in a function (we are about to make).
To get the character typed in the App, we need to read it from the BLE connection. From the class definition of the class BLESimplePeripheral, defined in ble_simple_peripheral.py, we can see that is has a function on_write(self, callback), which can be used to register a callback function that will be executed when something is written to the Bluetooth connection. So if we define that callback function, that can be used to receive that data that is being written (in this case: written in the terminal app).
Add the following piece of code at right before the while loop to realize and register this callback function:
# function to be used as callback:
def on_rx(v):
    received = v.decode().strip()
    print("RX", received)
    sp.send(temperature_data)

# register the callback funcion on_rx:
sp.on_write(on_rx)
Now, remove the line sp.send(temperature_data) from the while loop, as that will now be done by the on_rx function (can you see that?).
As you can see, it sends the temperature_data if something is received. This is not exactly what we want: we want it to send that only when we send a command, eg. the word “temperature”, to request the temperature.
An easy way to do that, is to check if the received text starts with a ‘t’. We can use an if-statement for that. In pseudo-code:
if received starts with 't':To check if text that starts with a ‘t’ was received, we can now use an if-statement like:
if received.startswith("t"):
    sp.send(temperature_data)
Now do the same for the humidity (create a second if-statement for that). Set the condition of the if-statement for the humidity to check on anything that starts with ’h’. Do not forget to add a global variable to hold the humidity output and assign that properly in the while loop, on a new line after temperature_data = …
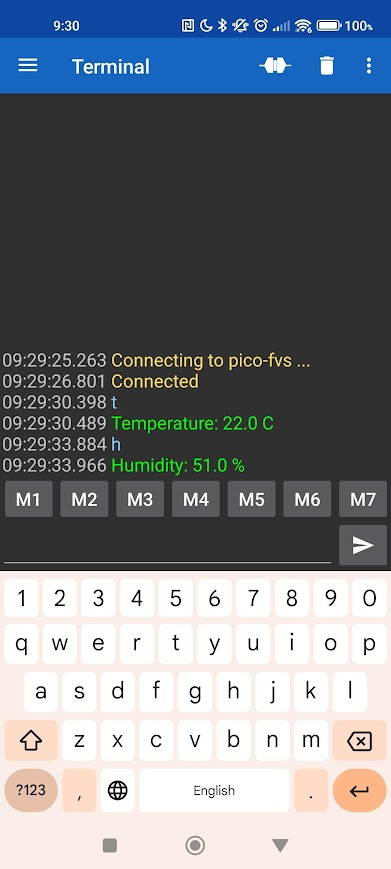
On your phone, disconnect the connection with the Terminal App. Then save and restart the script. Connect again and check if it works. You should now see no measurements, only when you request them (type a ‘t’ or ‘temperature’ and press Send):
You might notice that when you type a command, the text remains in the text-entry field. To prevent that, go to settings, “Send”, and turn on the option “Clear input on send”.
Document the code with comments
Make sure to add more comments to the parts of the code that you added/modified. Use multi line comments or single line comments. Use the comments to explain how the code works. It must be clear for us, when we review your code, that you understood its purpose.
Some examples of comments:
"""
Example of a multi line comment.
This is the second line of the comment.
"""

# Example of a line of code with comment at the end of the line:
print("Start of temperature measurement"); # display text at the shell
At the top of the script, add multi line comments with a general description of the script and have your name and student number on the first line of that block of comments.
Are you a student?
For students doing the course Application Development, having added the required comments is mandatory. When you hand-in the assignment, this will be checked. Before handing in, check the “Finalize” section and the checklist that comes with the assignment on Canvas too!
Summary
By doing this tutorial you have familiarized yourself with building an electronic circuit using a breadboard and you have used Python to program the Raspberry Pi Pico with a script.
In addition, you have learned the following.
- Made your own script by combining different examples and modifying existing code
- Incorporate a Bluetooth connection to a circuit to your phone
- Exchanging information and values of sensors via the Bluetooth connection
- Made your first steps to creating an App on your phone
- Adding comments to code
More information
- Good to know: The Raspberry PI Pico comes with a built-in temperature sensor
- More Raspberry Pi Pico Projects, Tutorials and Guides
- Programming Raspberry Pi Pico with Arduino IDE (Pico W compatible)
Send value to a website, via Wifi
After you have done the first 2 parts of this tutorial, until “Show values of sensor on display”, you can also send the values to a website, over Wifi. Use this script dht11_display_wifi.py for that.
This solution is based on this example, which learns you how to do a basic web request with the Raspberry Pi Pico W.