In this Java tutorial you will learn how to create a simple calculator using Eclipse. This tutorial is meant for beginners who are just starting with Java. It is strongly recommended to also learn the Java basics using for instance the w3schools tutorial.
Installing the Eclipse IDE for Java Developers
If you already have Eclipse installed, you can skip this part. But make sure you also have installed the Window Builder plugin of Eclipse. You can check that via Help > About, Installation Details.
Download the Eclipse Installer and run that. Select the first option: “Eclipse IDE for Java Developers”:

Click “Install” (keep options as they are).
Click “Accept Now”.
Wait for the installer to finish. This can take several minutes.
Click “Launch” to start Eclipse.
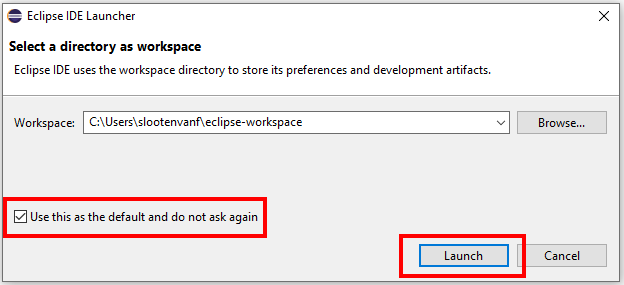
Select the option “Use this as the default and do not ask again” and click Launch:
Eclipse: Add Window Builder
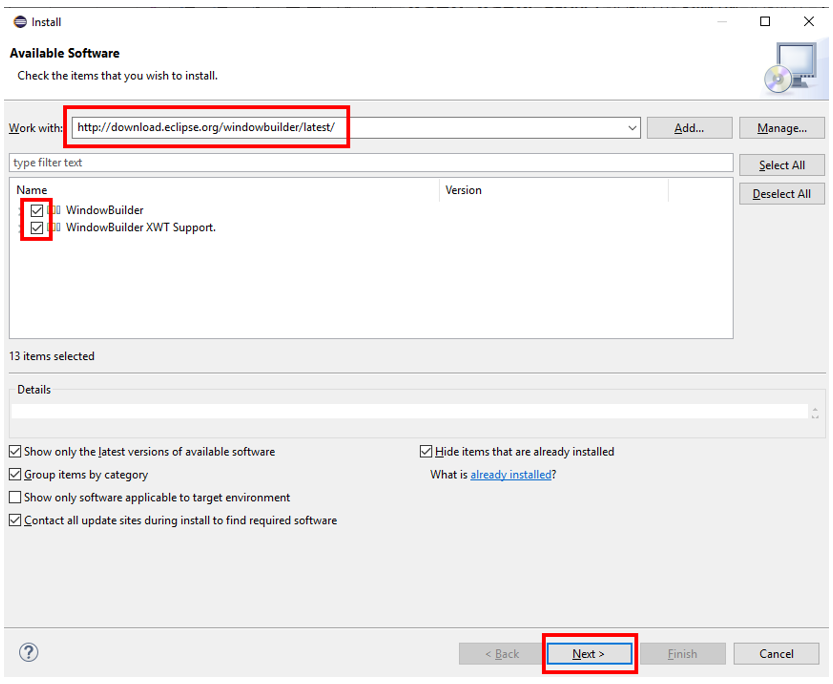
The tool to create graphical user interfaces is not part of all editions of Eclipse, and must be added manually. In Eclipse, choose Help > Install New Software… In the field Work with, enter this address:
http://download.eclipse.org/windowbuilder/latest/
(press Enter), and select WindowBuilder and WindowBuilder XWT Support:
To start the installation press Next two times. Accept the license, then Finish. The installation will continue in the background (you can see its progress in the lower right corner). Wait for it to finish. If asked to restart Eclipse, do so.
Create Java project and first Java file
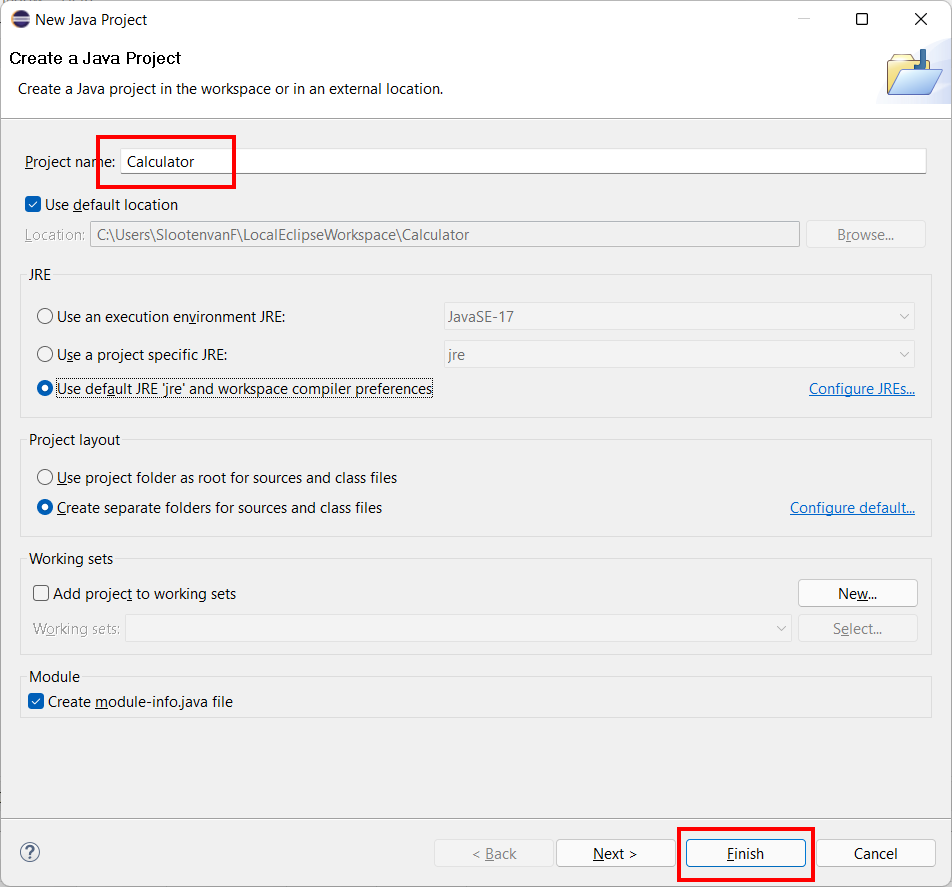
To start a new project, select File > New > Java Project from the menu. Fill in the project name and press Finish (you may leave the other options at their default values):
If a popup appears that asks you to fill in a module name, fill in “calculator” and press Create.
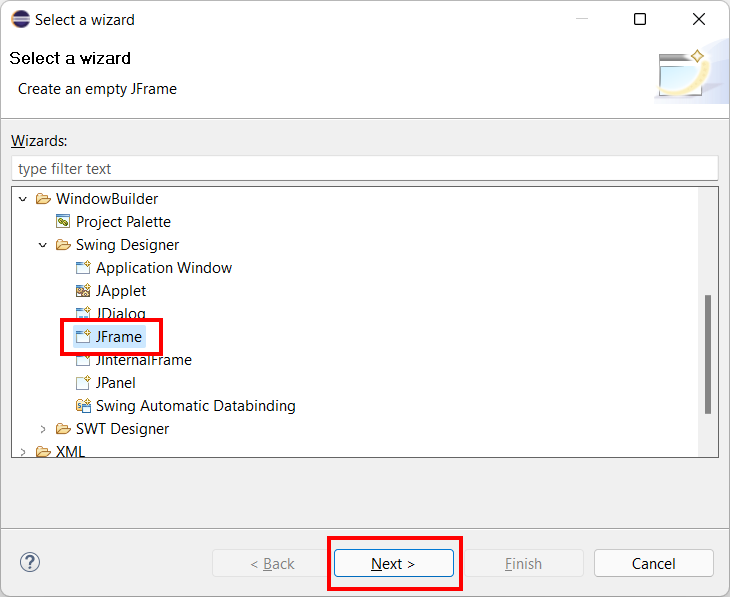
Select File > New > Other (or press Ctrl + N) to add a Java file to the project. Browse to WindowBuilder, JFrame and click Next:
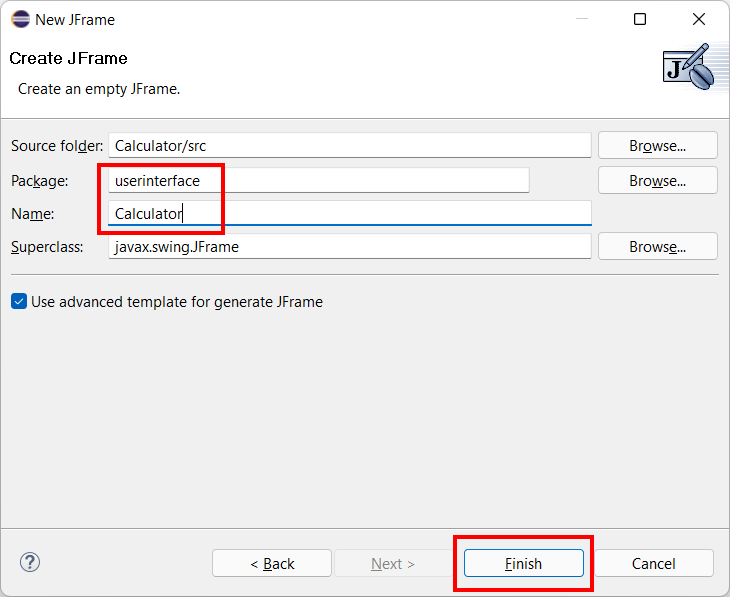
At package name type “userinterface” and at name “Calculator”. Press Finish:
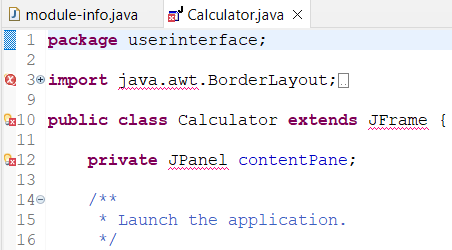
You might get some errors in the code, this is because the imports and the module info are not setup yet:
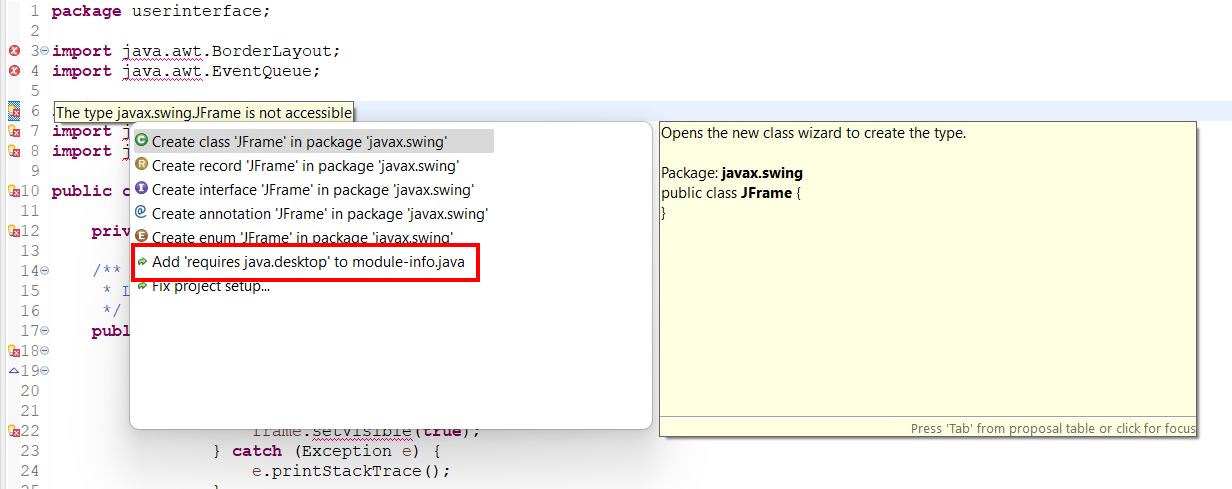
Top fix this, first add the module info. Click the first warning symbol that has a small light-bulb in front of line 10 (this indicates there are tips on how to resolve those), and click “Add ‘requires java.desktop’ to module-info.java”:
If you have any errors left, you might have to fix the imports (an ‘import’ statement tells the compiler to use a package, eg. from a certain library) by clicking one of the warnings in-front of the lines with errors.
Create the userinterface
We will create the userinterface with help of the Window Builder and its palette.
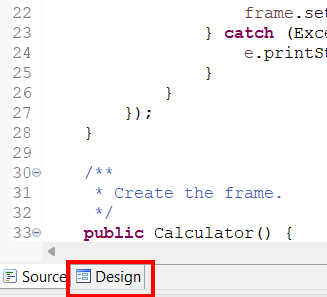
Switch to the Design tab of the code:
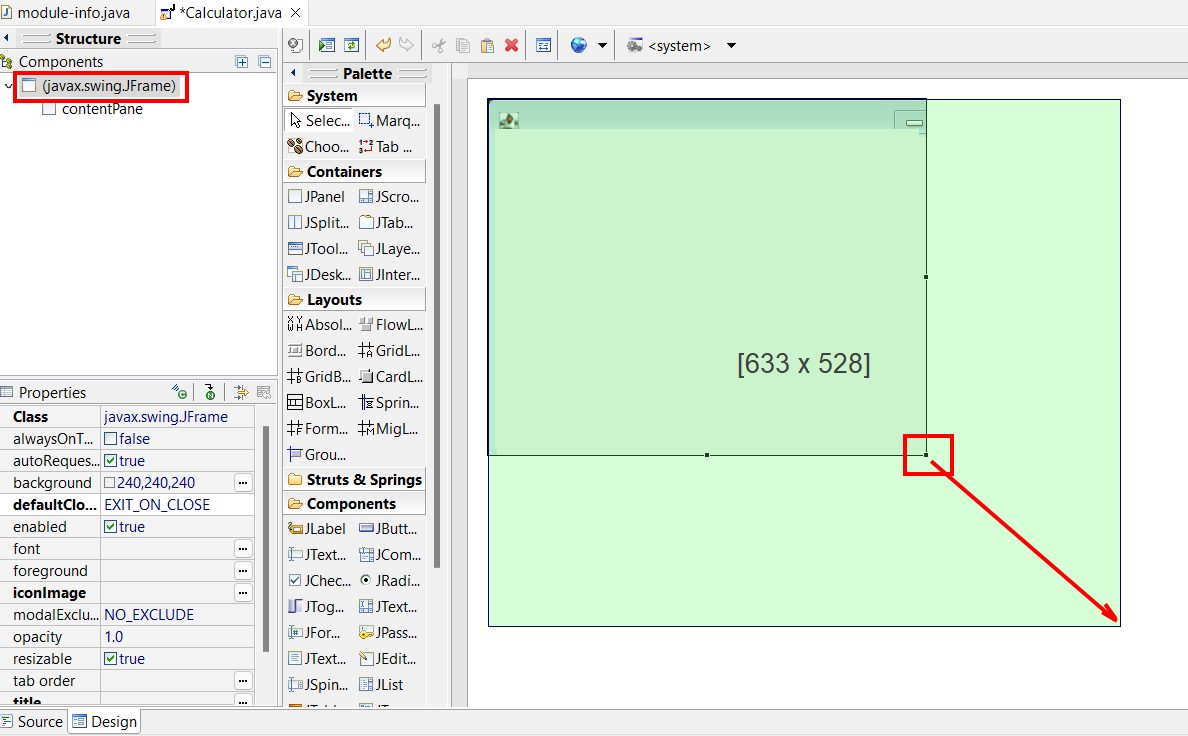
First enlarge the window by selecting the in the components tree and then dragging the window at the lower-right corner:
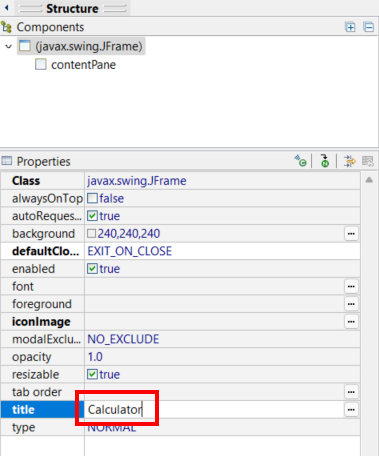
Set the title of the app by modifying the title property of the JFrame:
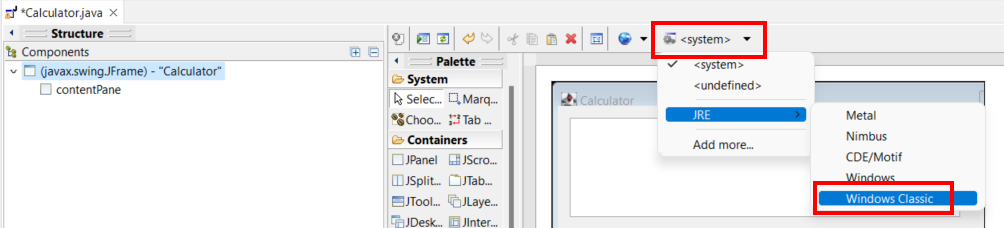
Set the look-and-feel of the app to Windows Classic:
(this is optional)
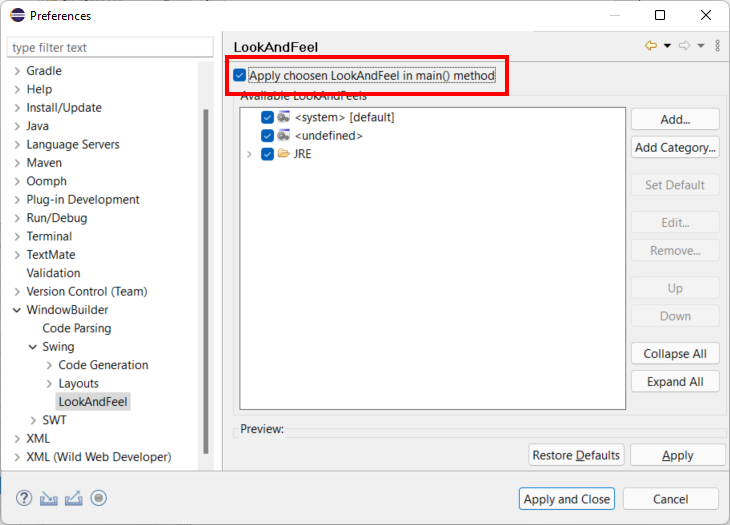
And make sure it will get applied via the preferences: select Window > Preferences, then navigate to WindowBuilder, Swing, LookAndFeel. Then set the option “Apply choosen LookAndFeel in main() method” (press Apply and Close):
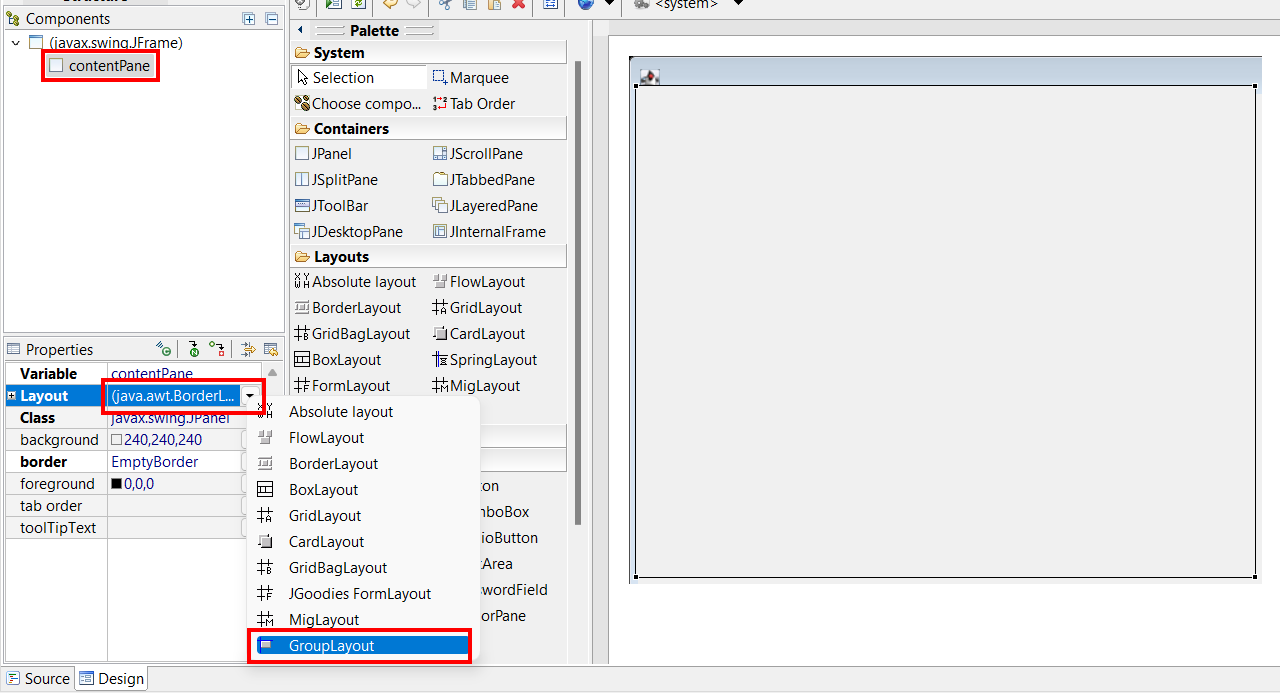
Set the layout of the contentPane to “Grouplayout”:
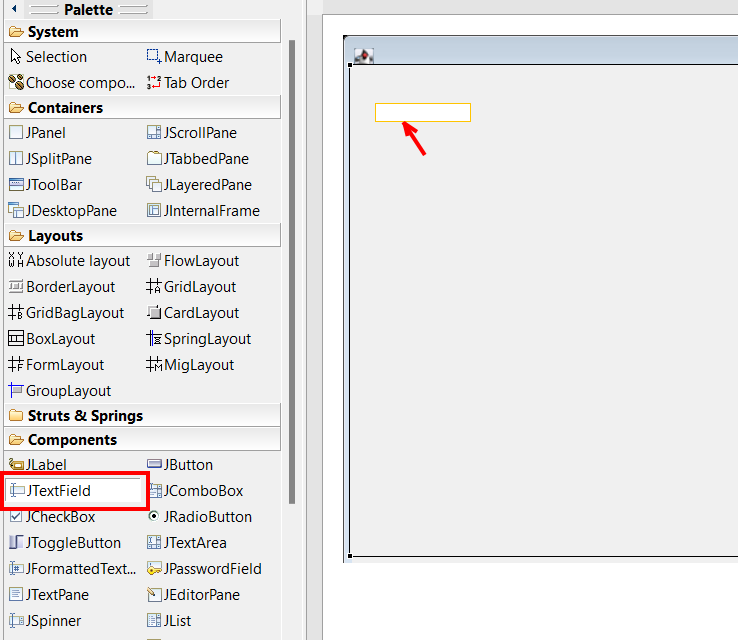
We will use a textfield as the display of the calculator, and the buttons will be inside a panel, with a grid-layout. First add the textfield (JTextField):
Place it somewhere at the top and enlarge it by dragging the corner(s):
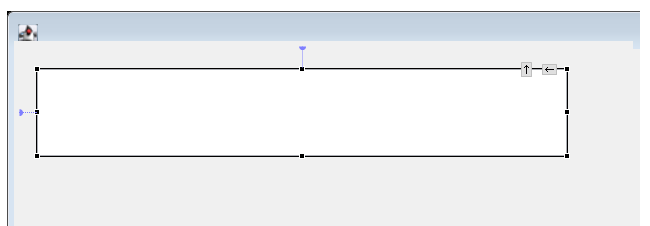
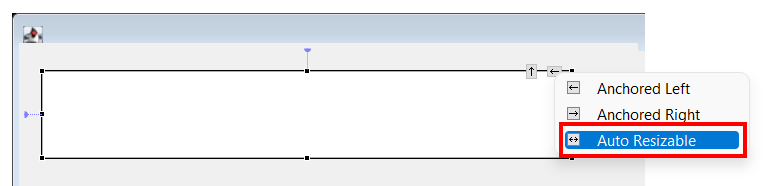
Make it auto resizable and align both left and right, by clicking the small arrow pointing left and then select “Auto Resizable”:
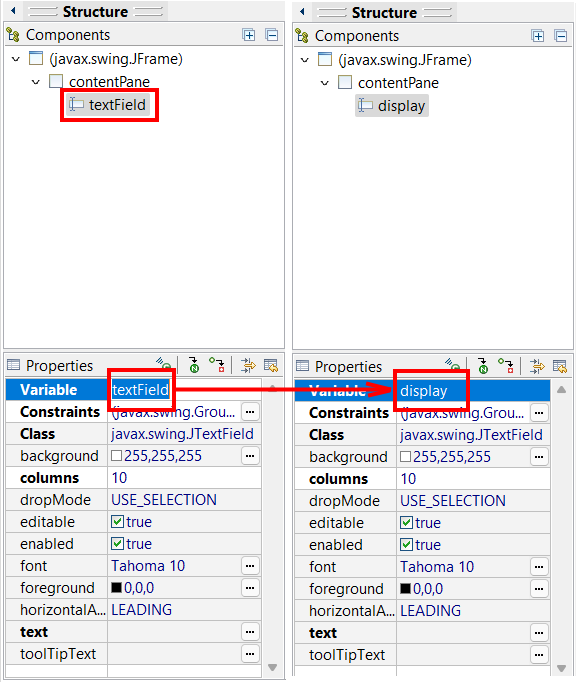
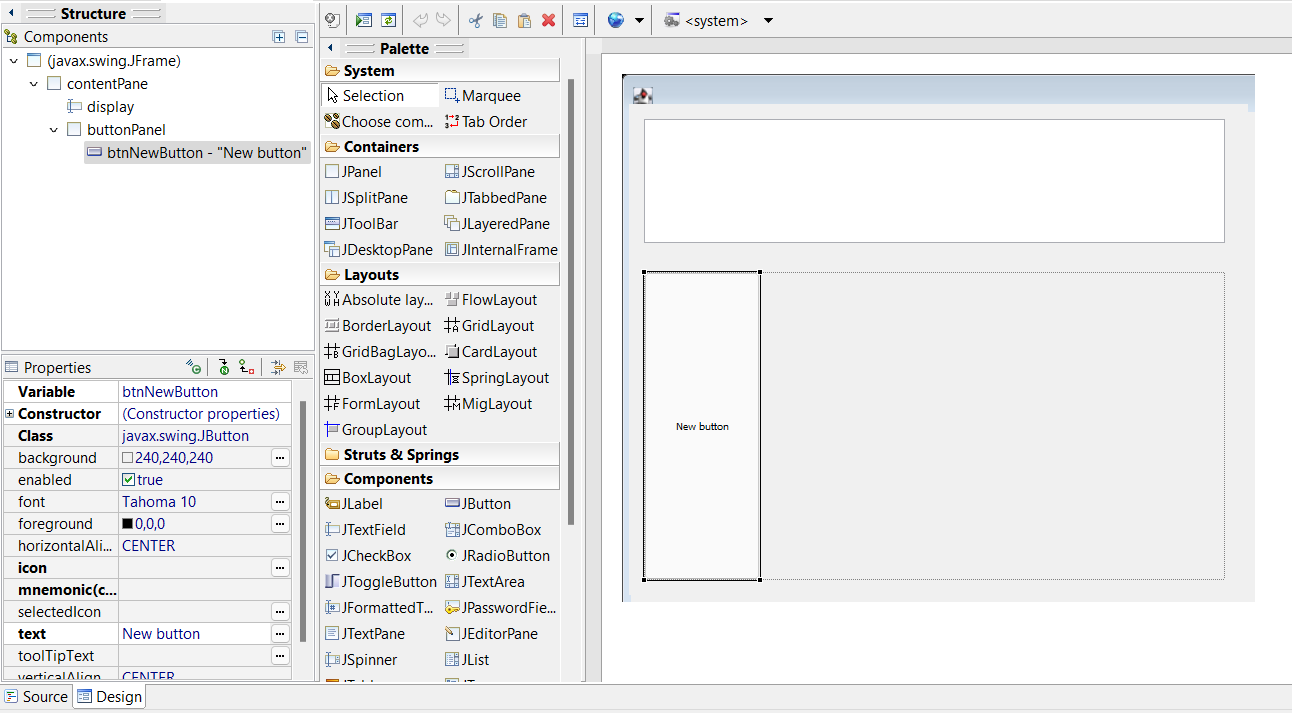
Give it a proper name by modifying its properties, rename the Variable name to “display”:
Set the font to a larger font also, for instance Tahoma 24.
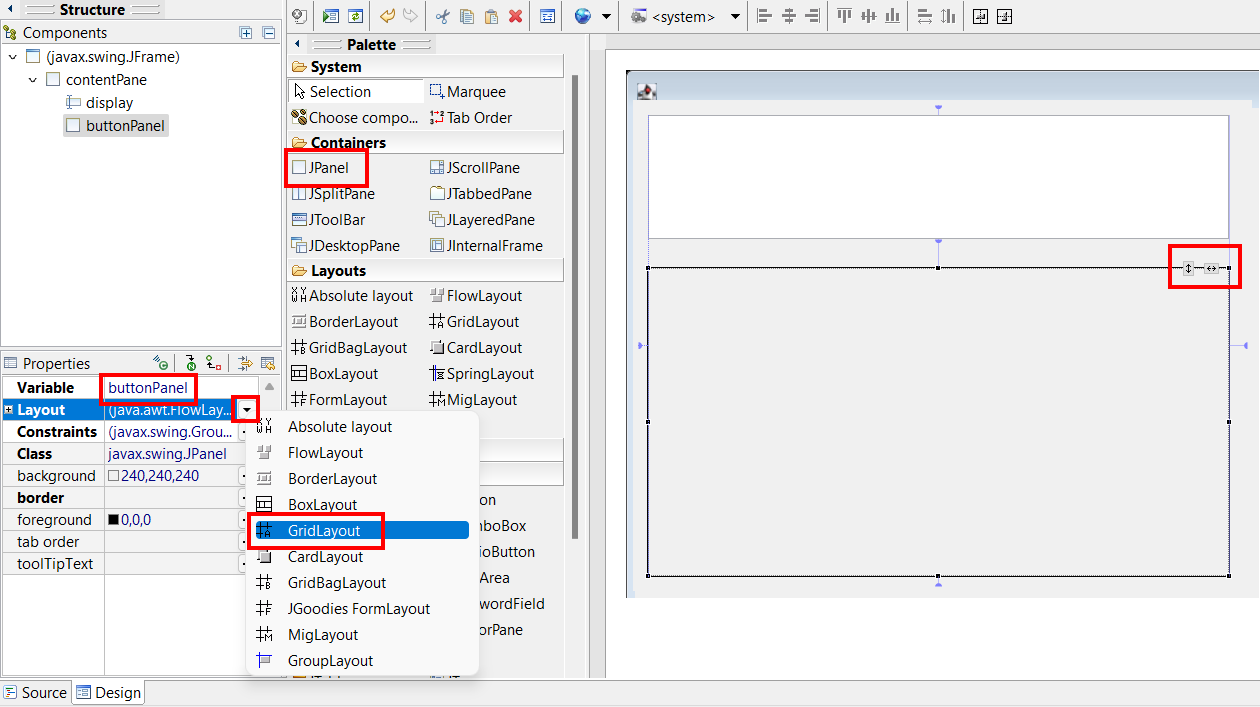
Next, add a JPanel, resize it so that is uses up the remaining space, name it “buttonPanel” and set its layout to GridLayout:
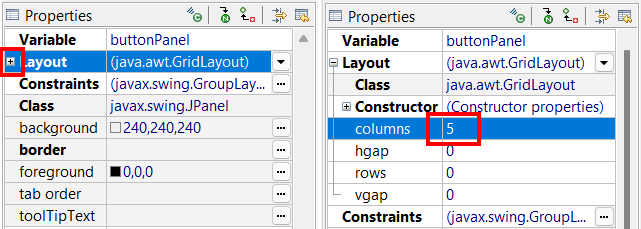
Now define the layout: set the amount of columns the buttons in that panel will be in to 5. Click the plus-sign in-front of Layout, then fill in the 5:
Add buttons to the grid panel
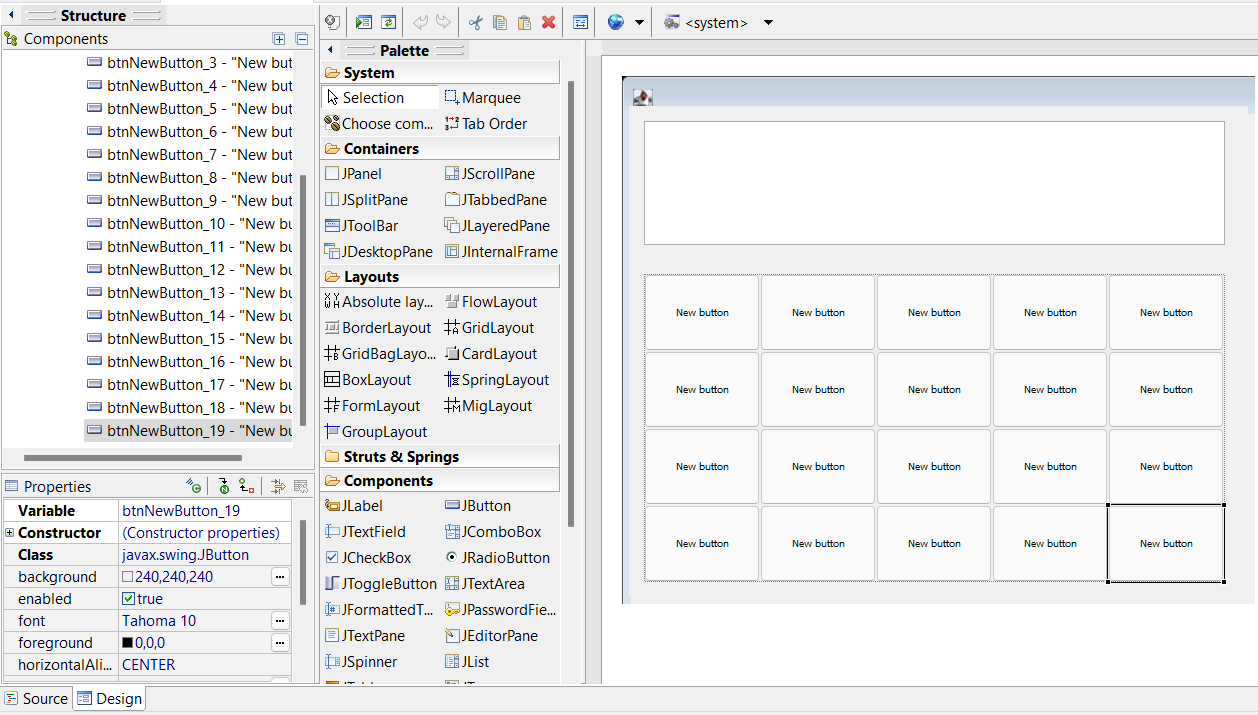
Add 20 buttons (JButton) to the buttonPanel (make sure to click inside that):

After the first button has been added, click on the right side of that to place the new button at the right side:

Keep doing this for all 20 buttons until it looks like:
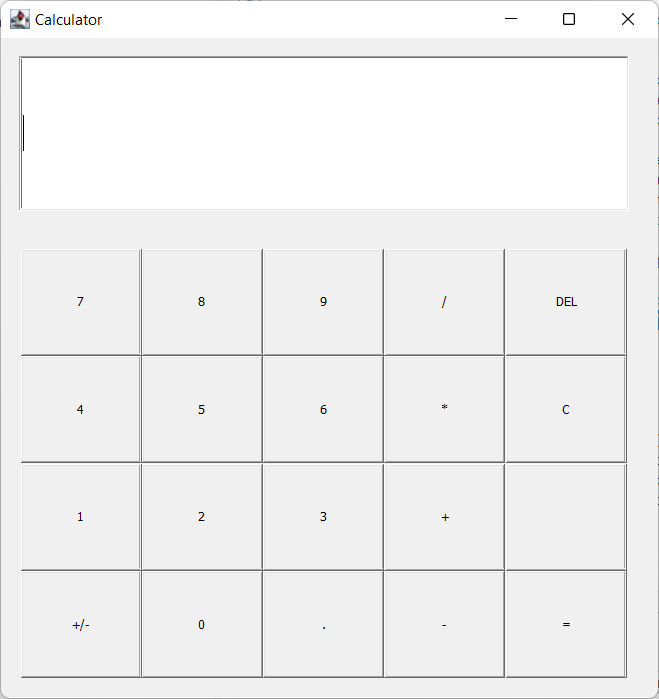
Give all buttons proper names and texts: change their variable names and the text properties of each of them according to the image below. The variable names are written in red on the buttons:

The one above the btnEq (equal sign) is not used and can have just an empty text.
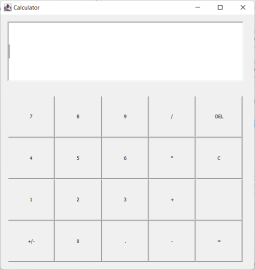
Run the app. It should look similar to the one below.
First interaction: add eventhandlers for the number buttons
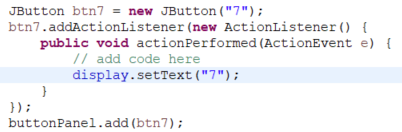
First we are going to make the number buttons work. Double click on the button with a “7” (btn7). This will jump to the code and a piece of code will be generated. This is the code that will be called when a user clicks the button:
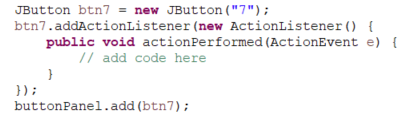
The “add code here” comment has been added to clarify where you must add code for the eventhandler. When btn7 is clicked, a 7 should appear in the display. We can accomplish that by using the setText() method of the display (display is an JTextField, which has a method setText(), which we can call to set its text). So we need something like:
display.setText( ... );Inside the brackets should be a 7:
display.setText( "7" );Lets add that to the code:
Now test it by running the app: press the Run icon  in the toolbar. Then you will see the app:
You will notice that if you press the button multiple times, there will remain only one 7 in the display. This is because we will set the text to “7” each time the button is pressed. But that is not what we want: we want a 7 to be appended to the text in the display. This can be accomplished if we first get the text of the display, then append a 7 to that and then set the text to that new String:
String currentText = display.getText();
display.setText(currentText + "7");
Try this (run the app). Does it work?
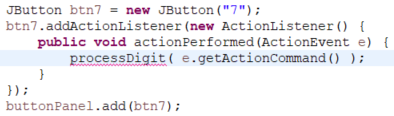
Now we will have to add this code to all number buttons. But before we do that, we can make our lives a bit easier. Because now we would have to copy-paste the code to every button, and modify the “7” bit. Eg. for btn2, the String would need to be “2”, and so on. But what if we can make it a generic piece of code?
We can ask the event (parameter e) for the action command that was involved. If this is empty (not set in the buttons’ properties), it will default to the text on the button, which is precisely what we need. So instead of “7”, we can use:
e.getActionCommand()So the code would look like:
display.setText(currentText + e.getActionCommand());To make it even more generic, it will be better to call a method from the eventhandler, which will have any additional code we will need in the future. We will name this method “processDigit”. So replace the code in the eventhandler by:
processDigit( e.getActionCommand() );So now the eventhandler looks like:
Eclipse is now complaining that this method does not yet exists. So we will create it. We will do this automatically, by clicking the lightbulb in the margin and selecting to create the method in the Calculator class:
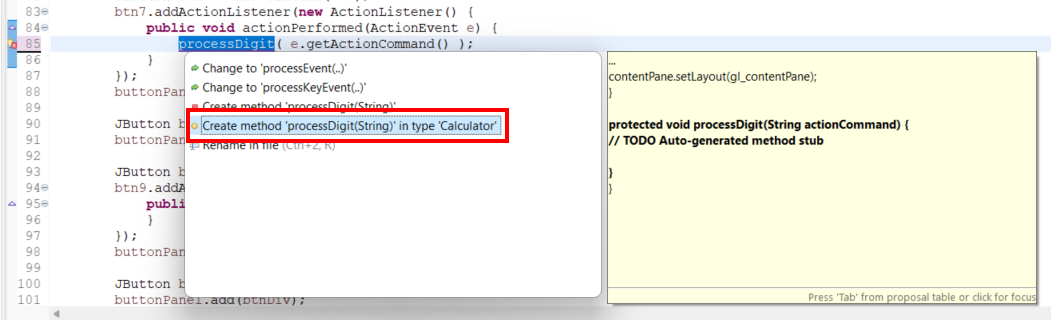
This will add the code, all the way down at the end of the class (scroll down):

In this method, add the code:
display.setText( display.getText() + actionCommand );This is a bit shortened version of the code used earlier. Do you understand the differences?
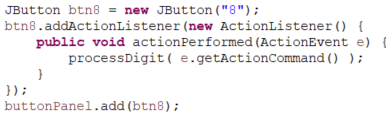
Switch to the WindowBuilder (tab Design) and double click on the next button, for instance the “8”. In its event handler, add the same line of code (copy-paste from the eventhandler of btn7):
Repeat this for all number buttons and the “.” (btnDot). And test if it work, you should be able to make any number appear on the display. The only problem is that you can now have multiple dots in a number, which should be fixed later.
Make operators work, and input a second number
In the Design view, double click the btnPlus, to add an eventhandler for that.
In the eventhandler, add a call to a method which will process the operator:
setOperator( e.getActionCommand() );Repeat this for the other operators (btnDiv, btnMin, btnMul).
Add the method setOperator() to the Calculator class (click the bulb in the margin). Add this line of code to that method:
operand1 = display.getText();This will store the number on the display into a variable, which we can use later when we will calculate the result of the expression. The variable operand1 does not exist yet, create it by clicking the bulb in the margin and choosing the option to ‘Create field …’:
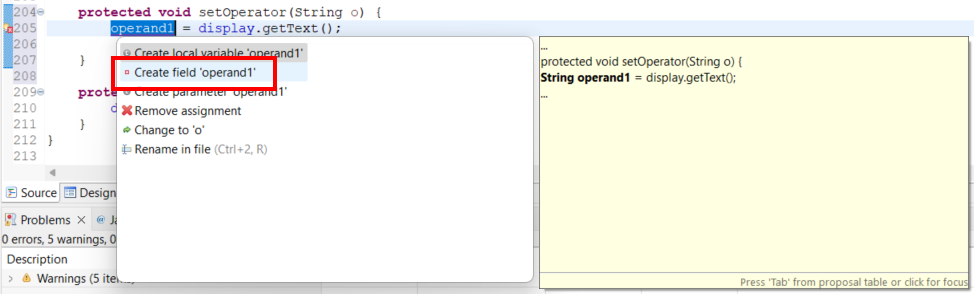
A field is another word for a class-variable.
The operator which is in the actionCommand parameter, must also be stored:
operator = actionCommand;Create a variable for operator also (create a field).
Finally, remove the number from the display, to indicate to the user that the second number can be entered:
display.setText("");Try this (run the App). Does it work?
You might want to add comments on the working of the code now. This is important to understand your code later. Or if you have to present/explain it to somebody else. Use the explanation from this tutorial to add comments. An example:
operand1 = display.getText(); // store the number entered first in variable operand1Perform calculation when equal button pressed
Add an eventhandler to the button btnEq by double clicking it in the Design view. Then add this code in that eventhandler and create a variable for the second operand (add field in the class):
operand2 = display.getText();
Until now we have stored the numbers (operand1 and 2) as Strings, which are text. To be able to do the calculation, they must be converted to real numbers. We will convert them to doubles. that can be done like this:
double o1 = Double.parseDouble(operand1);Do this for the second operand also, use variable o2 for that.
The result can be calculated now. But first, we must determine what is the operator, using an if-statement:
if (operator=="+") ...Then in case of the ‘+’ we can write:
if (operator=="+") result = o1 + o2;Now we must display the result:
display.setText(""+result);Check if it works (run the App).
The reason ""+result is used above, is that this will convert the double to a String, which is the type of the parameter of setText().
Now we must do some work to make the other operators work also. Extend the if-statement with else if …, to make it work for subtraction (read this you find need help):
if (operator=="+") result = o1 + o2;
else if (operator=="-") ...
Finalize this by adding the code to calculate the result. then add two more else if … parts to allow for multiplication and division operators to work.
At the end of the method empty the variables to allow to start over (for a next calculation):
operand1 = ""; operand2 = ""; operator = "";Try this (run the App). Does it work?
You might notice that starting a next calculation does not work properly: if you start pressing number buttons, they will append to the result which is still displayed. Instead of this the results must be erased when the first button is pressed. For this we can introduce a helper variable, which will indicate if a result is visible. For this we can use a boolean variable, which is true if the result is visible, and false otherwise. Declare that as a class-variable (class attribute):
boolean resultVisible = false;And set that to true at the end of the eventhandler of btnEq:
resultVisible = true;Now, we can add an if-statement to the processDigit() method which in pseudo-code does:
if resultVisible is true:
    clear the display
    set resultVisible to false
Add this in real code to the beginning of the processDigit() method (it must be the first line of code). Make sure to use a comparison operator in the if.
Check if you can do multiple calculations now.
Proper input of broken numbers (using the dot-button)
The eventhandler of btnDot could be improved by preventing that multiple dots can be input.
String n = display.getText(); // get the text on the display
if (n.contains(".")) return; // if it already contains a "." skip rest of this method
Add this at the beginning of the eventhandler for the button btnDot.
Make deletions possible
The btnC will simply delete the entire expression, exactly the same is what is being done after the calculation is displayed (at the end of the eventhandler of the btnEq. So add a method clear() to the class, and move the code from there to that. Then call the method at both spots.
The btnDel will delete the last character added. The code below will accomplish that. Try to understand it, then add it to the eventhandler.
// remove last character on display:
String tmp = display.getText();
if (tmp.length()>1) // if there is more than 1 character
    display.setText( tmp.substring(0, tmp.length()-1) );
else // otherwise just make display empty
    display.setText("");
The “+/-” button
The final button is the “+/-” one. Add an eventhandler for that. For this we provide the pseudo code:
get first character of the text on display
if first character is a minus sign, remove that
else, add a minus sign
You might want to get the text from the display into a temporal variable first, eg. with:
String tmp = display.getText();Next, you can call the charAt() method of the String tmp to retrieve the first character, this will be of type char (that is a basic type):
char first = tmp.charAt(0);After that you can construct the if-statement using the pseudo code.
If the first character is a minus-sign, we can set the display to the remaining part of the String, so the substring starting with character 1 (which is the second character):
tmp.substring(1, tmp.length())The else-part of the if-statment deals with the situation that there is no minus-sign. Then we need to add one:
display.setText("-"+tmp);Try this, do some more calculations. Your App should be complete now. Congratualtions!