This short tutorial introduces the ESP32 module (a Lolin32 Lite) and connects an HC-SR04 Ultrasonic sensor. The entire prototype will be powered by a battery and sent its data to a webserver via Wifi. It is assumed you have installed the Arduino IDE and have some basic understanding of using electronics and wiring a breadboard. Although in this example we use a display, you can also do without it.
Instead of using an ultrasonic sensor, it is also possible to use an optical (infrared) sensor. For details on how to connect it, look here.
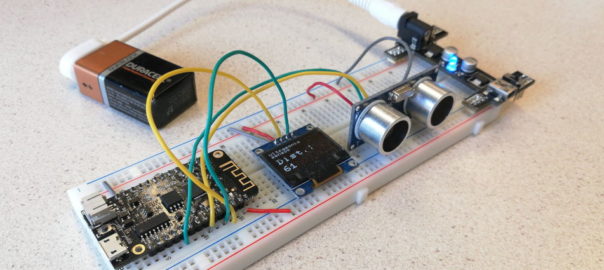
The basics of how to connect an Ultrasonic sensor have already been explained here. So we will not explain this into much detail here.
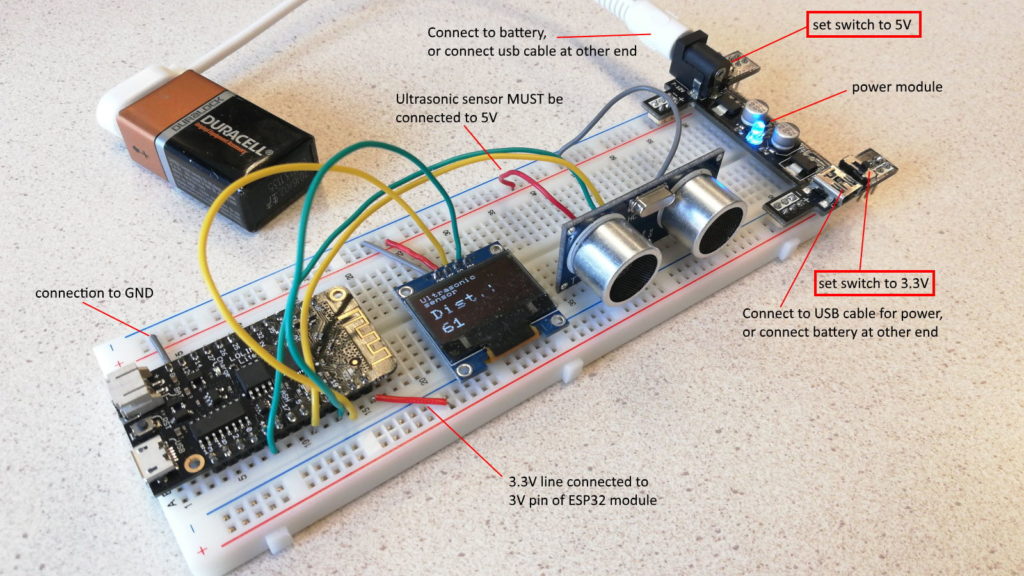
The Ultrasonic sensor needs 5V power to operate. The ESP32 board needs 3.3V power and the display is flexible. So we need one side of the breadboard to be on 5V and the other on 3.3V. If your ESP module does not have a 5V pin, you must realize this by for instance using a power module: Connect the power module to the breadboard first, but do not connect a power source yet (do this after you have build the complete circuit and verified all connections).
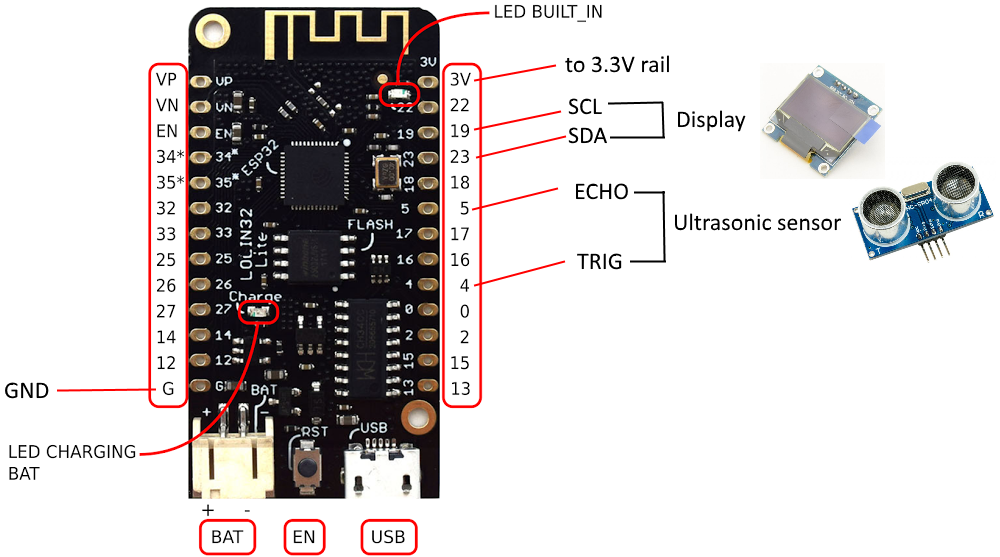
The Trig and Echo pins of the sensor can be connected to pin 4 and 5 of the ESP32 module. For the display, we connect SDA to pin 23 and SCL to pin 19:
(click image to enlarge)
When you connect it all, it looks like (do not connect a battery yet):
Make ESP module ready for use in Arduino IDE
Start the Arduino IDE. Choose File > Preferences. At “Additional Boards Managers URLs” enter "https://dl.espressif.com/dl/package_esp32_index.json" (without the quotes). Press Ok.
Now choose Tools > Boards > Boards Manager. Enter “esp” in the search field.
Click on “esp32 by Espressif Systems” and click the Install button.
If this explanation is unclear, you if you run into trouble, check this tutorial (only the installation part, so skip when you reach “Testing the Installation”).
Download example sketch
You can download this example sketch ultrasonic_sensor_with_display_esp32.ino here. This sketch uses several libraries: if you have used the previous examples for the display and the ultrasonic sensor, you have the libraries “U8g2” and “Newping” for these already. If not, install them via Tools > Manage Libraries (search for their names).
Connect an USB cable to the ESP32 module and connect the other end to your computer. Set the board properties as indicated below (COM port might be different):
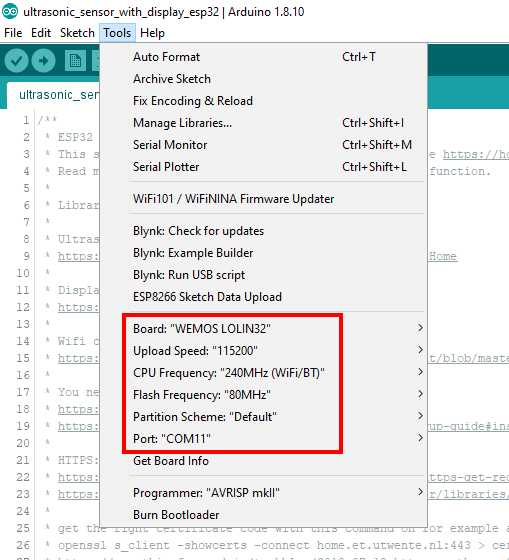
The Port is the active COM port as used when you connect the module (eg. COM1-12, or on Mac OS something like “/dev/tty.usbmodem…” or “/dev/tty.usbserial-…” ).
Upload the sketch
If needed, connect a power source to the power module (eg. a 9V battery or USB cable). Run the sketch (press the Upload button ![]() ). The display should show the distance as read by the sensor. If you do not use a display, you can see the distance in the serial monitor, which you can start via the
). The display should show the distance as read by the sensor. If you do not use a display, you can see the distance in the serial monitor, which you can start via the ![]() icon in the top right corner.
icon in the top right corner.
If no distance is shown, double check if the Ultrasonic sensor is connected to 5V and if the power module is connected to a power source (either a battery or a USB cable).
Checking connection
If there is no Wifi connection, the led on the ESP32 module will keep blinking. Review the ouptut of the connection process in the serial monitor.
The module needs a regular Wifi network with the SSID and password as specified in the sketch. If you follow one of my workshops, the default SSID and password should work. You can also create a Wifi hotspot using your phone.
Storing the value online
The example sketch stores the distance online on the webserver home.et.utwente.nl. The example uses the variable “dist” to store the value for the measured distance, see at line 148:
doRequest("dist", buf);It is better to change this to something of your own, because others might be using the same example. So at this line, change “dist” into something else, eg. “distgrp2”.
Upload the sketch again, and check the value on your computer by opening this page in your browser: https://home.et.utwente.nl/val/dist (change “dist” into the chosen variable).
If you add ?live to the URL, the page will automatically refresh, so if the distance changes, it should also change in your browser: https://home.et.utwente.nl/val/dist?live