We are going to create an application that can display the temperature of several weather stations in the Netherlands, as well as the average temperature of those weather stations. This tutorial can also be done in Python.

You are given a WeatherStation class for reading the data. This class can read data from an online XML file. XML files are used on the internet to provide data in a structured way (in a specific format). Buienradar is a site that provides weather data from several weather stations in XML form.
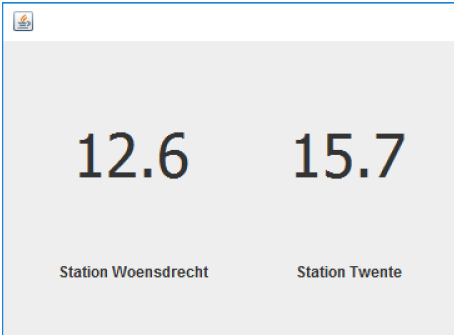
The example used in this tutorial is a weather station with temperatures of multiple stations.
Tutorial steps
- Design and create the user interface
- Add the WeatherStation class to the project
- Create the display of the temperature
- Add multiple instances of the class to the user interface
- Calculate the average temperature and display it
These steps are explained in detail below.
1. Design and create the user interface
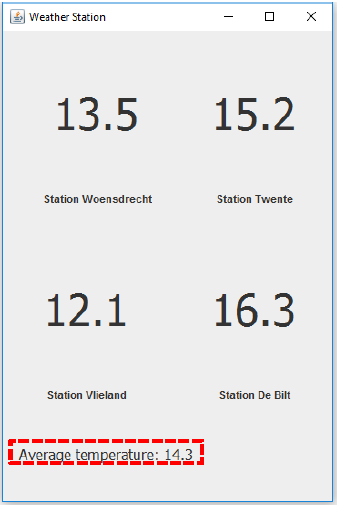
First, we create one of the four Panels for displaying the temperature with the name of the weather station. Then we use that Panel several times (copy) to display the data of several weather stations. Also, we create a separate part of the user interface in which the average temperature is displayed (at the bottom in the example).
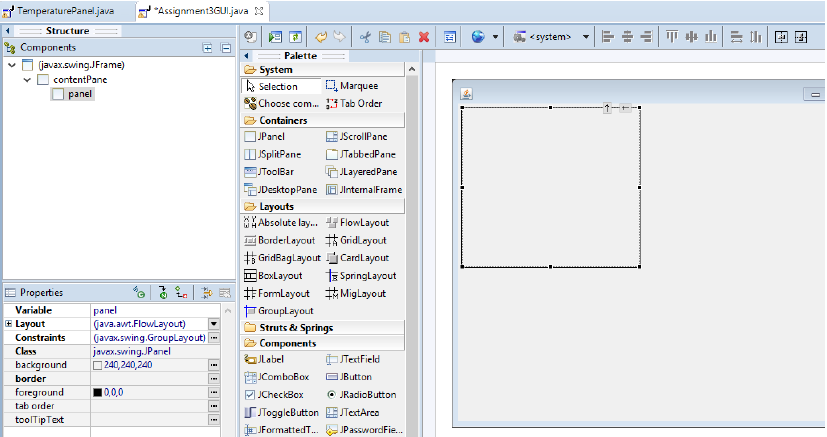
Start with a new project “Assignment3_s1234567” (use your student number in the name). Add a JFrame and a JPanel to the project, both via File > New Other, and then under WindowBuilder, Swing Designer. The JFrame will be the user interface of the entire application; name this “Assignment3GUI”. The JPanel becomes a Panel for displaying the temperature of 1 station, which we will use several times. Name this “TemperaturePanel”. The project structure now looks like:

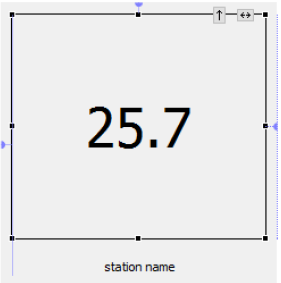
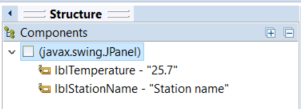
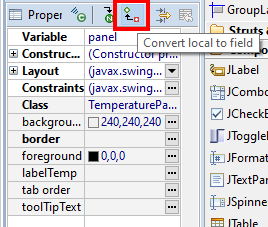
Using the Designer, add two labels (JLabel) to the TemperaturePanel, one of which with a large font (e.g. font size 48), which we will use to display the temperature. The smaller label is used to display the name of the weather station. Remember to choose a suitable layout (property of the Panel) and meaningful names for all the components. Make both labels a field (a class variable), with the “Convert local to field” toggle button:

Double-check (in the Window Builder) that the TemperaturePanel is a JPanel (javax.swing.JPanel):
Before continuing, save all the files via File > Save All.
Add Panel to the main user interface
Now we are going to add the Panel to the main user interface. Switch to Assignment3GUI.java. Set the layout of the contentPane to GroupLayout (or any layout you prefer). Add a JPanel to the user interface:
Make the Panel a field (a class variable), with the “Convert local to field” button:
We are now going to morph (change) this Panel into the TemperaturePanel we have just created. In the list of Components click with the right mouse button on the panel and select Morph, Subclass:
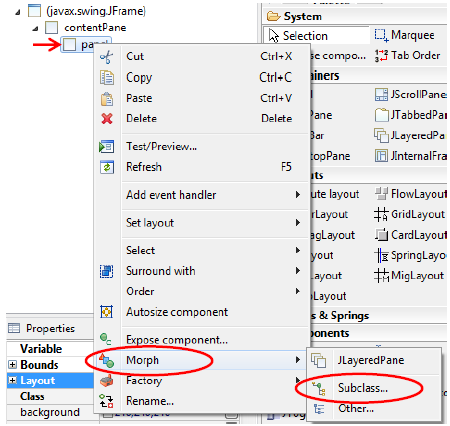
Type “TemperaturePanel” in the window that pops-up and click Ok.
You previously practiced ‘Morphing’ in the drawing-tutorial with the DrawingPanel class.
If you have problems, save all files and retry. Also make sure TemperaturePanel.java does not contain errors.
2. Add the WeatherStation class to the project
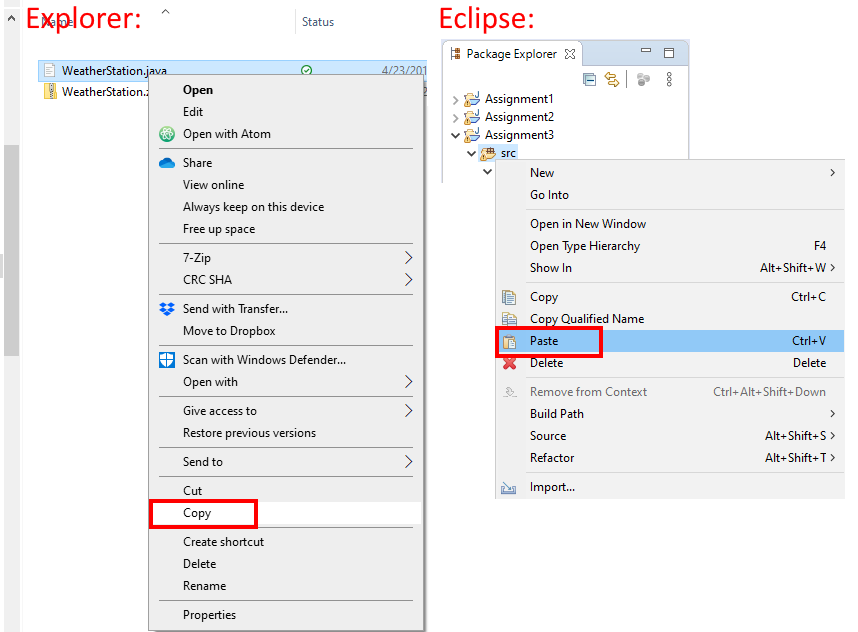
Download the zip-file WeatherStation.zip. Extract WeatherStation.java from the zip file and copy it (using the Windows Explorer or Finder). Paste it in Eclipse by right-clicking the src folder and select Paste:
The project will now look like:
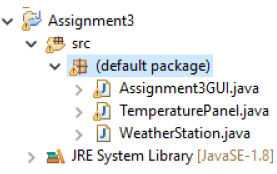
If all 3 .java files are not in the same package, move them into the default package. A package is like a folder in the project, you can move files to it by dragging and dropping.
3. Create the display of the temperature
We can now add an object of type WeatherStation to the TemperaturePanel class, so we can use methods of this object to set up the station and retrieve data (like the temperature and name) from that station by calling the method.
Creating an object consists of 2 steps:
- Creating a class variable for the object
- Creating the object in memory, with a new statement
This has also been explained in todays’ lecture.
In the pieces of sample code below, the declaration of the variable (step 1) for the object is shown in red and the assignment of the variable using the new statement in blue (step 2).
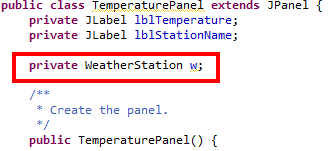
First, declare a class variable w of type WeatherStation and make it private:
Next, use a new statement to create the object for w. We do this at the end of the constructor:
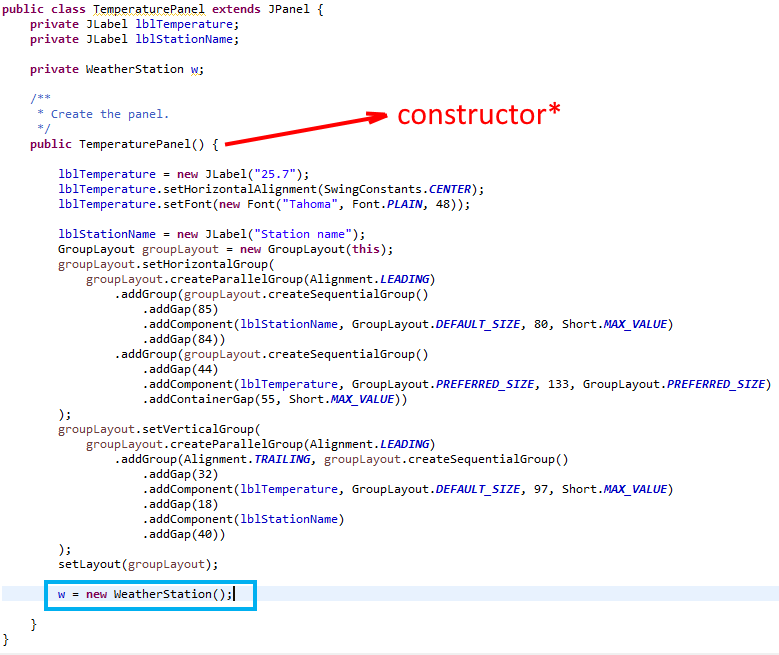
* This is the constructor of this class: a special method that is used to create objects in the class. A constructor has the same name as the class. More info on this in today’s presentation.
As you can see, the components of the user interface are defined in the constructor. These are the two labels that we have created using the WindowBuilder. The names of the labels (in this example labelTemp and labelStationName) may be different for you.
Call a method of the WeatherStation: request temperature
After the object for the weather station has been created, we can request things from the object by means of the method calls. For instance, the Weather Station has a readTemperature() method to retrieve the temperature. You can get a list of all methods of object w when you type a ‘w’ followed by a dot:
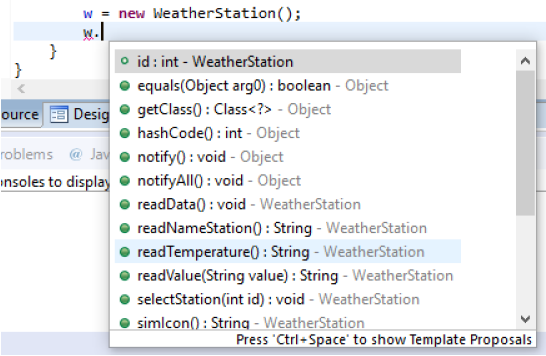
We can request the temperature from object w by calling the readTemperature() method. This method results in a String. So, we create a new variable of type String and give it the value that results from the method call:
String temp = w.readTemperature();Show the temperature in the userinterface
Now we are going to display the value of the temperature in the label for the temperature. To do this, the label has a setText() method.
Type the variable name of the label of the temperature (in this example labelTemp), followed by a dot. Start typing the method name (setText) and select that method from the list by double-clicking it:
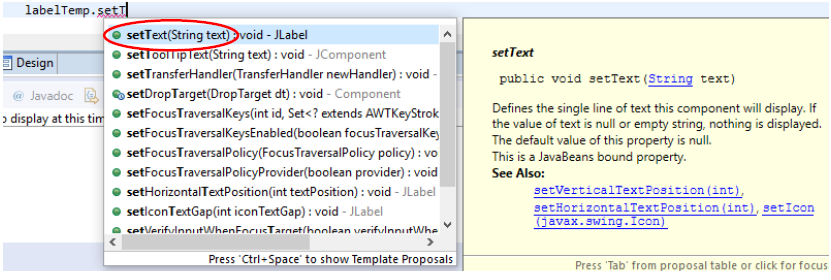
Next, a selection screen appears where you can select a parameter from a number of suggestions:

Eclipse has detected that we have created a new variable temp of type String on the previous line, as a result of which it is also included in the suggestions, because it “fits” as a parameter (it is of the same type). We select the suggested temp variable by double-clicking it. We close the line with a semicolon. The three lines of code we created is finished, and looks like:

You can now check if the temperature is actually displayed. Switch to Assignment3GUI.java and run the application.
Include a comment for the lines you have just added to TemperaturePanel.java.
Similarly, at the end of the constructor of TemperaturePanel, add more code which displays the name of the weather station in the other label.
More info on parameters of methods can be found in today’s presentation.
4. Add multiple instances of the class to the user interface
The WeatherStation class can retrieve data from a number of weather stations. When creating the object, you can specify the ID of a weather station using a parameter. If this parameter is missing, the default weather station from the XML file is used. To use multiple weather stations, we must know the station ID. We can find this in the XML file at the following address xml.buienradar.nl (this is unfortunately in Dutch). Open that address to view the XML file that is displayed. Data of a weather station always starts with:
<weerstation id="6391">Followed by the data of that station.
If we want to use data from a different station, we need to specify the id as parameter when creating the object:
w = new WeatherStation(6391);Because we want to create multiple panels later, each with different IDs, it is useful to make the ID configurable by making it a parameter for the constructor of the class TemperaturePanel. Therefore, we add a new constructor to the class TemperaturePanel with the id as the parameter:
public TemperaturePanel(int id) {
    this(); // call base constructor
}
Move the lines you added in the previous step, which start with w = new WeatherStation();, from the other constructor to this constructor. And add the parameter id:
w = new WeatherStation(id);The new constructor now looks like (names of variables and labels might be slightly different):
public TemperaturePanel(int id) {
    this(); // call base constructor
    w = new WeatherStation(id);
    String temp = w.readTemperature();
    labelTemp.setText(temp);
    String stationname = w.readNameStation();
    lblStationName.setText(stationname);
}
If you just copied the code above, you might get errors! Why? Your names of the labels or other variables might be different. So adjust the code so it matches your labels and variable names.
If you still get errors, also check if the labels (labelTemp, lblStationName) are class-variables: are they defined at the top of the class? If not, you missed the part in step 1: “Make both labels a field (a class variable), with the “Convert local to field” toggle button…”. To solve this, put a comment // in front of the lines with errors, then switch to the Design tab and make them a field. Then switch back to Source and remove the comments.
Now save the TemperaturePanel.java file (CTRL+S). Switch to Assignment3GUI.java and find the line where a new TemperaturePanel is made:
panel = new TemperaturePanel();Add a station ID’s as a parameter there:
panel = new TemperaturePanel(6391);The TemperaturePanel can now display data of multiple stations. To make sure that all changes work, you must save all files in your project (File > Save All).
In the Designer, we can now make a copy of the panel. There are 3 steps to do this, read them all 3 before you do them!:
1) Right-click the panel and select Copy, 2) right-click contentPane and select Paste :

3) move the mouse to the location in the WindowBuilder, click on the spot where the copy should be placed:

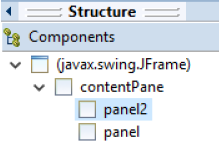
We change the name of the fresh copy to “panel2”:
We have now created a new object of the TemperaturePanel class, also called a new instance.
Now change the id for panel2 to 6290 in the source code:
panel2 = new TemperaturePanel(6290);The result:
You may now add 2 more panels of other weather stations. Find new id’s in the xml file. Which should bring the total number of panels to 4.
5. Calculate the average temperature and display this
To display the average temperature of all the stations in our application, add a label to the user interface:
To calculate the average, we need the temperature as a number (of type double). The temperature as we use it now is text (a String). So we have to convert a String to a double. An example:
String temperature = "21.45"; // Example String containing a temperature value
double number = Double.parseDouble(temperature); // convert it to a double
Add a method to TemperaturePanel which gets the temperature as a number
We can request the temperature as a number from each panel, if we add a new method to the TemperaturePanel class, which:
- requests the temperature from the weather station
- converts this into a number (double).
You can design (think of) and add (write code) for this method and add it to the TemperaturePanel class. So you have to do this your self. Look at examples from previous lectures if you do not know how to do this.
Once you have created the method in the TemperaturePanel class, save TemperaturePanel.java.
Get the temperature from each panel
You can then get the temperature from each panel in the Assignment3GUI class by calling the method you just created for each panel. A draft for these method calls and calculation will look like this:
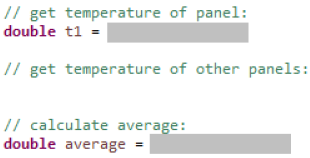
The name of the method you have created and the calculation have been made grey here. You can add this code at the end of the constructor, all the way at the bottom of the class.
Hint: to call a method for an object you need to do something like object.method() So if the object is a panel, type panel followed by a dot . then see if it displays your method (the method you just added to TemperaturePanel to get the temperature).
After calculating the average, the value can be displayed in the label you have created for that purpose, by calling the setText() method of that label.
The outcome of the calculation is a number. The setText() method expects a String as parameter. You can place a number in the label by attaching the number to a String using the + operator:

Format the output
The result of the calculation can be a number with many decimal places. Make sure you have an accurate presentation of the output, i.e. 1 or 2 decimal places. Use what you have learned about formatting output in the lecture.
Extra challenge
This last part is for you to get some extra practice. It will not be graded. Display the humidity in the TemperaturePanel. Add a label for that, and use method readValue() of the WeatherStation class to get the humidity like this:
String humidity = w.readValue("luchtvochtigheid");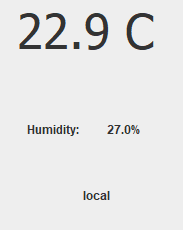
Connect your own temperature sensor (from the practical!)
This article shows how to setup a serial connection to a temperature & humidity sensor build with an Arduino and display the values from these in this application. If you have time left, you could start adding that. You can skip the first step of that article, do step 2, and then in step 3 Morph one of the panels that are already there into a LocalTemperaturePanel.
Summary
On this third day you have written Java code and learned how to apply variables in expressions to perform calculations.
You have also learned the following:
- Create a user interface.
- Using expressions to perform calculations.
- Calling and determining the right methods from existing classes.
- Using variables as parameters for methods.
- Coming up with and creating new methods.


