
In this tutorial we will go through the steps of reviving an archived (student) portfolio website from the old portfolio server. Focus is on a site that was made using WordPress.
We will install a local webserver using XAMPP, a bundle that contains Apache (the webserver), PHP and a MySQL database. So the webserver can run on your own computer. But a similar procedure can also be applied to get the archived site running on an other hosting platform
(in that case skip the installation of XAMPP).
Before installing XAMPP, consider the PHP version needed. In our situation, the old server was running PHP 7.4, so we go for the version of XAMPP that has that.
Download and install XAMPP.
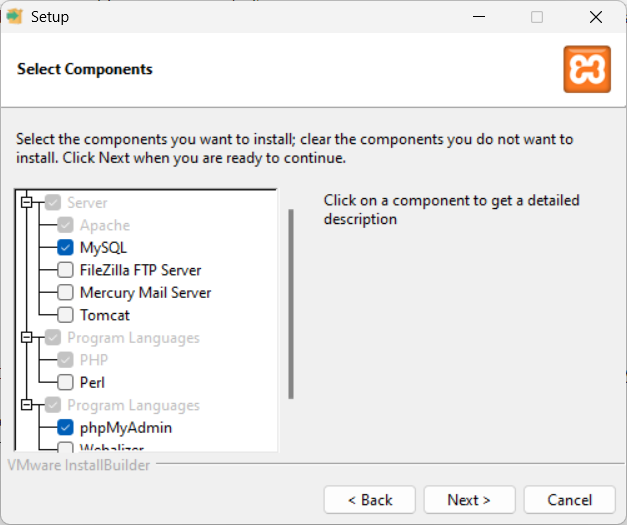
Select only the components you need: Apache, MySQL, PHP, PHPMyAdmin
On Windows, install XAMPP in the default location: C:\xampp
Using the XAMPP control panel, Start Apache and MySQL and check if http://localhost/ works.
Restore the site
A good tool to extract all kinds of archives, is 7-zip. Install that if you can not extract everything with the tools on your computer.
Make sure to extract all files from the site archive file (eg. site.tgz) into a temporal folder.
(the compressed files/zip/tar files must be completly extracted, so if inside that, there is another tar archive, extract that also)
Step 1: move site folder into xampp htdocs
If not there yet, Create the folder C:\xampp\htdocs\student\
Move students’ site folder into that:
Beware that the folder might be deep in subfolders: like srv\sites\portfolio.id.utwente.nl\webroot\student\xxxx
Move that folder into C:\xampp\htdocs\student\
Check if http://localhost/student/xxxx/ works (where xxxx is the name of the students’ site folder), it should give a message “Error establishing a database connection”
(because setting up the database is the next thing will will do)
Step 2: make user account & database
Open the wp-config.php file in a text editor (that file will now be in C:\xampp\htdocs\student\xxxx).
Add the lines below to prevent WordPress & plugins from updating while we are busy:
(if a line already exists that sets it to true, remove that)
define( 'WP_AUTO_UPDATE_CORE', false );
add_filter( 'auto_update_plugin', '__return_false' );
Save the wp-config.php file.
Now we need the database details. They are in the wp-config.php file.
In the XAMPP control panel, next to database, click ‘Admin’ to start phpMyAdmin (will open in browser).
In phpMyAdmin:
Click on “User accounts”, then under “New”, click “Add user account”.
Fill in the details:
User name: student number (DB_NAME/DB_USER) you get from the wp-config.php file.
Leave ‘Host name’ as it is (“Any host” and value should be ‘%’).
Password: copy/paste password (DB_PASSWORD) you get from the wp-config.php file
(paste again in the ‘Re-type’ field).
Check both options:
“Create database with same name and grant all privileges”
“Grant all privileges on wildcard name (username_%)”
At the bottom, press “Go”.
Step 3: import data
At the left, in the list of the databases, select the database that was just added.
Click Import, Choose file, and select the compressed SQL archive file (eg. s1234567.sql.bz2).
Press Import. (leave all options default)
This might take a while (you will not see any progress indications, so be patient).
If all goes well, you will get a “Import has been successfully finished…” message.
Step 4: fix database links
We must update the database to fix links pointing to the old URL of the website. As an example, we assume the old site was hosted on ‘portfolio.id.utwente.nl’ and we will keep the rest of the URL the same, then we must change:
https://portfolio.id.utwente.nl/student/xxxx to: http://localhost/student/xxxxThis piece of SQL code will do that:
update wp_options set option_value = replace(option_value,'portfolio.id.utwente.nl','localhost');
update wp_posts set post_content = replace(post_content,'portfolio.id.utwente.nl','localhost');
update wp_posts set guid = replace(guid,'portfolio.id.utwente.nl','localhost');
update wp_postmeta set meta_value = replace(meta_value,'portfolio.id.utwente.nl','localhost');
Go to the SQL tab in PHPMyAdmin, copy the piece of SQL code above and paste it into the ‘Run SQL query/queries …’ field there. Press Go to execute it.
Step 5: Check site/troubleshoot
Go back to http://localhost/student/xxxx/ and reload to see if the site works.
Troubleshooting:
Edit C:\xampp\htdocs\student\xxxx\wp-config.php file
change:
define( 'WP_DEBUG', false );to:
define( 'WP_DEBUG', true );Save it, reload the site, see what you got. If errors occur try Google-ing those to see if you can get any hints on the reason and maybe a fix.
If you are the owner of the site, try logging in to the Dashboad, via http://localhost/student/xxxx/wp-login.php