This tutorial will introduce you to coding MicroPython on a Raspberry Pi Pico. MicroPython is a version of Python that runs on a microcontroller, like the Raspberry Pi Pico.
Warning: this tutorial is for MicroPython and will not work for CircuitPython! There is a CircuitPython tutorial here.
To get started, you need an editor that helps you to write code in Python and can connect to the Raspberry Pi Pico. Two options for editors are:
Thonny is an editor specifically for Python programming, and focusses on beginners. Visual Studio Code is more advanced, and can be used for a wide range of coding applications. But Visual Studio Code is also good for beginners to start with and will in the long run provide a much broader use.
Both are offering features to communicate with the Raspberry Pi Pico. You may want to read a more comprehensive comparison. Below steps to setup both editors will be explained. You may pick one.
Setup Visual Studio Code
If you have not done so already, download & install both Python and Visual Studio Code. Detailed steps for the Python installation are here. At the first screen of the installation of Python, make sure to check the box that says “Add Python to PATH”.
After installation, if asked to reboot/restart your computer, do that first.
To check your installation, issue the command “py –list” or “python –version” (without the quotes) on a Command Prompt. It should list the version of Python that was just installed:
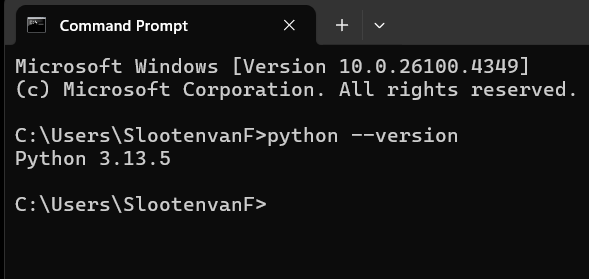
If this does not work, you might have forgotten to check the box that says “Add Python to PATH” at the Python installation. Or you did not restart your computer. If after a restart, it still does not work, you must uninstall Python, restart your computer, then start over.
Start Visual Studio Code. Go to Extensions:
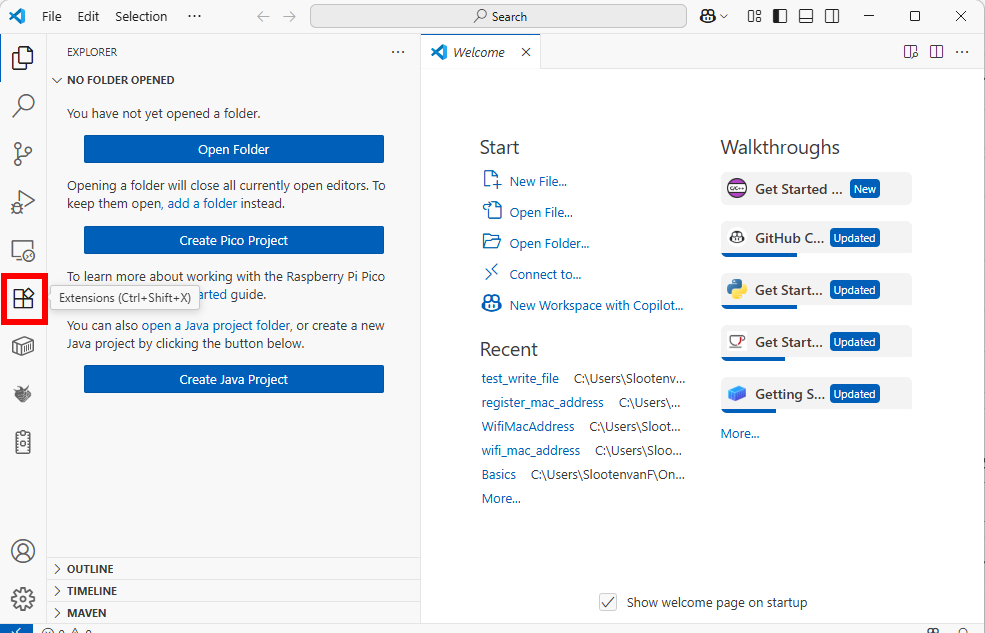
Install the extensions listed below. In short, you install an extension by searching for its name in the overview of extensions, then click “Install”. More details here.
Install these extensions:
- Python*
- Rasberry Pi Pico*
* some other related extensions (or dependencies) will be added automatically
After installing the extensions, restart Visual Studio Code.
Start a new MicroPython project (Visual Studio Code)
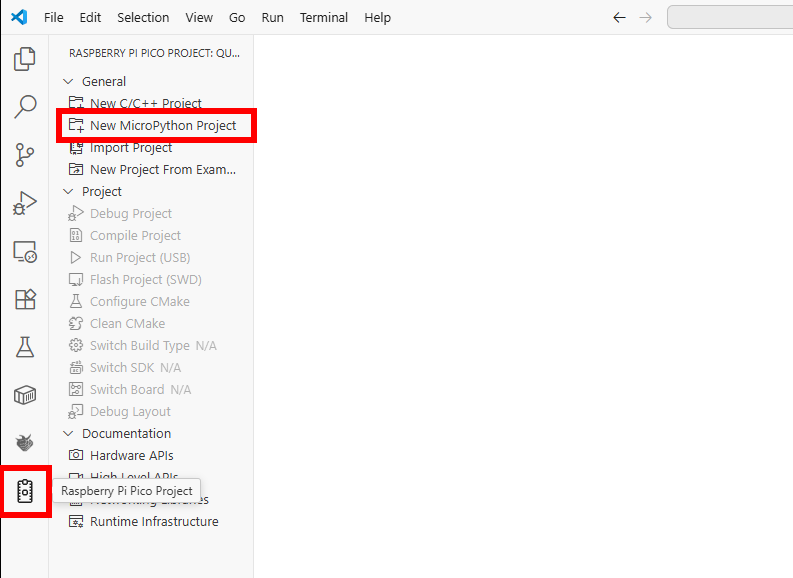
Now start a new MicroPython project: first click the Raspberry Pi Pico Project icon in the Side Bar on the left, then select “New MicroPython Project”:
Type a name for the project and select a location to store the project folder:
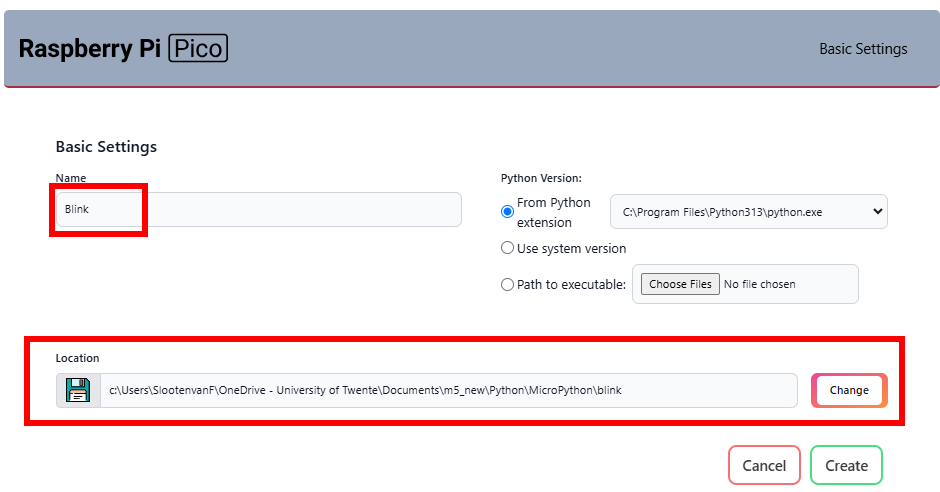
Press Create to create the project. You should see something like this:
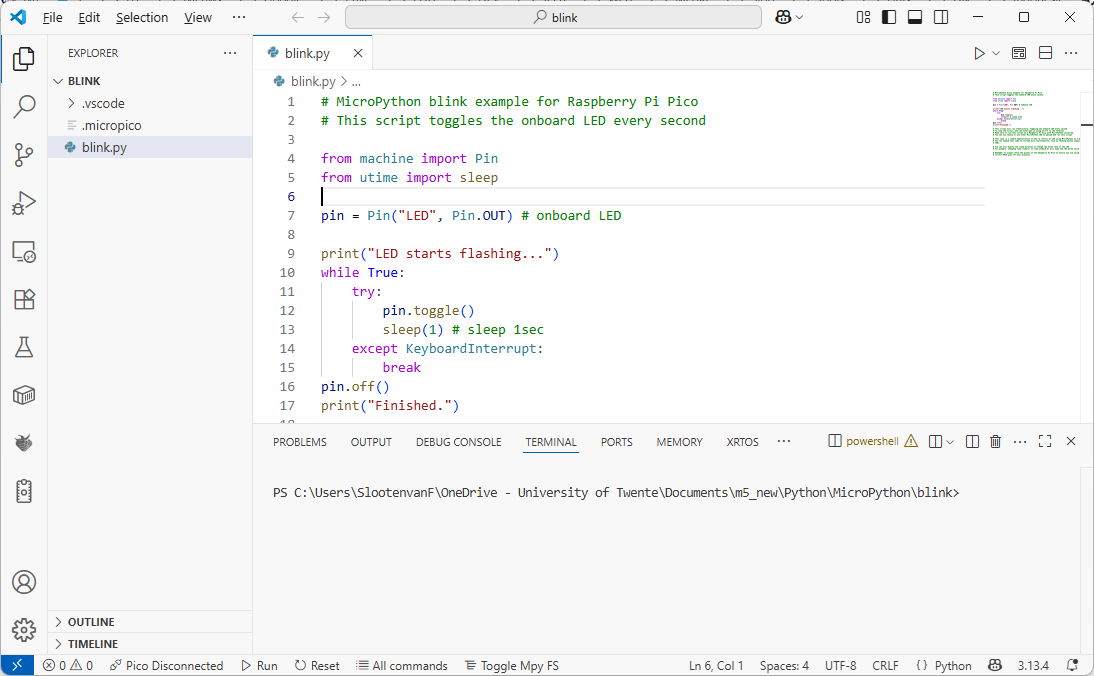
If the script blink.py is not open yet, double click it in the Explorer to open it.
Watch the Status Bar at the bottom: it displays “Pico Disconnected”.
Next, connect the Raspberry Pi Pico to your computer using a USB cable.
Now, the Status Bar displays “Pico Connected”:

If MicroPython is not installed on the Pico yet, it will stay “Pico Disconnected” and you might get a notification like this:
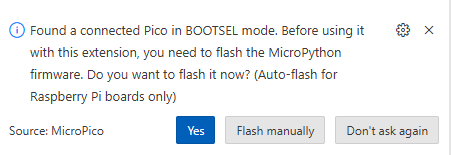
Ignore that (click “Don’t ask again”) and proceed to the section “Install MicroPython” further down this page. The reason for this is that the Raspberry Pi Pico Extension in Visual Studio Code might not detect the proper version of the Pico you have.
If you have a properly installed MicroPython firmware, the Status Bar should display “Pico Connected”.
Check the availability and version of MicroPython, as displayed in the Terminal:
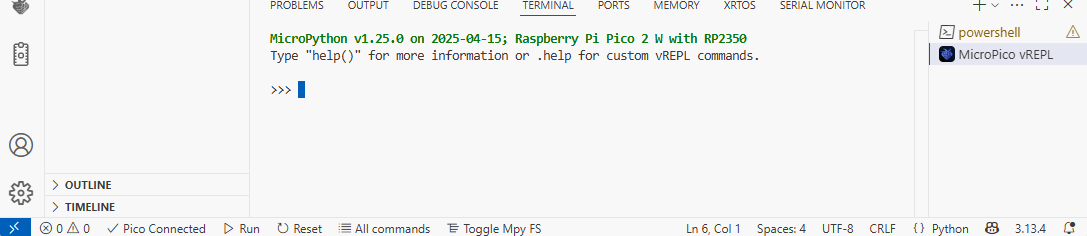
Check the version listed in the Terminal (here: v1.25.0) with the latest available version on the MicroPython site. Is that is newer, then follow the steps below, under “Install MicroPython”, to update it to the latest version.
If you have the latest version, you may scroll down to “Run Blink example with Visual Studio Code” to run the example and start coding.
Setup Thonny
(you may skip this if you installed Visual Studio Code)
A video tutorial that explains all this very well:
If you prefer not to watch the video, the steps explained shortly:
If you have not done so already, download & install the Thonny editor. As it comes with Python, you do not have to install that. If you need help with installing, scroll down to “Instructions & downloads” on the Thonny homepage to get to the instructions for your specific type of operating system.
Next, start Thonny.
It might look similair to this:

The error in the shell means it is not connected to the Pico (yet). So connect the Pico with the USB cable to your computer.
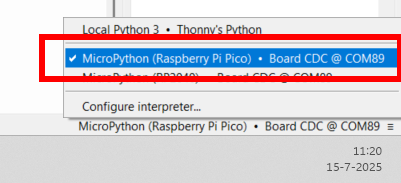
In the bottom right corner, select the connection to the Pico:
See if things work, by typing the command below in the Shell:
print("Hello world")and press Enter. It should output the text:

From the info in the Shell, you can also see which version of MicroPython the Pico is currently running. In this case, it is version 1.25.0. Check here which version is currently available. If your version is outdated, you might want to update the firmware.
If there is no connection and/or the print-statement does not work, or you have an outdated version of the firmware, you probably have to install the MicroPython firmware. You can do that from this page, scroll down to “Install MicroPython”.
Now try to connect to the Pico again, via the popup menu in the bottom right corner. Scroll up a bit in this page, and retry typing the print command. If all went well, this should now work.
Install MicroPython
In the last part of setting up your editor, we checked the availability and version of MicroPython on the Pico. If it was not installed yet, or if the version of MicroPython is old, follow the steps below to install it.
You can do this without the editor, then follow the “basic instructions” below, or from the Thonny editor:
Install MicroPython – basic instructions
Download the latest release of the UF2 firmware (my students will have a W-version of the Pico, check this on the board, it will have “Pico 2 W” or “PicoW”/”PicoWH” written on it). A full list of MicroPython versions for a broad range of other microcontrollers is here.
For my students, if you have “Pico 2 W” written on the board, download this firmware. If it’s “PicoW”/”PicoWH”, download this firmware (its at the bottom of the page, under “Firmware”, “Releases”.
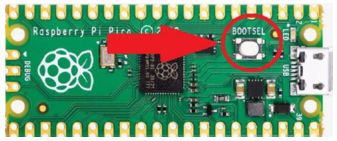
Next, connect the Pico to your computer while holding down the BOOTSEL button (it’s a small button on the Pico).
A drive will appear (check the File Explorer or the Desktop):

Drag/drop or copy the UF2 file into that drive and wait for the copying to finish. The Pico will restart, with the new MicroPython firmware.
Install MicroPython from Thonny
Right-click in the bottom right corner and select “Install MicroPython”:
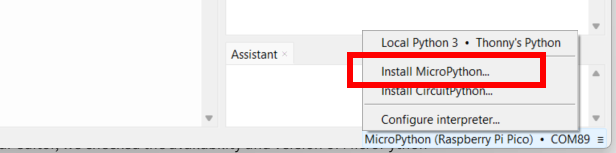
If the install menu is not shown, disconnect the Pico and reconnect it while holding down the BOOTSEL button on the Pico. Or click “Configure interpreter…” and then click the link “Install or update MicroPython”. If it still does not work, or follow the basic instructions.
Next, choose the appropriate options. Double check you have the right variant (as written on the Pico):
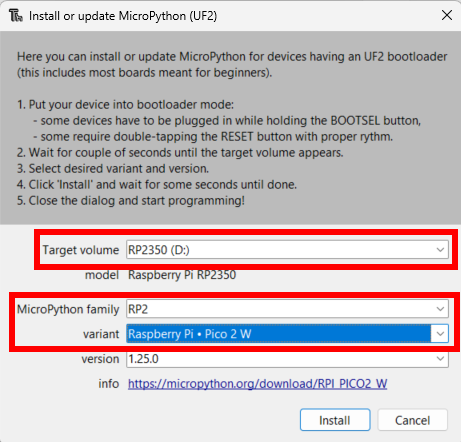
Press Install and wait until it finishes copying. Then Close the Window.
Note: Be careful when connecting and disconnecting the USB cable, as the connector on the Pico can be broken easily. (preferably, keep it connected to the Pico, and connect/disconnect the other end of the cable)
You may now test your setup by running the Blink example: make the onboard LED on the Pico blink. You may do so with your editor of choice: Thonny, or scroll further down for Visual Studio Code.
Run Blink example with Thonny
Start a new MicroPython project (Thonny)
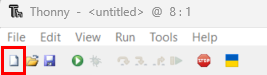
If there is no editor open yet, press the “New” icon or choose File > New.
Enter the code below into the editor:
# MicroPython blink example for Raspberry Pi Pico
# This script toggles the onboard LED every second

from machine import Pin
from time import sleep

led = Pin("LED", Pin.OUT) # onboard LED

print("LED starts flashing...")

while True:
    led.value(1)  # Turn LED on
    sleep(1)      # Wait for 1 second
    led.value(0)  # Turn LED off
    sleep(1)      # Wait for 1 second
Press Ctrl + S or File > Save to save the file. When asked “Where to save to?”, choose “Save to this computer”. Then locate a folder somewhere in your documents folder, where you are going to save your coding projects. Type the filename, eg. “blink.py” and press Save.
The Thonny editor should now look like the example below:
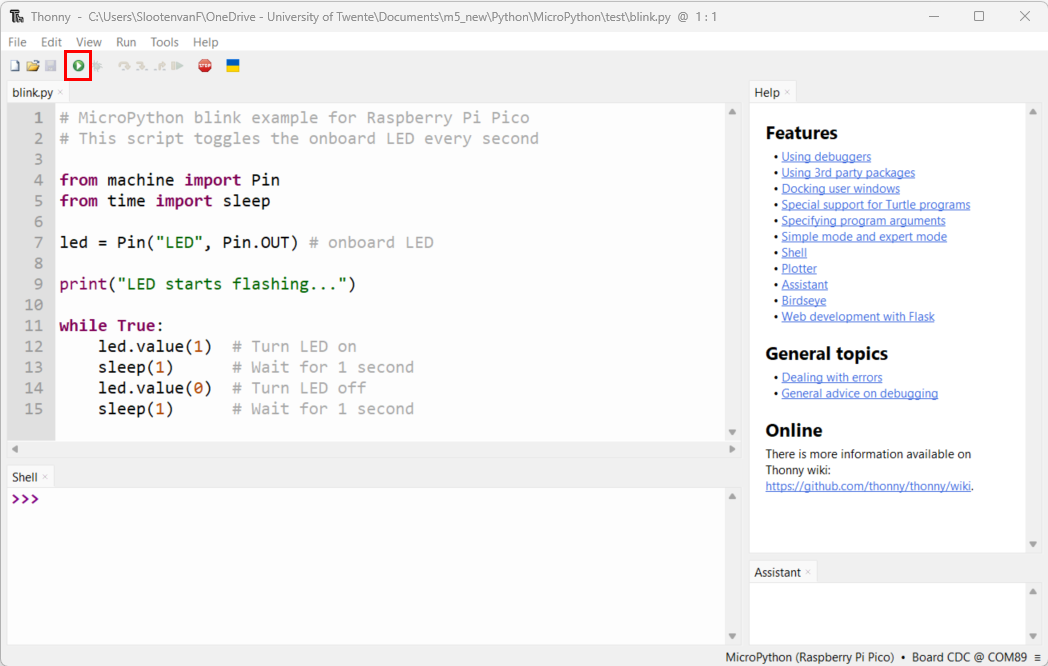
Now press the Run icon (see above). It should run, and show output in the Shell:
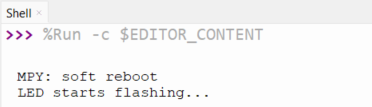
Notice the output of the script in the Terminal, and the Run button has changed to “Stop”.
Als check if the onboard LED on the Pico is flashing.
You are now ready for more fun projects with the Pico! (see below at “Learn more”).
Run Blink example with Visual Studio Code
If you do not have the Blink project open yet, do so. It was explained after the installation of Visual Studio Code, scroll back to the top at “Start a new MicroPython project (Visual Studio Code)”.
Your screen should be similair to the one below. Click the Run button in the status bar at the bottom:

It should run, and show output in the Terminal:
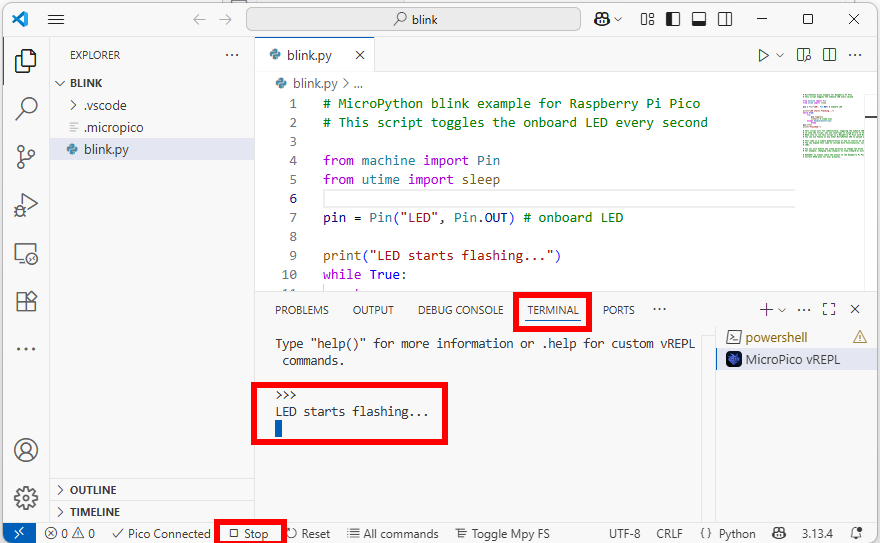
Notice the output of the script in the Terminal, and the Run button has changed to “Stop”.
Also, check if the onboard LED on the Pico is flashing.
You are now ready for more fun projects with the Pico! (see below)
Troubleshooting
If you get an error like this when running the script:

Or other import-related/module not found errors, make sure that you use the right “Run” icon: the one at the bottom of the screen:

Learn more
- My tutorials for the Raspberry Pi Pico, or more specific, with MicroPython
- Core Electronics: Raspberry Pi Pico Workshop for Beginners
- Random Nerd Tutorials: Getting Started with Raspberry Pi Pico (and Pico W) or Raspberry Pi Pico: HC-SR04 Ultrasonic Sensor (MicroPython) (distance sensor)
- e-book “Get started with MicroPython on Raspberry Pi Pico”
- More


