Assignment: design, build and test a “product counter” which is able to count various products passing by on a conveyor belt. The counter should have a display which displays: a) measured distance, b) whether there is a product in sight (or not) and c) the number of counted products.
Submit your results using the form at the bottom of this page (keep the page open and fill in the details while you work).
It is advised to do the practical in groups of 2 students.
Design considerations
What sensor to choose?
- Check rules of thumb (as stated in lecture)
- Distance sensor: which type? optical? or ultrasonic?
- Does sensor speed play a role? (the number of measurements it can do in a certain time) How is this related to for instance belt speed? (regarding sensor speed, for an ultrasonic sensor, compare the RCWL-series to the HC-SR04)
- Which sensor would you pick if you get to decide? (do research on internet)
- What sensor would you pick if you would not only have to count, but also uniquely identify each product?
- Which sensor do you pick from the available ones? (see below) Why?
Enter your answers to these questions in the form at the bottom of this page (at “Submit results”). Do not submit the form yet (this has to be done when you are finished).
Build sensor to measure distance
Before you start: install the Arduino IDE or Python, if you choose to code with that (details are in the tutorials below).
You can build the sensor using a combination of the components below (they are in the plastic box):
- Basic components: breadboard, wires, USB cable.
- An OLED display (start with step 1 of this tutorial)
- Sensors: (choose one)
- Ultrasonic distance sensor (HC-SR04) (for beginners, do step 1 – 3 of this tutorial)
- Optical laser distance sensor (VL53L1X Time-of-Flight Distance Sensor, this is not in the box, but available from teacher)
- Optical infrared distance sensor (Sharp GP2Y0A21YK0F, this is not in the box, but available from teacher)
- A micro processor (choose one):
- An Arduino Nano or BLE Nano (choose one of the sensor-pages above to learn how to use it)
- A Raspberry Pi Pico, programmed in Python (choose a tutorial with the laser sensor, or with the ultrasonic sensor)
Use a tutorial for a sensor from the list above to build your sensor. The Ultrasonic distance sensor (HC-SR04) tutorial is an all-in-one tutorial, most suitable if you are a beginner. Do step 1 and 2 of this tutorial.
Count products
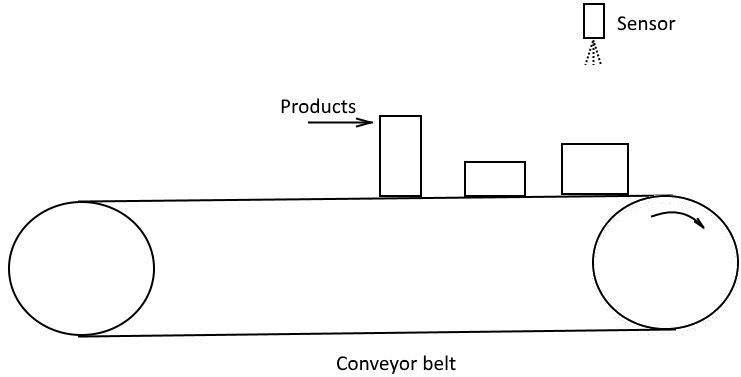
By now, you should have a working sensor which can measure distances. You can mount this sensor facing down above the conveyor belt, or you can mount it at the side. For example:

First step: detect a product
If for example the sensor is measuring 60 cm when there is no product, then this is our base. If then the measured distance drops (for a certain period), we know, something has passed our sensor. As a first step, try to incorporate something into your sketch which indicates the presence of a product (if a product is detected). An algorithm for this, in C (for Arduino) could be:
if (distance==0 || distance>=60) { // nothing seen
   // display: "NO PRODUCT"
}
else { // product in sight
  // display: "A PRODUCT!"
}
Learn more about if-statements in C (Arduino) or in Python.
Complete the code. Test your sensor with the new code on the conveyor belt. Does it work? Can it be improved?
Second step: start counting
Counting products can now be added quite easily: every time a product is in sight, and the previous state was “nothing seen” we can increase the counter. So we need two variables: a boolean (type bool) which keeps track whether there is a product in sight, and the counter, which is an integer (type int). Add these and make sure they get proper values. Show the value of variable ‘counter’ on the display and then test the results on the conveyor belt.
Increase the belt speed. If things do not work as expected, consider altering the timing of the loop (increase or decrease the amount of measurements). The call to delay()* at the end of the loop() can be used to change this. This has likely to be a shorter delay, to improve accuracy.
* In Python, the delay is realized with time.sleep(1)
Third step: avoid mis-counts
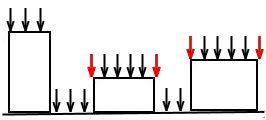
It is possible that readings contain glitches (short mis-reads). So never trust a single reading:

Only when you read something twice or more (black arrows) it can be more sure that detection is accurate. Can you incorporate this into your sketch also?
Solution
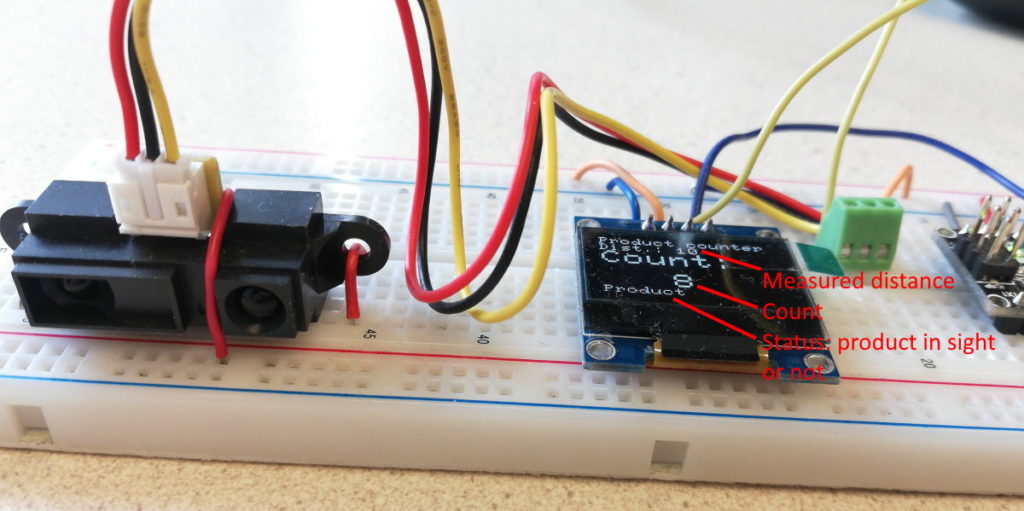
In the end, your solution should display the measured distance, counted products and status (whether or not there is a product in sight).

If you are unable to create a working solution yourself, you can get my solution upon request (email me). As a final challenge you can test that, and try to improve it if necessary.
Submit results
The form below may be used to submit the results of the sensor practical. Please submit the form when you are finished with the practical.