This tutorial can also be done in Python: the tutorial for that you can find here. This tutorial is part of a series. Make sure to start with the first, eg. if you have not setup Eclipse and your Java environment yet.

We are going to create an application that can draw a simple shape. This shape fills the screen, and might even scale when we resize the application. The color of the shape can be adjusted by entering the RGB values (three numbers) for the color components red, green and blue. These numbers can have values 0-255. Examples of how to draw shapes are given here.
Tutorial steps
- Design and create the user interface
- Write code for drawing
- Set color
- Read user input
- Drawing with different colors
- Draw the colored shape
- Make entry of numbers fool-proof
These steps are explained in detail below.
1. Design and create the user interface
The user interface consists of two parts:
- A part for entering the RGB values
- A part for drawing
We can use a Panel for both parts, which is a component which holds other components (a container). You can also draw in a Panel.
Start with a design: Draw (on paper) a sketch of the user interface that shows the division into two Panels. One of the Panels contains three input fields and an Ok-button (JButton) to execute the input of the values.
After you finish the design, you can start creating the user interface.
Start by creating a new project, via File > New > Java Project. Name the project “Assignment2_s1234567” (use your student number in the name). Do not create a module-info.java when asked (choose “Don’t Create”).

Add a JFrame: right click the Assignment2 project folder, choose New > Other. Browse to WindowBuilder > Swing Designer. Select JFrame and click Next. Name it “Assignment2GUI” and at ‘package’ fill-in “userinterface”.
Switch to the Design-tab. Set the layout to “GroupLayout”: click on contentPane, and select the Layout at Properties:

The steps to create a user interface are covered briefly here. If you do not remember exactly how to do this, check the first tutorial.
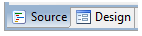
You can switch between the source code Editor and the WindowBuilder (Design) with the tabs at the bottom:
Tip: If the tabs do not appear, open the file by clicking it with the right mouse button: Open With > WindowBuilder…

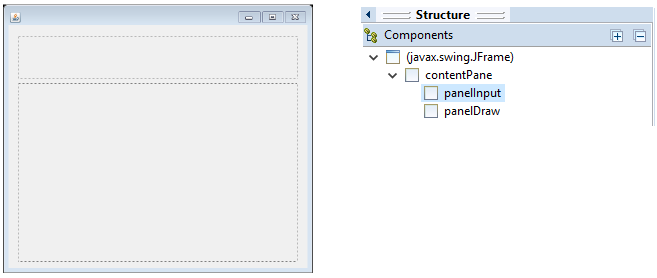
Now add two JPanels, a smaller one on top, which will be used for input of colors, and a large Panel, to be used for drawing below that (but you may use your design as inspiration here also). You can find JPanel under Containers in the Palette.
Give both Panels meaningful variable names as shown in the Structure below.
We use the top panel to input color values, so name that “panelInput” (under Properties, field ‘Variable’). The bottom panel will be used for drawing a shape. Name that “panelDraw”.
It will look this this, for example:
Set the layout of the smallest Panel to “GroupLayout”. Now add a label (JLabel), three text fields (JTextField) and a button (JButton) to this Panel and make sure it looks like:

Give the components meaningful names. Convert the button and panelDraw to class variables (fields):
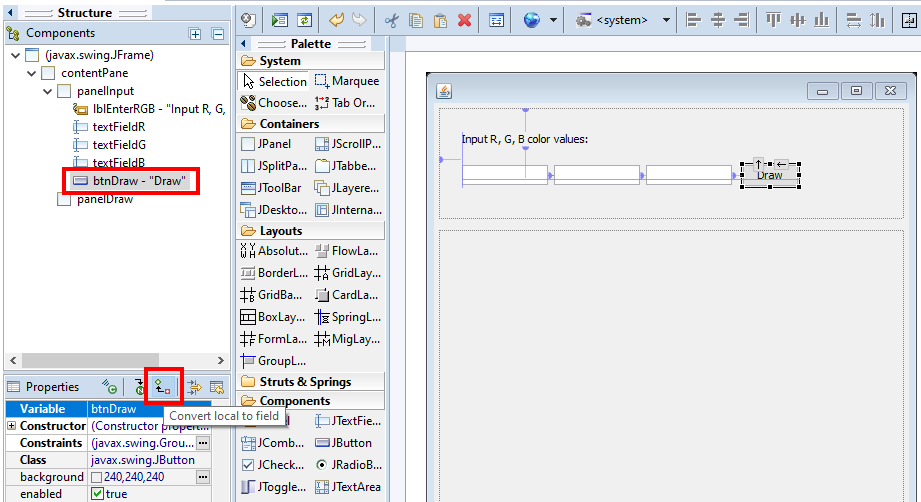
Check if the textfields are fields (class variables) already (they should be), if not, convert them also to field. Warning: the “Convert local to field” is a toggle button. If it already looks like below, it is already a field, and you do not have to change it:

The structure should look similar as shown below. Also pay attention to the location of the components. The new components are in the Panel that we use for input:

It is possible that your application does not properly fit in the Window. In that case, you can change the size of the window and various components to make it fit better. You can also look up the method call setBounds(…) in the code and change its parameters if necessary.
The user interface is now ready. Run your program using the Run button ![]() to check if everything works.
to check if everything works.
If you do not like the way the user interface elements are displayed, you can customize the style, using the Look-and-feel button at the top right of the WindowBuilder.

If you select Windows (located under JRE), it will look more like a Windows user interface.
Note: for this to work, you must first enable the “Apply chosen LookAndFeel …” option via Window > Preferences. This is located in the Preferences under WindowBuilder, Swing, LookAndFeel.
Now switch to the Source tab.
Make the draw-button the default button: To make the draw-button the default button which will be triggered when the ENTER key is pressed, add the following line of code at the end* of the constructor Assignment2GUI():
getRootPane().setDefaultButton(btnDraw);* to find the end, select the opening bracket ‘{‘ right after Assignment2GUI(), then scroll all the way down to find the matching closing bracket ‘}’ which will be highlighted. That’s the end. Add the line of code before that. See also today’s presentation: the explanation of “Code of user interface” (at the end).
If adding this last line introduces an error, check the name of the button, is that btnDraw? Or did you name that differently? Or did you forget to make the button a field? (scroll up if you missed that)
2. Write code for drawing
To be able to execute drawing commands we must create an extended version of the class JPanel.
Add a new class to the project (File > New > Class). Name it “DrawingPanel” and type “javax.swing.JPanel” at the field Superclass (see below).
Pay attention to upper case and lower-case characters when entering values for Name and Superclass here. For example, in javax.swing.JPanel you must write JPanel with a capital J and P! At Superclass, you may use the Browse button as help, to avoid mistakes.
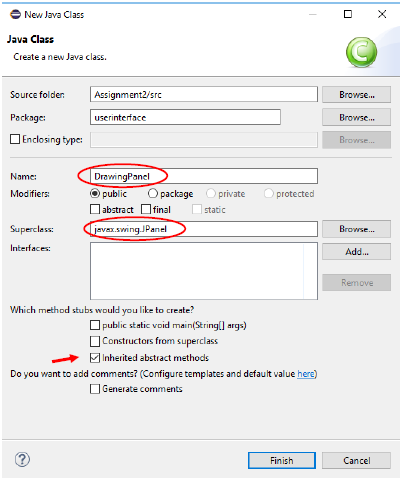
Before you press Finish, make sure the option “Inherited abstract methods” is enabled and other options are disabled.
Now save the whole project (File > Save All). (if everything is saved already that will be grey)
Also check if the project does not contain errors: if there are, fix those before you continue.
Morph the panel into a DrawingPanel
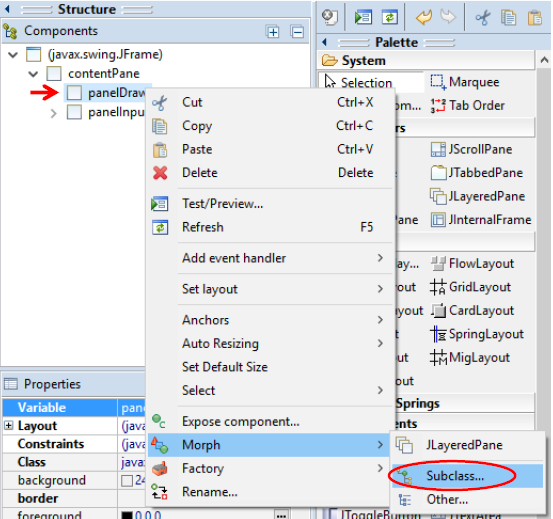
Next, we change panelDraw in the user interface into a DrawingPanel (this is called morphing, changing the class into another: the class of panelDraw is now JPanel, and will become DrawingPanel). Right-click the panel in the list of Components and select Morph > Subclass:
Type “DrawingPanel” in the text field and click on Ok:

Now a drawing method can be added to the DrawingPanel class:
Switch to DrawingPanel.java (if not opened in a tab yet, double click it in the Package Explorer). Select Source > Override/Implement Methods… from the menu.
In the list that appears, find JComponent and open that (click on the triangle in front JComponent):
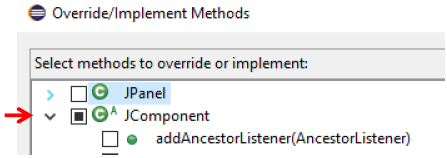
Find the paintComponent() method of JComponent and select it. Then click OK.

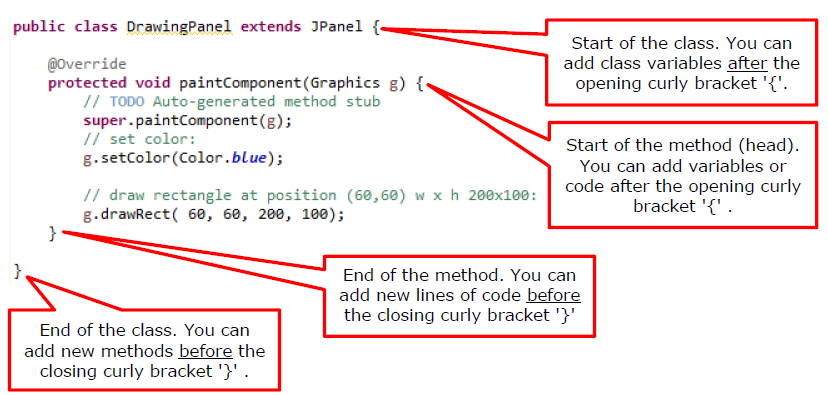
The code now looks like the example below. If the parameter has a different name than ‘g’, for instance, ‘arg0’, change the parameter arg0 to g:

You can now add drawing methods (of the Graphics class) to the method just created. Use the examples in the appendix to draw a few sample shapes. In the examples, the parameter of the paintComponent() method has the name ‘g’. If the generated code uses arg0 as a name for the parameter, its useful to also change its name into ‘g’. This will make it easier to copy code from the examples into the paintComponent() method. Make sure you add the drawing code after the line with: super.paintComponent(g);
Run your program using the Run button to check if the shapes are drawn correctly. If not, check if you did not forget steps, like the morphing (re-check everything in this step).
Add variables and methods to a class
In the next section, methods and variables are added to a class. Variables are usually added at the beginning of the class (class variables) or at the beginning of a method. Methods are usually added at the end of the class. Where that is exactly, is explained below.
Curly brackets ‘{‘ ‘}’ are sometimes called curly braces also. In Dutch, they are called ‘accolades’.
3. Set color
To draw with a certain color, the DrawingPanel class must be able to remember the drawing color. Drawing with Java and the related techniques are explained in the appendix.
First add a variable for the color to the DrawingPanel class. Do this at the top of the class, on a blank line after the opening bracket ‘{’:
Color drawColor;This variable is of the type Color. This is a class from the Java library awt. If this is the first time you are using it, a light bulb appears in the margin and red lines will appear underneath the unknown word. Click on the light bulb and double-click on “Import Color” (or press Ctrl + Shift + O) to use Color from the java.awt library (we will import that library):

We are going to make the default color black by assigning a value to the drawColor variable. To do this, we change the line with the variable we just created into:
Color drawColor = Color.black; // default drawing color blackWe now need to add a method which can set the color (assign a value to the variable drawColor).
This method is given below. Add the code to the DrawingPanel class. Note the location: Add the code at the bottom of the class, on a blank line just before the last closing bracket ‘}’. This method gets three variables r, g and b as parameters and uses those to create a new color (new Color) which is assigned to the class variable drawColor that we have just created.
public void setColor(int r, int g, int b) {
    drawColor = new Color(r % 256, g % 256, b % 256);
    repaint(); // draw again because the color has been changed.
}
If errors appear after you have added this method, undo it (press CTRL-z). You then have added it at the wrong spot. Browse up a bit to the last paragraph of part 2 of this assignment, to learn where to add new methods.
4. Read user input
Tip: Learn more on input of integers in the presentation of the lecture.
Double-click on the Draw-button in the user interface to create an Event Handler. You also did this in the previous tutorial.
To read the values entered from the text fields, you must call the getText() method of the text fields. The output (the result) of this method is a String. Therefore, we first declare a variable of type String and assign the outcome of the call of the getText() method to it. This is done as follows:
First type the declaration of the variable followed by an = sign to assign the value:
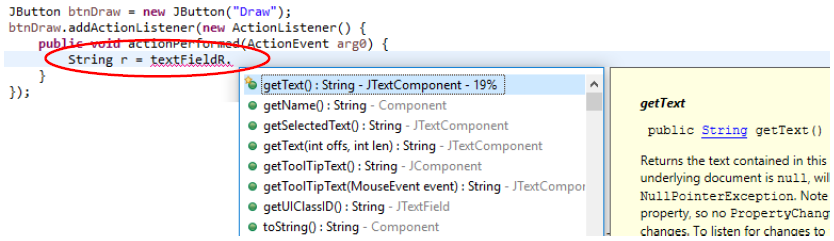
String r =Behind this, type the variable name of the text field:
String r = textFieldRIf we type a dot immediately after this, we get a list of methods of the text field. Find the getText() method in that list and click on it to read the documentation of that method:
After double-clicking on the method, it is added to the code:
String r = textFieldR.getText()Add a semi-colon ‘;‘ at the end to finish the line of code:
String r = textFieldR.getText();On the next line, you can display the value entered in the Console, by calling the println() method:
System.out.println("Input value for red: "+r);When the program is running you can use this to check if entering numbers works. Run your program to check if entering a number in the field for red works (press the Draw-button). You should see this in the Console Window:

If the Console is not visible, you can show it via: Window > Show View > Console.
You must now repeat these steps for reading and displaying the values entered for the green (g) and blue (b) text fields and make sure that all three values are displayed in the Console.
5. Drawing with different colors
To draw using the color values entered we need to call the setColor() method of the DrawingPanel class in the Event Handler we have just created. This method expects three integers (r, g and b) as parameters. However, in the Event Handler the three values from the text field are read as a String (which is text). Therefore, we must convert the String to an integer (a number). To do this, add this code (at the end of the Event Handler):

Tip: if you do not remember exactly where the Event Handler (of a button) is, you can always double-click on the button in the Window Builder.
Repeat this for the g and b values.
Now add the call of the setColor() method to the Event Handler:

We assume that you have named the Panel for drawing “panelDraw” (at step 1). You might notice that an error occurs here. Even if you do not experience an error, please read on.
The problem might arise, when building the user interface, the order of creation of components might differ. If button btnDraw is created before panel panelDraw, the variable panelDraw will not be in the same scope (the region in the code where a variable or object is valid).
To solve this, these variables must be defined as a class variable (sometimes also called a field). A class variable is always defined at the top of the class and accessible in all methods of the class. Check which variables are defined at the top of the class. There should be at least the panelDraw and btnDraw variables and the variables of the textfields:

If one of the variables in your code is missing here, convert them to fields (switch to Design), as explained in step 1 and re-do the part “Convert the button and panelDraw to class variables (fields)”.
If you did get an error message at the call of the setColor() method, that should have disappeared now, because the panelDraw variable is now valid in the entire class, instead of only in (part of) the method: it has become a class-variable.
6. Draw the colored shape
To make sure the selected color will actually be used for drawing, we need to set the drawing color in the paintComponent() method in DrawingPanel.java. If you have used an example from the appendix, you have already set the color by calling the setColor() method. This call must now use the color variable drawColor as a parameter. Find the call for the setColor() method and adjust this as follows:
Check if previously added (test) shapes are now drawn using the specified color (enter values for r, g and b and click on the button).
You now must draw a more complex shape. Some possibilities: a mushroom, a traffic light or a pie. The shape must consist of at least two different basic shapes.
Use your own creativity to draw the shape you have chosen. Remember that you can get help to find out what kind of drawing methods there are. You can get help in different ways:
- In Eclipse: in the paintComponent() method, enter a ‘g’ (the Graphics-object), followed by a dot, after which all methods of the Graphics class are listed; click on one to see what it is/does. Drawing methods start with “draw…” or “fill…”. Double click to use it.
- Google: search for terms like “java draw figure” or “java draw nice icon” and so on. You might like for instance the Android-icon.
- The API description of the Graphics class
Delete the test shapes you made earlier using the drawing methods (or place them in comments).
Please note that some examples you may find on the internet might use the Graphics2D class instead of the Graphics class. If that is the case, add the following line before the drawing code:
Graphics2D g2d = (Graphics2D)g; // convert standard Graphics g to a Graphics2D objectIf you want the dimensions of the shape to be dependent on the size of the Panel in which is drawn, you can do that as follows: You can retrieve the width and the height using methods getWidth() and getHeight().
To draw a rectangle that creates a horizon effect in the drawing, you can use this code:
int h = getHeight(), w = getWidth();
int horizon = h/2-20;
g.setColor(Color.lightGray);
g.fillRect(0, h-horizon, w, horizon);
7. Make entry of numbers fool-proof
The application is not entirely fool proof. What happens when we start the application and click the Draw button without filling in color values? Check the output in the Console. A red error message like the one below probably appears here. If you scroll up, you will see that this is an “Exception”: something Java is unable to run.
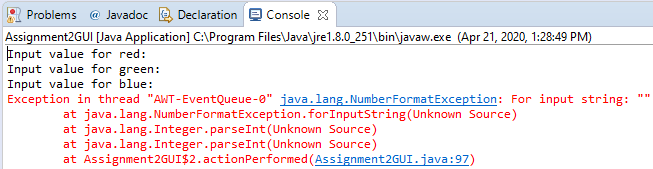
In one of the lines at the top you will also see a reference to a line number in a Java file. That’s where the error occurs. It is probably one of the lines with a call of the parseInt() method. This method cannot handle a parameter that is not an integer. In this case, it is an empty String.
To solve this problem, we could check if there is an integer in the relevant field. And if not, we place a zero (0) in the field.
We can use r.matches(“\d+”) to check if the String read in variable r only contains digits (integers). This expression is true if the String consists of integers. Using the Boolean not-operator, an !, we can then build this if-statement:
if (!r.matches("\\d+")) { r="0"; textFieldR.setText(r); }Insert this line at the location after the call to getText() (after reading the String). Repeat for the g and b values.
Test the application.
Summary
With this tutorial you have written Java code and learned how to apply variables in expressions to perform calculations.
You have also learned the following:
- Create a user interface.
- Read and use values in a user interface.
- Use drawing methods.
- Use of variables in expressions.
- Apply mathematical functions.
- Find information using the online help function.
Learn more
Please practice your drawing skills with the information in the Appendix: drawing with Java graphics.


