Java tutorial: prototype an ATM with Eclipse
In this tutorial, we create a prototype of an ATM as an example of prototyping Userinterfaces. The Axure version of this tutorial can be found here.
What you need
- Eclipse IDE for Java Developers
- JDK version 8 (it will not work with version 9 or 10!)
The focus of this tutorial is to realize the interaction, not on design or ergonomics. Basic knowledge of Java and Eclipse is recommended. A demo version can be downloaded and tried here.

Start
Create a new Java Project via File > New > Java Project. Name the project "ATM". Then create a new JFrame via File > New > Other, WindowBuilder > Swing Designer > JFrame. Also name this "ATM".
![]() Switch to the Designer. Increase the JFrame to approximately 570 x 430 by pulling the outer edges.
Switch to the Designer. Increase the JFrame to approximately 570 x 430 by pulling the outer edges.
Then set the layout of contentPane to Absolute layout (right-click > Set layout).
We can now build the Userinterface.
Create the main display
The main display will be a JPanel containing a JTextPane with a welcome text and the name "maintext".
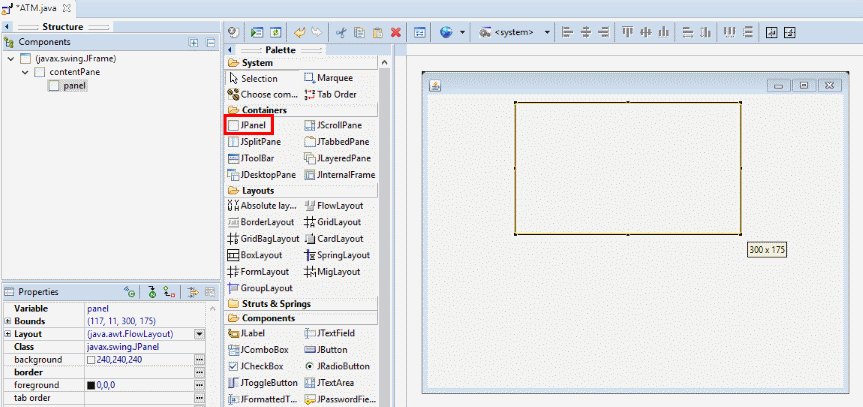
We first draw the JPanel: click (with the left mouse button) in the Palette on JPanel. Then click in the drawing area.
Place the JPanel at the top in the middle, leaving enough space for the panel with number buttons, etc.
By pulling the dots you can adjust the size, see below. Give approximately the same dimensions (300 x 175) as the example below.
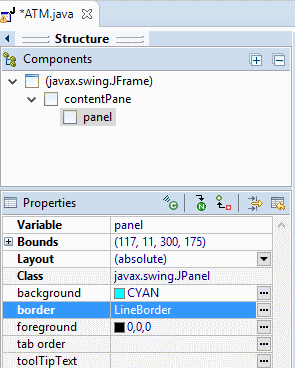 Now set the Layout of the panel to Absolute layout and set the background color to a light tint,
eg light blue.
Setting the background color (background) and Layout can be done via the Properties.
If you want, you may change the border also.
We use a LineBorder of 2 pixels thickness and rounded corners.
Now set the Layout of the panel to Absolute layout and set the background color to a light tint,
eg light blue.
Setting the background color (background) and Layout can be done via the Properties.
If you want, you may change the border also.
We use a LineBorder of 2 pixels thickness and rounded corners.
Next, place a JTextPane in the center of the panel.
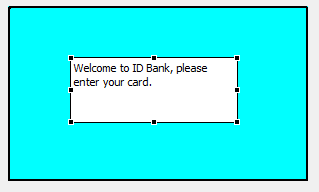
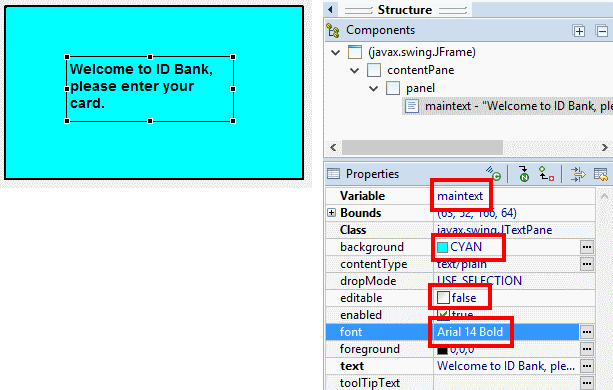
Set the text: "Welcome to ID Bank, please enter your card.". Change the variable name of the JTextPane into "maintext". Give the JTextPane the same background color as the panel and give it a slightly larger font. We use a Bold 14 point Arial font here. Uncheck editable.
It now looks like this:
Save your work by clicking Save ![]() .
It is wise to do this regularly.
.
It is wise to do this regularly.
2. Create card and slot and realize the entry of the card
We add these components to the contentPane (make sure it is selected). We draw the card and the slot, these are both JPanel's. Place the card all the way to the left. Set the width of the card to 60, adjust the background color (Fill Color). Place the slot right under the main display, make it 20 pixels wider than the card, so 80.

Name the panels "card" and "slot". The slot gets a slightly thicker border: a LineBorder with rounded corners of 4 pixels wide.
Because we want to animate the card, we create a separate class for it, which will get a method that allows the card to move and disappear into the slot.
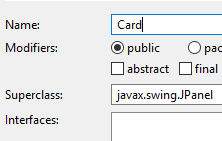 Add a new class to the project (File > New > Class).
Name the class "Card" (with a capital C) and type at Superclass "javax.swing.JPanel"
(the card becomes a derivative class of JPanel). Press Finish to add the class.
Add a new class to the project (File > New > Class).
Name the class "Card" (with a capital C) and type at Superclass "javax.swing.JPanel"
(the card becomes a derivative class of JPanel). Press Finish to add the class.
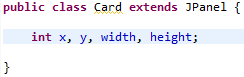
Because we move the card (change position) and also change size (We make the card smaller and smaller to get the illusion that it disappears in the slot), The class must be able to 'remember' the position and size. We use 4 variables for this: x, y, width and height. These will be 4 integers (type int), which we add as class variables:
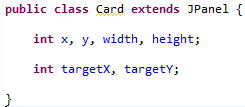
Because the card moves to the slot, we must also be able to capture the target position. To do this, we add the targetX and targetY variables:
To create an animation in Java, we can draw an object at a changing position with a Timer. We add a Timer to the class, which for each clock-tick, draws the card at another position. We also need to start the animation from the Userinterface. We make a method for both actions.
The method that is called on each clock-tick we name 'update'. And the method that starts the animation is named 'moveToTarget' because we move the card to a target (the slot). Below is a layout for the two methods, including pseudo code as comment:
private void update() {
// determine new position
// draw card at new position
// if target-position reached: stop timer (stop animation)
}

public void moveToTarget(int tx, int ty) {
// set target position
// set starting position (the position at which the card has been drawn originally)
// set dimensions
// start Timer (clock starts ticking)
}
You can copy the above code with copy-paste into the class Card.
We begin to further develop the moveToTarget method. This has already got two parameters, the tx and ty, this is the position of the target (the position it will move to). Capturing the target position is a simple matter of setting the class variables we already created:
targetX = tx;
targetY = ty;
The determination of the starting position and the dimensions can be done by asking the object what its current values are. Because the class Card is derived from JPanel, which is a standard Userinterface component, we can use methods already available to request position and size. These are the getX() and getY() methods for the position, and getWidth() and getHeight() for the dimensions. The assignment for the x is thus: x = getX(). You can fill in the rest (y, width and height) yourself.
Before we can add the last line: "start Timer", a timer must be added to the class. Timer is a class from the javax.swing library. We add this as class variable (top of class!):
Timer timer = new Timer(5, (e)->update());As you can see, we've initialized it already (with 'new'). The 2 parameters of the constructor are the time of 1 clock-tick in milliseconds (5), and a reference to the update() method. The Timer will 'tick' every 5ms and call the update() method at every 'tick'.
We can now complete the last line of the method moveToTarget(), which will start the timer. This can be done by calling the timer() method of the timer:
timer.start();The update method()
This method consists of three parts:
// determine new position
// draw card at new position
// if target-position reached: stop timer (stop animation)
When determining a new position, we need to make sure that the x and y of the card come closer to the target. Because the slot is the target, we know that it has a higher x position and a lower y position. We need to increase x and lower y. The difference in y position is only very small. That of the x is larger. With this in mind we increase x by 10 and decrease y by 1:
x = x + 10;
y = y - 1;
You can vary with these values at your own discretion.
In order to draw the card to the new position we need to tell the card its new position.
This can be called by calling the setLocation(x, y) method and then repaint().
To check if the card has reached the slot, you can use the if-statement below. If the target is reached, the timer can be stopped, this will end the animation.
if (x>=targetX && y<=targetY) {
	timer.stop();
}
To use this class in the Userinterface we need to morph the card (a JPanel) to the class Card.
Important: before you continue Save all files in the project by pressing "Save All" (next to the Save-icon).
In the Userinterface, right-click the card and select Morph > Subclass. In the search field under "Select a type", type "Card", select the class Card, and press OK.

We are going to make sure that the animation is executed when the card is clicked. We do this by adding an event handler to the card that responds to mouse clicks.
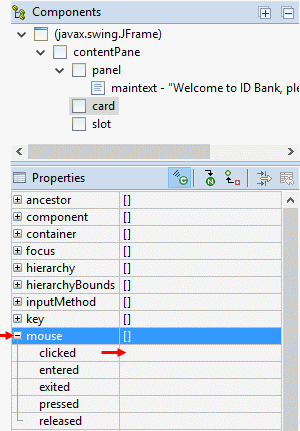 Select the card. At Properties click the icon for the events
 ![]() .
Open the mouse events by clicking the "+" sign in front of "mouse".
Double click in the empty field behind "clicked".
.
Open the mouse events by clicking the "+" sign in front of "mouse".
Double click in the empty field behind "clicked".
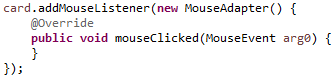
An event handler is now added to the source code:
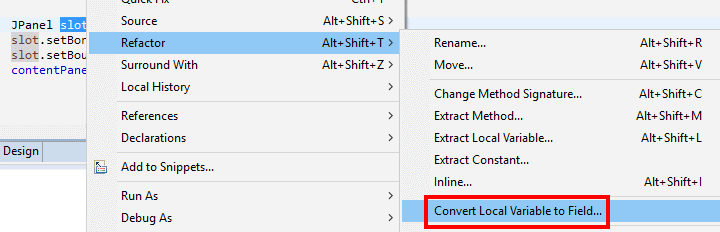
Before we can add code here, we must first ensure that the slot becomes a class variable. (It is now a local variable in the constructor) We need the position of the slot in the event handler (this is the target of the animation of the card). Find the definition of the slot in the code, click it with the right mouse button and choose Refactor > Convert Local Variable to Field ...:
Click Ok to accept the default options.
We can now call the method of the card that starts the animation in the eventhandler mouseClicked():
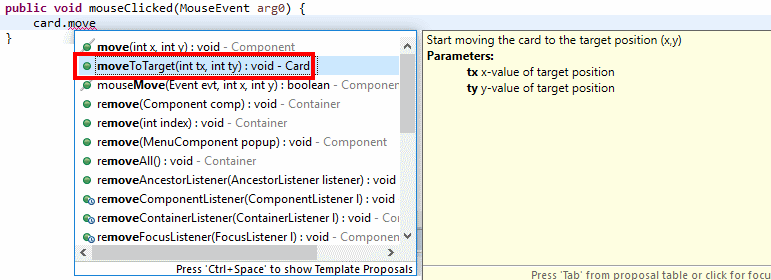
Double-click the found method (moveToTarget).
The target-position of the animation will be the position of the slot.
Therefore, replace the parameters by the slot position:
slot.getX() + 10 and slot.getY() + 10.
Because of the small offset of 10, the card will fit into the slot nicely.
Press Save All. And run your program to test it. The card probably shoots over the slot. This is because in the update() method of the card, the if statement only checks whether both the x and y values are beyond the target. It would be better if we checked the target at the beginning of the method, and only increase the x and y values if the target is not yet reached. This can be done by adding two if-statements:
if (x<targetX) x = x + 10;
if (y>targetY) y = y - 1;
Now, the card should move neatly towards the slot.
For the second part of the animation, we reduce the height of the card so it appears as if the card disappears in the slot.
The if-statement at the end of the update() method of the card checks whether the card has arrived at the slot. If this is the case, we can instead of stopping the timer, lower the height to zero. If the height is 0, then we can stop. In pseudo code:
if (x>=targetX && y<=targetY) {
// lower the height
// adjust dimensions
// if height is 0, stop timer
}
To decrease the height we do this: height = height - 1;
To adjust the dimensions we can use the setSize() method: setSize(width, height);
The last line becomes a new if-statement: if (height == 0) ...
The complete code for the update() method looks like this (your solution might differ slightly):
private void update() {
	// determine new position
	if (x<targetX) x = x + 10;
	if (y>targetY) y = y - 1;
	// draw card at new position
	setLocation(x, y);
	repaint();
	// if target-position reached: stop timer (stop animation)
	if (x>=targetX && y<=targetY) {
		// lower the height
		height = height - 1;
		// adjust dimensions
		setSize(width, height);
		// if height is 0, stop timer
		if (height<=0) timer.stop();
	}
}
Test the program using the Run button. If it's ok, the card will disappear in the slot.
3. Enter PIN code
After the card has been clicked, the this text (maintext) may appear:
"Enter your PIN, and press OK".
In the Userinterface, locate the mouseClicked() eventhandler and after the call of the moveToTarget() method of the card,
append a call to the setText() method of maintext that sets this text.
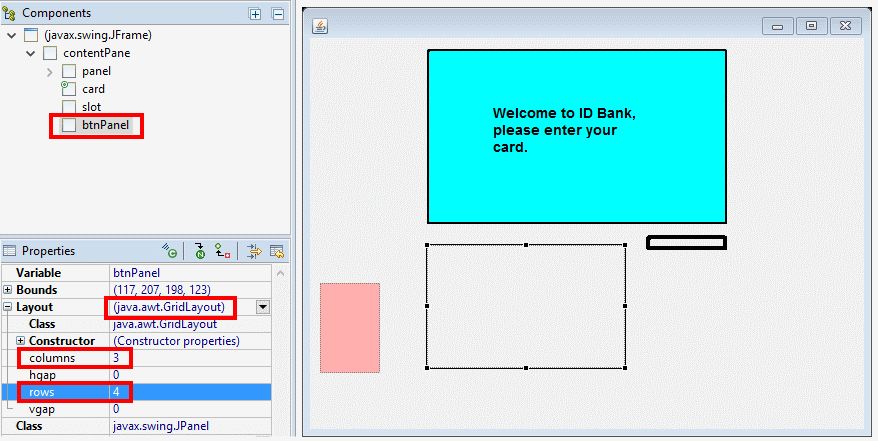
Now add a new panel under the main panel where we will format the number keys. Name this panel btnPanel, set the layout to GridLayout and set the grid to 3 columns and 4 rows:
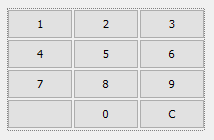
The PIN will be entered with the number keys that are clicked. Now add 12 JButtons to the panel btnPanel.
Click the button at the top left, and name this btn1 and set the text with "1". Then click the button next to it, name this btn2 with text "2" etc.
In the bottom row, the middle button becomes "0" and the bottom right button "C", name this btnC. We do not use the bottom left button, give this a blank text. The button panel will look like this:
If you wish, change the layout of the buttons at your discretion. For example, you can give the C button a red background. The background of a button is only visible as a thin border. If you want the entire background to be visible, add the code below after the call of btnC.setBackground().
btnC.setUI((ButtonUI) BasicButtonUI.createUI(btnC));
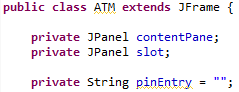
Next, add a class variable pinEntry of type String to the ATM Class and empty it:
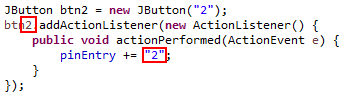
We can assign eventhandlers to each button by double clicking on the button in the designer. Do this for btn1 and add this code to the eventhandler:
pinEntry += "1";
Repeat this for the remaining number buttons, use corresponding values. This will increase the String pinEntry with the number corresponding to the corresponding button. Switching to the Designer and then double-click the button can be cumbersome, Can you also do this by code by copying the piece of code from the event handler, Then adjusting the number behind btn and the number in the string:
At btnC, you can empty pinEntry:
pinEntry = "";
No PIN should be entered if the card has not yet been entered into the slot.
Therefore, you can clear pinEntry after the card has been entered.
Add pinEntry = ""; to the mouseClicked event handler of the card also.
Would you like an asterisk to appear every time a number key is pressed?
Then add the following to each event handler of the number buttons:
maintext.setText(maintext.getText()+"*");
To ensure that the asterisks appear on the next line of the main text, add '\n' to the line which displays the "Enter your PIN..." line:
maintext.setText("Enter your PIN, and press OK\n");
4. Check PIN
We add 8 buttons without text next to the main display. Make sure they are aligned neatly. You can first make four on one side, then select all 4 (hold shift key) and then copy them to the other side. Next, add 2 labels "Cancel" and "Ok" on the display next to the lower buttons:

Name the button at the bottom left btnCancel and the bottom right button btnOk. Name the labels lblCancel and lblOk. The names of the other buttons and labels will be added later.
The labels only have to be visible after the card is inserted. So we hide them. Select lblCancel, click Properties on the advanced properties icon:
![]()
Scroll all the way down to the list and uncheck "visible":
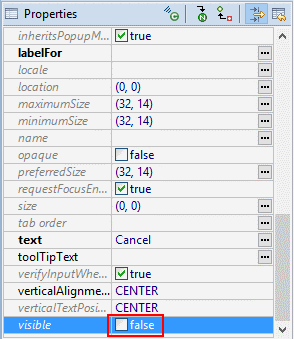
Do the same for the label lblOk.
To make the labels visible when the card has been entered, Can you invoke the setVisible() method in the mouseClicked event handler of the card for both labels:
lblCancel.setVisible(true);
lblOk.setVisible(true);
Check if the labels are invisible when starting the Application and become visible after clicking the card.
Now, if we press the Ok button, we can check the PIN. Select the Ok button (BtnOk) and double-click it to create an event handler.
We will check the value of the variable pincode entry is equal to "1234". We use the value "1234" as good value for the PIN (for the demo). To compare a String with a given value, we can use the compareTo() method. This method, as a parameter, gets a string to compare the String with. The method returns 0 if the String are the same. The call of the compareTo() method will look like this:
pinEntry.compareTo("1234")
An if statement that checks this expression would look like this:
if (pinEntry.compareTo("1234")==0) {
   System.out.println("PIN Ok");
}
else {
   System.err.println("Wrong PIN");
}
The next action for the ATM if the PIN is in order is to ask for the amount of money. This will be dealt with in the next step.
If the entered PIN was incorrect, we will send the message "PIN was incorrect. Try again." Again, the variable pincode entry will be cleared. In the else part of the above if-statement call the setText() method of the maintext label to display this message and clear the variable pincode entry.
Test the application with both a good and a wrong PIN before continuing.
5. Choose amount
To allow the selection of a fixed amount, we add the remaining labels 20, 50, 70 and 100, 150, 200:
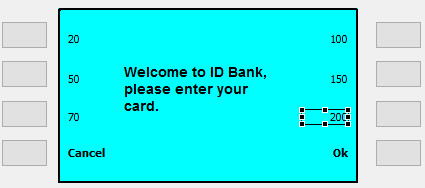
Name the label to the left above lbl20 and enter its text "20". In the same way, do the other 6 labels. Make all labels invisible (advanced properties: visible extensions). Name the corresponding buttons next to them btn20, btn50 etc.
As with the PIN, we make a new class variable for the amount. Name this "amount", the type can also be String. We give this variable a value in the event handlers of the buttons for the amounts. Double click the Btn20 button to add the event handler and add the following 2 lines of code:
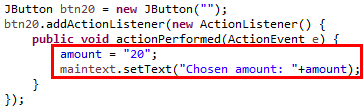
Repeat this for the remaining buttons (Btn50 ... Btn200).
After entering the PIN, the labels of the amounts must be visible and the text in the main display must show the following message: "Choose amount and press Ok.". This has to be added to the event handler of the Ok button (BtnOk). First, set the text of maintext with the setText() method:
maintext.setText("Choose amount and press Ok.");
Do you get an error when using labels in the event handler?
This is probably because Ok button's definition appears before the labels.
You can solve this by moving the complete Ok button (BtnOk) code so that it comes after the labels.
Make sure you add it at the proper place in the if-statement (it should only be done if the PIN is Ok).
Visibility of the labels can be set as follows:
lbl20.setVisible(true);
Do this for all 6 labels that show the amounts.
Test the application. Is the chosen amount displayed?
6. Eject note
If at this stage, the Ok button is pressed, we are having a problem. The code in the eventhandler is still from processing the PIN. We can distinguish between these two phases in the process by looking at the variable amount. If it has a value (it is not empty) then we are in the phase of ejecting the money. Therefore, we will reset the variable amount after input of the PIN.
In the eventhandler of the Ok button, add the line that will clear the variable amount:
amount = "";
Add an if-else statement to check if an amount has been chosen, as highlighted:
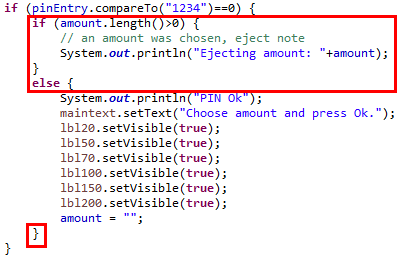
The chosen amount is displayed at the Console via System.out.println.
Add another message in the userinterface via maintext.setText().
For example: "Issuing money ...".
Check if it works.
Animate a note that comes out of the slot
To create an animation of a ticket that comes out of a slot, we can use the card as a base.
Copy the card slot and name this "outputSlot".
Make it a little wider. Now place a new JPanel in this slot and make sure it looks like a banknote:
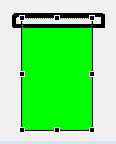
Name the new JPanel "banknote". Make sure it comes to the foreground via right click, Order > Bring to Front.
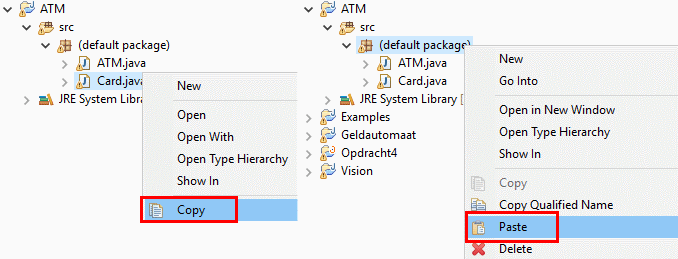
The animation will change the height from 0 to height. This gives the impression the note "rolls" out of the slot. The class Card can be re-used for this, as it contains already usable code. In the project explorer (on the left), right-click Card.java and choose Copy. Then right-click the package, and choose Paste:
Name the copy "Banknote" (with a capital B).
The Banknote class will look like this:
public class Banknote extends JPanel {

	int width, height, maxheight;

	Timer timer = new Timer(20, (e)->update());

	private void update() {
		// increase height:
		height++;
		// set new dimensions:
		setSize(width, height);
		// draw again:
		repaint();
		// if height is at maximum, stop timer
		if (height==maxheight)
			timer.stop();
	}

	public void animate(String amount) {
		// make note visible:
		this.setVisible(true);
		// set properties:
		width=getWidth();
		height=0;
		maxheight=getHeight();
		// do first update
		update();
		// start timer: clock starts ticking
		timer.start();
	}

}
You can copy this code with Copy > Paste. Save all files.
In the Userinterface, morph the JPanel banknote to this class Banknote. Make sure the ticket is hidden when loading the page (via advanced properties: visible > false). In the ATM Class, at the appropriate spot, call the animate() method of banknote.
To make the amount visible on the ticket, you can open the Banknote.java file with the Window Builder (Right-click, Open With > WindowBuilder Editor). Add a JLabel, name this lblAmount. Switch to Source Code and make lblAmount a class variable. In the animate() method, add a line that sets the lblAmount with variable amount (it is a parameter of this method) with setText().
7. Stop after banknote is ejected and enable abort
After the animation of the money output is complete, after a short wait, the interface must return to the initial situation.
We start with the last: 'return to the initial situation'.
In the ATM class, find maintext, card and banknote, and make class variables of these: search them in the code, select them, right-click and choose Refactor > Convert Local Variable to Field.
Add a method to the ATM class and name this reset(). This method will return everything to the starting situation. Add to this method:
Two lines of code that clear the variables pinEntry and amount.
A line that makes the banknote invisible again, using setVisible(false) method.
A line that sets the card to the original location and gives original dimensions.
For this, look for the definition of the card (in the constructor) and copy the line using the setBounds(...) method.
A line that sets the original welcome text to maintext.
Add a call to this method reset() in the eventhandler of the Cancel button (BtnCancel) and test if it works. Can it start again after clicking the Cancel button?
Next, we add a Timer (from javax.swing library) to the Class ATM, which will call reset() 5 seconds after the banknote is ejected. Add the timer as a class variable to the ATM class (top of class):
Timer timer = new Timer(5000, (e)->reset());
The parameters are 5000ms (5 seconds) and reset() is the method that will be called. Because we want to call the method only once, add a call to the stop() method of the timer to the method reset():
timer.stop();
Next, we call the start() method of the timer in the event handler of the Ok button (btnOk), direclty after the spot where the animation of the money is started (method call animate() of the banknote).
8. Prevent unintended interactions
As you may have experienced in testing, some elements of the userinterface can be clicked while that is not (yet) intended. We've already solved some of these problems by ensuring that variables at startup have a good value and values are checked.
Clicking buttons that should not actually be used, however, cannot be avoided. One solution to this is to see if the label "Ok" (lblOk) is already visible. This label is now made visible when use of the Ok button is allowed. If you add this check at the beginning of the Ok button's event handler:
if (!lblOk.isVisible()) return;
This prevents execution of the code in the event handler if the label "Ok" is not visible. If you add this check also to the 6 eventhandlers of the buttons to choose the amount, this will catch most of the unintended interactions.
9. Enhance the interface
We add panel that makes it clearer that the interface is a whole. We also add a logo.
Draw a JPanel all over the machine and send it to the background via right-click, Order > Send to Back. Update the style of this panel by setting, for example, background color, border and corner rounding (scroll down to the example of the end result to see it, it is the blue panel in the background).
Add a folder to the project, which is going to store resources like images: Right-click the main project folder and choose Build Path > Configure Build Path. Click Add Folder. Click Create New Folder. Type the folder name: "resources" and click Finish. End with Ok (2 times).
Find an image to be used as the logo of the ATM. Copy the image, then in Eclipse, Paste it in the resources folder. Add a JLabel and set the icon property with the image (at 'Image selection mode' select 'Absolute path...'):
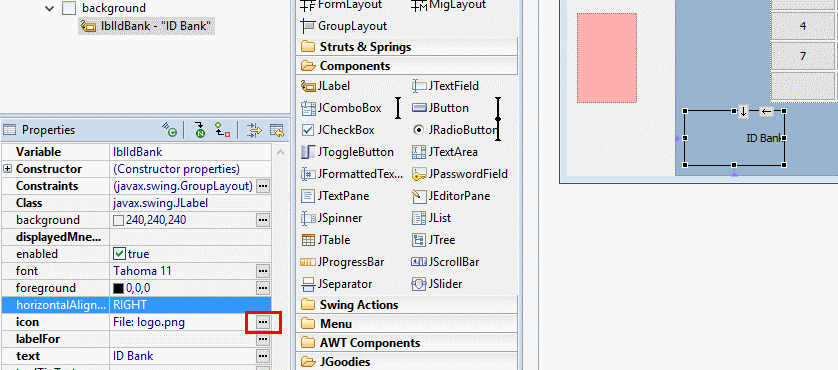
Find the label you just added an icon to in the code. It might look similar to:
![]()
Change the last line to:
lblIdBank.setIcon(new ImageIcon(getClass().getResource("logo.png")));
(name of your label and file might differ)
If you use this way to load a resource, instead of the filepath, your code no longer depends on the filepath as it is on your computer,
and can be transferred or exported easily (we use this in the last step).
Run the application. An example of the end result:
When complete, also consider setting a title for the application.
10. Publish/share prototype
Eclipse allows you to export the result to a JAR-file. This packs your project into a file that you can publish on a website or otherwise distribute. To run a JAR file, only the Java runtime environment is required, which is already available on many computers, or can be easily installed via Java.com.
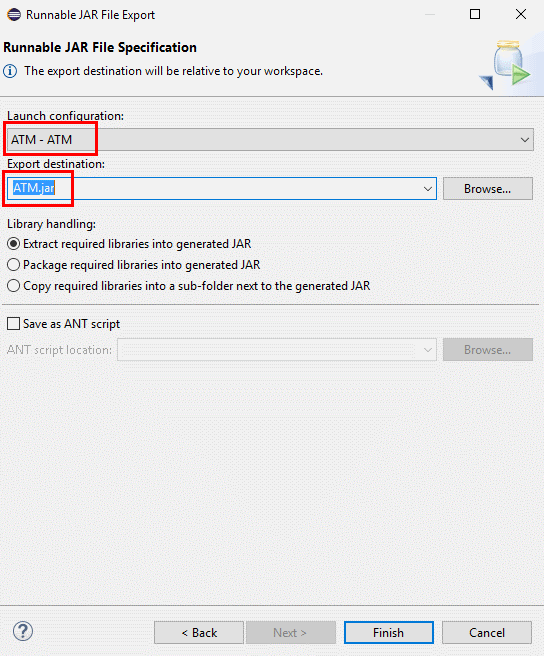
To export the project, choose File > Export and then Java, Runnable JAR File. Press Next. At "Launch configuration" specify what project you want to export. At "Export destination" type a filename, eg. "ATM.jar" (you can also use the browse button to specify the folder). If you do not specify a folder, the file will be written to your Eclipse Workspace folder.
When you press Finish, the Jar-file is created.
The resulting Jar-file can be downloaded and tried here.
More info
* To use this in Eclipse, extract the zip-file, then import it in Eclipse via File > Import, choose "General, Existing projects into Workspace". In the next step, use the Browse button to navigate tothe folder where you extracted the zip-file.