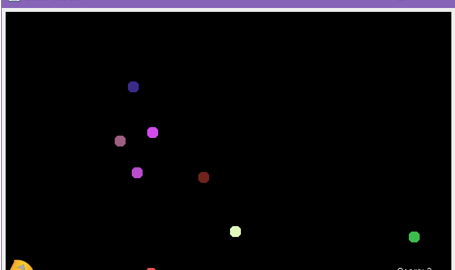
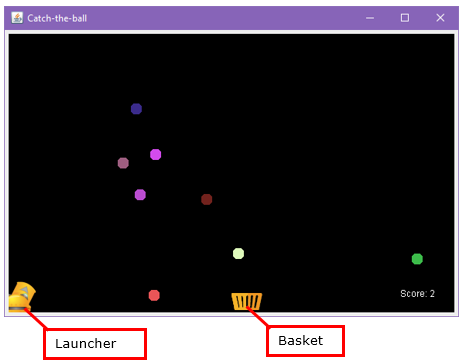
In this tutorial, you will make a simple game in which balls are launched, which we then have to catch. The user of the game controls a basket in which the balls must be collected. The aim is to catch as many balls as possible and earn points that way.
The basket is located at the bottom of the screen and can only move to the left and right. The balls come from a launcher which launches balls with random trajectories and speeds.
Normally you would make a design for all (moving) game elements (launcher, basket, balls), e.g. in the form of a class diagram. In order not to complicate this task, this has already been done. So, you get class definitions for the game elements and an accompanying class diagram it’s in the zip-file). For the launcher and basket we use pictures that are also supplied.
In this assignment, we program the dynamics of the game: to control and track all the game elements, to ‘catch’ balls and to keep score.
Tutorial steps
- Create project & user interface
- Draw the first game elements
- Add Timer and Keylistener and let the basket move
- Add balls
- Determine whether or not balls are caught
- Add sounds
1. Create project & user interface
Create a new Java project “Assignment5_s1234567” (use your own student number in the name).
Download the zip-file “assignment5.zip” and extract it. In the Windows Explorer (or Finder), Copy all folders from the folder to which you extracted the zip-file and Paste that into the project (right-click the main project folder, choose Paste).
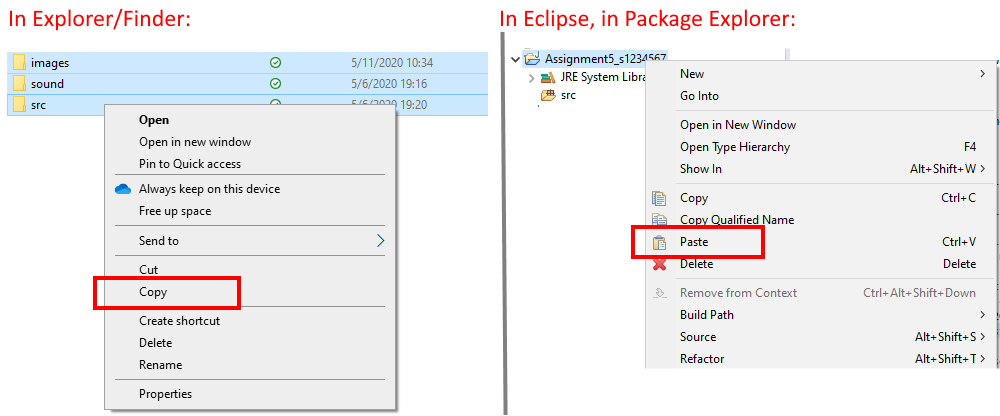
If you get a Question “Assignment5_s1234567\src exists. Do you want to overwrite?” answer “Overwrite”.
You will get a few errors, these will be fixed shortly (read on).
If you open all the folders, the project should look like this:
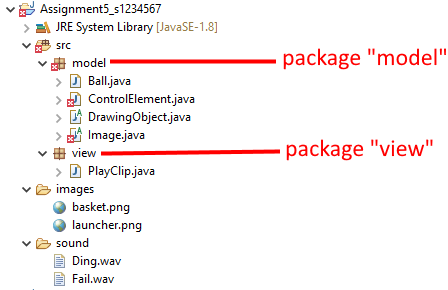
The code of this project is organised in packages. The model package contains the game elements classes, the view package contains the userinterface classes.
Create the user interface
Add a JFrame form to the package view (right-click the package view folder, select New > Other …). Name this “GameUI”.
Make the dimensions of the JFrame about 600×400. Set the layout of the contentPane to GroupLayout. Add a JPanel that fills the JFrame entirely. Make the panel’s background black.
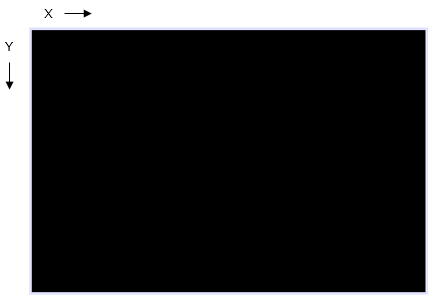
Because we are going to draw objects in this Panel, we have indicated the x and y direction for you. The origin is the upper left of the Panel.
Add a DrawingPanel
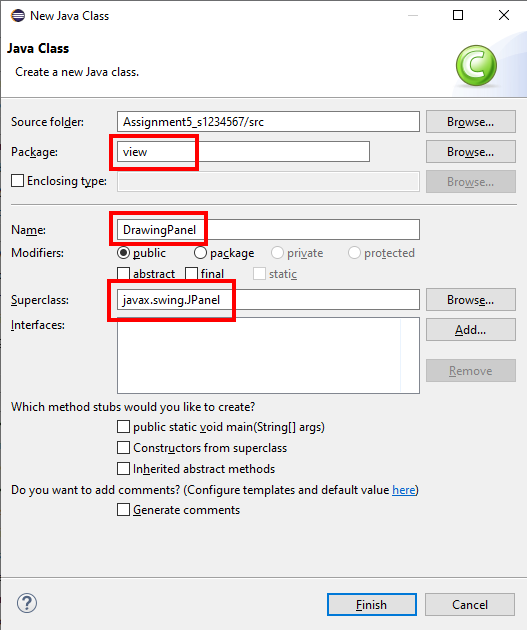
Add a new class to the package view, name it “DrawingPanel”. At superclass, fill in: javax.swing.JPanel:
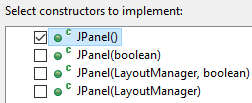
In DrawingPanel, add a constructor: Choose Source > Generate Constructors from Superclass. Select only JPanel() . So de-select the remaining three variants:
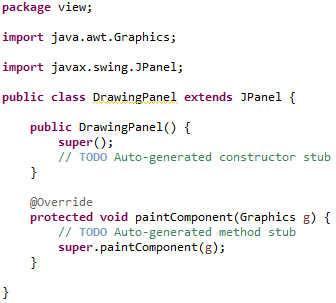
Add a drawing method via Source > Override/Implement Methods. Open JComponent and select the paintComponent() method.
The class now looks like this:
Save all files: File > Save All. All error messages should now have disappeared from the project.
Now morph the panel in the user interface to a DrawingPanel. Make sure you pick the one from this assignment (Assignment5) as there might be more DrawingPanels from previous assignments. Check assignment 2 if you don’t know how to do morphing anymore.
2. Draw the first game elements
To store the game elements, we add an ArrayList to the class Drawing Panel as a class variable:
private ArrayList<DrawingObject> gameElements;Initialize this list in the constructor with:
// create a list of game elements (which are DrawingObjects):
gameElements = new ArrayList<DrawingObject>();
Add basket
We’ll first add the basket, which we’re going to catch the balls with. This is a ControlElement. Add a class variable for this:
private ControlElement basket;Because the game takes place in the DrawingPanel, the various classes provided use the dimensions of this panel to register itself. However, these dimensions are only there when the application has started and the DrawingPanel is actually drawn. Therefore, we can only start adding game elements when the DrawingPanel is ready for use (added to the application’s user interface). This means that we can only add new elements when the paintComponent() method is called for the first time. So we use an if-statement in the paintComponent() method to see if we get there for the first time: if the basket is not there yet, we will make the basket:
if (basket==null) { // if no basket is made yet, create it
	newBasket();
}
Create the corresponding newBasket() method and to that add the following code which creates the basket and adds it to the list of game Elements:
basket = new ControlElement("basket.png", this, getWidth() / 2, getHeight() - 25);
gameElements.add(basket);
Do you understand where the basket will be drawn? The position is the 3th + 4th parameter: the x and y value of the position at which the basket is drawn.
Draw game elements
To be able to draw all game elements, add a loop to the paintComponent() method. In this loop, for each element, call the paintComponent() method of that element. You can for example use a for-each loop for this. An example of this has been given in today’s lecture.
You can now test whether the program works: is the basket drawn?
If not, check if the for-loop is in the main body of the paintComponent() method and not inside an if-statement.
Add Launcher
Drawing the launcher that’s going to shoot the balls works like the basket. It is also a ControlElement, which remains in a fixed spot at the bottom left of the picture. The parameters of the constructor are different:
The first parameter of the constructor is the name of the image (filename). This is "launcher.png". The second parameter is the same: this. The last two parameters are the x and y value of the position. Make sure the image is drawn in the lower left corner.
Test to verify the launcher is drawn in the correct spot.
If not, again check if the newly added code is in the main body of the paintComponent() method and not inside another if-statement.
3. Add Timer and KeyListener and let the basket move
Add Timer
Because we want elements to be able to change positions all the time, we want to draw the DrawingPanel with all the game elements over and over again. We do that with a Timer. Declare a timer class variable (javax.swing.Timer) in the class DrawingPanel as explained in the lecture. Initialize it in the constructor. The first parameter of the constructor, is the time for each clock tick; set it to 20 (ms). Make sure the Timer calls the repaint() method at each clock tick. After initialization, also call the timer’s start() method.
Add KeyListener
A KeyListener is a kind of eventhandler which listens to key-events: a key-press on the keyboard is such an event. We add it to the user interface of the application, the class GameUI (you may have chosen a different name). Add “implements keylistener” behind the class header:

Fix the error: choose the “import KeyListener” option:

Then click on the light-bulb in the margin again and choose “Add unimplemented methods”:

Three methods will then be added. We are going to use the keyPressed() method (leave the others, keyReleased() and keyTyped(), empty!). Add to the keyPressed() method a line with System.out.println() as shown below, to display the code of a key:
// show keycode of pressed key:
System.out.println("keyPressed " + e.getKeyCode());
The parameter of the method might have the name arg0. Rename that to e.
Finally, at the end of the GameUI() constructor, add this line to activate the KeyListener:
addKeyListener(this);Start the application and press a number of keys. Does the keycode appear in the Console?
Moving basket
We are now going to move the basket to the right and left when the arrow keys are pressed. Add two methods left() and right() to DrawingPanel. The method left() calls the setMoveL() method with parameter true:
basket.setMoveL(true);The right() method calls the same method, but with the parameter of setMoveL() set to false. Both methods left() and right() call the method move() of the basket after that.
Before we can call the new methods left() and right() from the keyPressed() method in the class GameUI, we must first turn the panel in the class GameUI into a class variable. Select the panel in the Window Builder and click on the icon “Convert local to field” at the Properties. It is possible you cannot find the “Convert local to field” toggle switch. In that case check whether the panel is already a class-variable. If it is, you can continue. If not, turn the panel into a class variable:
Make sure it is declared as a class-variable (at the top of the class GameUI):
private DrawingPanel panel;Find its declaration in the constructor. It might look like: DrawingPanel panel = new DrawingPanel(); then remove the “DrawingPanel” in front, so it looks like:
panel = new DrawingPanel();if …
In GameUI’s keyPressed() method, add a call to the panel’s left() method if the left arrow key is pressed . And of course, if the right arrow is pressed , call the method right().
Test whether the basket can move left and right. If the basket is not moving: double check if you did all the steps outlined above.
4. Add balls
Add a new ball just like the basket and the launcher: add a method to DrawingPanel that makes a new Ball. The parameters of a Ball’s constructor are the width and height of the panel, which you request with getWidth() and getHeight().
Now call this method in GameUI’s keyPressed() method when a key is pressed: choose your own key which launches a ball.
Test whether the application launches balls when you press the launch-key.
Random balls
Of course, for a game it is not as much fun if you have to launch balls yourself. It is more fun if balls come randomly (unexpectedly).
So, we add a piece of code that will launch random balls. Declare in DrawPanel a class variable random of type Random:
private Random r;And initialize it in the constructor with:
// initialize the Random generator:
r = new Random();
Then you can call the nextInt() method of the random generator with a number as a parameter. Eg. nextInt(20) will generate any number between 0 and 20. Add this code to the paintComponent() method:
// there is a chance of 1 in 20 on a new ball:
if (r.nextInt(20) == 1) {
    newBall();
}
Test whether the application launches balls at random times. Of course you can adjust the chance if you think it should be different.
5. Determine whether or not balls are caught
Now it’s time for the real game element: we have to check if a ball is caught by the basket or not. For this, we will introduce a score. If a ball is caught, the score will increase. Add a class variable “score” of type int (integer) to the DrawingPanel, and set it 0.
Add the captured() method listed below.
public boolean captured(int x, int y) {
    for (DrawingObject o : gameElements) {
        if (o instanceof Ball ) { // only Balls can be captured
            if (x >= o.getX() - o.getWidth() && x <= o.getX() + o.getWidth() &&
                    y >= o.getY() - o.getHeight() && y <= o.getY() + o.getHeight()) {
                gameElements.remove(o);
                score++;
                return true;
            }
        }
    }
    return false;
}
Add an if-statement to the paintComponent() method that uses this method to see if the basket has captured anything. The parameters of the captured() method are the x and y value (position) of the basket.
If anything is captured, show a notification in the Console, eg. with: System.out.println("Ball captured");
Make sure the score appears on the screen. You can use the method call g.drawString() that can put a text on the screen.
The text to show is the first parameter and could for instance be: "Score: "+score
If necessary, consider setting the text-color before the call to g.drawString(). Use what you learned in assignment 2!
Test whether balls are caught and whether the score is shown.
Remove balls not captured
Balls that are not caught but disappear from the view should be removed. We therefore add another loop to the paintComponent() method of DrawingPanel. It can be exactly the same as the loop used to draw all the elements. However, the body (content) of the new loop is different: here we check if an element is a Ball and is no longer visible (not visible), so we can remove it from the list. To check if an element is out of view, we can use the visible() method combined with the not-operator !:
if (e instanceof Ball && !e.visible()) { // only invisible Balls will be removed
    gameElements.remove(e);
    System.out.println("Ball removed");
    break; // stop the loop
}
In the body of the if-statement that checks if an element is no longer visible, three things are done:
- The element is removed from the list
- A notification is given
- The loop is stopped
The last, stopping the loop, is necessary because an element is removed from the list: the for-loop is therefore no longer correct: the list has become shorter, but the conditions for the for-loop are determined at the beginning of the loop.
Because the loop ends with a break, we are not sure if all the non-visible elements have been removed. That’s not a big deal, because the paintComponent() method is executed very often by the timer: a next time, the next non-visible element will be removed.
6. Add sounds
A game wouldn’t be a game without some sound effects. As an example, we show how to play a sound when a ball is captured. Declare a class variable in DrawingPanel:
private PlayClip ding;Initialize it in the constructor:
// initialize sounds with the sound files:
ding = new PlayClip("sound/Ding.wav");
Replace the line System.out.println("Ball captured"); which is executed when a ball is caught, by:
ding.play();Repeat this procedure when an element (ball) is not captured and disappears from view. Then make sure that the sound Fail.wav is played, at the line System.out.println("Ball removed");
Test if the sounds work.
Extra challenge
(this is an optional part of the assignment, only do this if you have some extra time left, or would like to practice further)
You might notice that balls are drawn over the launcher and balls. So draw them in reverse order: start with last elements. So launcher and basket will always be drawn last, which makes them appear in front. To realize this, in the paintComponent() method, use a for-loop which draws elements from last to first:
for (int i=gameElements.size()-1; i>=0; i--) { 	// for each element in list

}
Inside the loop, use the get() method of the list (gameElements) to get element i. Then call the paintComponent() method of that element.
Make the chance of random balls to appear dependent on the score: the higher the score, the more balls will appear (to make the game more difficult). An example condition for the if-statement which determines the chance on balls to appear could be:
r.nextInt(10+Math.abs(100-score)) == 1Think of other enhancements that could improve the gameplay or the looks of the game. Eg. lower score when balls were not captured. Introduce new game elements: eg. bonus balls with a different look which gain extra score if captured. Design your own game-elements.
Summary
You have created an interactive game and learned how to realize logic and interaction for such a game. You’ve learned the following.
- Applying a Timer to realize movement of game elements.
- Use and apply a KeyListener.
- Applying sound in a Java application.
- Setup game situations using selection statements.
The class diagram (it’s in the folder extracted from the zip-file) has been generated with Object Aid UML Explorer. Click here to see how to add that to Eclipse.